


 You'll need 8 circles to make the full Dahlia. I've used the 1 3/8" Circle Punch. Decide which side of your paper is to be the main pattern and keep this side at the back for the first three creases/folds.
Take your circle, and fold in half - but only crease the BOTTOM half of the circle, as shown by the dotted line.
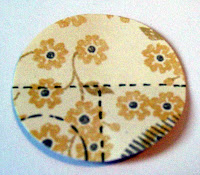
Fold your circle in half again, creasing the full length of the second dotted line.
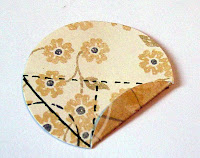 This part is a little tricky, but you'll soon get used to it. Make a fold from the two points where your creases meet the outer edge of the circle. The solid line on the left of the circle is where you should fold, the right side has been folded already.
 Turn your circle over, and fold both sides towards the middle like you're making a paper dart. Repeat the above steps until you have 8 dart shaped pieces.
Cut a smaller circle, here I've used the 1" Punch, you could also use the 1 1/4" Punch. Fold in half, then in half again to make some guide lines.
Line the 8 pieces of your Dahlia on this circle, adhering with SNAIL or 2 Way Glue Pen.
To see a card featuring a finished Dahlia, please see this post: http://thinkingstamps.blogspot.com/2008/04/darling-dahlia.html
No comments:
Post a Comment
Your comments mean the world to me - thank you!
I reply to comments via email, so if you would like a reply, please leave your address in the comment!