August 29, 2008

Terrific Tens!

Today marks the start of a new feature here at thinkingstamps, Terrific Tens! Super simple and chic cards that take 10 minutes or less to create.

I asked my friend Christine what she'd like to see on my blog...and one of her requests was baby cards. You know what? she's right! I haven't made a baby card and shared it here ever! So Christine, this one's for you and I'll pop it in the post this weekend - hope you can use it soon!

I wanted to go with a gender neutral colour scheme, something that would be good for a girl or a boy. I settled on Certainly Celery and Almost Amethyst. The card base is Kraft, the perfect colour for a simple card like this.

That adorable elephant is from the Celebrate Everyday set - can you believe I've had this set for over six weeks and am only just inking it now?!? In fact....I couldn't even find it this afternoon....talk about panic! Thankfully it had just fallen into a big box of "stuff"! Here's how to make this little cutie:

Stamp the elephant on Whisper White using Stazon ink and again on some Certainly Celery Prints Designer Paper. Cut out the celery elephant and stick onto the Whisper White using a Two Way Glue pen.

Cut a square of Almost Amethyst and pierce the corner design using the mat pack templates for spacing. Adhere to the Kraft card using Dimensionals.

Tie a piece of Certainly Celery grosgrain ribbon around the elephant layer and adhere to the card using Dimensionals. Colour the small flower using a So Saffron marker and dot the center with a white gel pen.

Punch out a circle of Certainly Celery Prints paper with the 3/4" Circle Punch and lay the clear button over top before using the mat pack to pierce holes through the paper. Tie the paper and button together using linen thread. Stick the button onto the Elephant layer using a couple of Mini Glue Dots. You're done!

Super easy and super cute, right? To me this style of card looks like something from a high-end design boutique, it would look adorable paired with a funky pair of booties or a stretch and grow and best of all it only took ten minutes to make!

If you've got a request for a stamp set or occasion you'd like to see covered, send me an email and let me know!

Have a wonderful weekend,


Stampin Supplies:
Stamp Set: Celebrate Everyday
Ink: Stazon
Card stock: Kraft, Whisper White, Almost Amethyst
Paper: Certainly Celery Prints
Punches: 3/4" Circle punch
Accessories: Certainly Celery ribbon, Clear Button, Mat Pack, Crafter's Tool Kit, Linen Thread, Stampin’ Dimensionals.
All supplies available from Stampin' Up!

August 26, 2008

Bloomin' Thanks

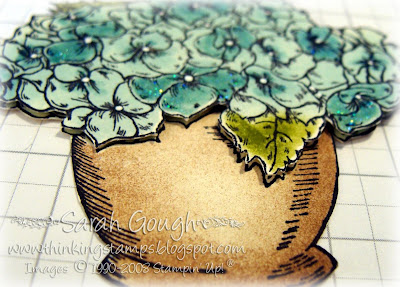
Here's the finished card from today's Technique Spotlight: Glitter Glue Paints. Don't you just love that sparkle?

Are you sick of seeing this Bloomin' with Beauty stamp set yet? I can't help but use it all the time, it's so gorgeous and so much fun to colour.

The image was stamped twice on Very Vanilla cardstock with stazon ink. I masked and sponged the vase, as I did with this card. I used Close to Cocoa for the vase, Old Olive for the leaves and Soft Sky for the flowers.

After making my glitter glue paint, I used it to shade the flowers - the sparkle in real life is so pretty!

I used my white gel pen to dot the center of each flower. This makes a huge difference to how the flowers draw the eye, try it and see!

I cut out the coloured flowers and layered them on my stamped and cut out image with dimensionals.

The paper is from the Fall Flowers pack, don't you love those colours? So pretty. It's layered on Old Olive which has been lightly sponged.

The sentiment from Short & Sweet was stamped with Stazon on Very Vanilla, punched out with the Small Oval and sponged with Soft Sky. This was layered on a sponged Large Oval punch.

I used my slot punch to create a slot to run the River Rock double stitched ribbon through. This is my favourite ribbon right now, such a pretty colour.

I punched three 1/4" circles from Soft Sky card and adhered them to the designer paper layer using Old Olive brads. The entire layer was stuck to the River Rock cardbase using Stampin' Dimensionals.

Overall this is a pretty simple design, offsetting all the elements gives it a really dynamic feel though. Hopefully you didn't mind seeing Bloomin' with Beauty again!


Stampin Supplies:
Stamp Set: Bloomin' with Beauty, Short and Sweet
Ink: Soft Sky, River Rock, Stazon, Close to Cocoa
Card stock: River Rock, Old Olive, Very Vanilla, Soft Sky
Paper: Fall Flowers Designer Paper
Punches: Large and Small ovals, Slot, 1/4" Circle and 1/16" Handheld punches
Accessories: Crystal Effects, White Gel Pen, Dazzling Diamonds, River Rock Double Stitched Ribbon, Sponge Daubers, Earth Elements Brads, Stampin’ Dimensionals, SNAIL adhesive.
All supplies available from Stampin' Up!

Technique Spotlight: Glitter Glue Paints

Today I thought I'd do a technique that I find soooo useful for adding a little sparkle to your cards and other projects. We're going to be making our own glitter glue in custom Stampin' Up! colours. Glitter glues and paints are really popular for adding shimmer and shine to your papercrafts and I love being able to make any colour you want!

Now, I'm sure I'm not the first person to ever do this...but having never read a tutorial for it I have no idea if there's an official "recipe" out there - this is just my tried and tested way of making a glitter glue/shimmer paint!

To start, you'll need:
  • Toothpicks
  • Reinker in the colour of your choice (I'm using Soft Sky)
  • Crystal Effects
  • Dazzling Diamonds Glitter

That's it! Let's get started! First, spoon out a small amount of glitter onto the lid of a stamp case. Yup, no fancy mixing jars or even plastic plates here - I just use a stamp case because I always have one on my work surface! I just use the toothpick to spoon out a small amount of glitter. You only need as much as you can use in one sitting.

Add one or two drops of reinker on top of the glitter. It's best to start with one if you want a colour really close to the Stampin' Up! colour - I used two because I wanted a darker shade of Soft Sky.
Mix the reinker into the glitter using the toothpick. Mixing it this way first gives a really nice colour to the glitter.
Add three or four drops of Crystal Effects to the glitter. It's best to start with a small amount, you can always add more later to tone down the colour. Mix well with the toothpick.
That's it! All done! Your glitter glue/paint is ready to be used on your project. I like to use an old dried up blender pen to paint it on, a cotton bud or the toothpick will also work.

I pick up a small amount of the solution and paint or dab it on. Here I've used a dark solution of Soft Sky to shade the flowers. Once you're finished, be sure to use a tissue to wipe the remaining solution off your stamp case. I just scrub my dried out blender pen on scrap paper to remove any mixture.
The finished product! It dries in minutes, and not only do you get the sparkle from the glitter, I also find there's a subtle shine and sheen to the overall solution. A photo doesn't do it justice, I hope you'll try for yourself! If you'd prefer to just add sparkle, perhaps to a snowflake on a Christmas Card, just omit the reinker when you make up your mixture.

The best thing about this technique is the glitter will NEVER flake off your project. No more glitter on your hands.....face.....carpet....the cat....

See the finished card here: Bloomin' Thanks


Stampin Supplies:
Reinker in the colour of your choice
Crystal Effects
Dazzling Diamonds Glitter
All supplies available from Stampin' Up!

Tutorial coming tonight!

Hi all,
Hope you had a great weekend, we had a lovely one, lots of relaxing and dinner with friends. I've just finished photographing a tutorial for you, but have run out of time to write it up - it's time to make dinner (baked pasta and meatballs - yum!) So I'll be back tonight with a fun technique spotlight for you to try!

I've spent a lot of time the last few days sorting out all my computer files and organising photos. I just had to share this photo from last Christmas with you. This is Luna who has been more than a little miffed that Gabriel has featured on this blog twice and she was nowhere to be seen! She's a Chinchilla persion and is three and a half. I didn't pose her like this, she just likes sitting underneath anything she can, clothes airer, Christmas tree - it's all the same to her!

August 20, 2008

Sweet Boho and a Winner!

Here's another card using the gorgeous Sweet Serendipity set along with one of my favs, Boho Backgrounds.
I wanted to have another play with the Old Olive/Apricot Appeal/Groovy Guava combo. This time I used more Apricot Appeal. Really simple card, all the focus is on the stamping.

I inked the Boho Background stamp with Groovy Guava then reinked the flower stems with an Old Olive marker. Once I'd stamped the image repeatedly and cut to size (don't forget to clean your stamp between inkings!) I sponged the edges heavily with Apricot Appeal ink. Don't you love the warmth this creates?

The sentiment was inked the same way, with a marker and Groovy Guava. It was punched out with the large oval punch and mounted in an oval label holder from the Antique Brass Hodgepodge kit.

Two rows of piercing border the ribbon/cord bow. The ribbon and copper cord is retired now, but some Taffeta ribbon would look gorgeous too! The Apricot layer is adhered to an Old Olive mat with Dimensionals. I'm not going to lie...that bow was tricky to tie and took awhile....but it was worth it!

Now for the notepad winner....random.org chose....

#4 which is....Kelly! Wooohooo, I think you should buy a lotto ticket this week, you're one lucky chick winning competitions left right and center! The notepad is coming your way tomorrow!
Chris Millar sent me this award today, what a sweetheart, thank you! I've been given blog awards before and alwaysss forget to pass them on, so I'm doing it now while I remember!

The rules of the award are...

(1) The winner can put the logo on their blog. (2) Link the person you received your award from. (3) Nominate at least 7 other blogs. (4) Put links of those on yours. (5) Leave a message on the blogs of the girls or boys you’ve nominated.

...but I'm a rebel and running out of time before a DVD night with Shanan, so I'll leave you with two AMAZING artists that inspire me constantly. Beate and Silke. They both use lots of Stampin' Up! products and have really distinct styles that I love.

Happy Stampin!


Stampin Supplies:
Stamp Set: Boho Backgrounds, Sweet Serendipity
Ink: Old Olive, Groovy Guava, Apricot Appeal
Card stock: Very Vanilla, Old Olive, Apricot Appeal
Accessories: Mat pack, Hodgepodge Hardware, Copper Cord and Olive Organza (retired), Stampin’ Dimensionals, SNAIL adhesive.
All supplies available from Stampin' Up!

August 19, 2008

Love is....

When your husband empties your wastepaper bin without you even asking! My bin always fills up fast with paper scraps etc, I LOVE it when Shanan empties it for me - spurs me on to tidy the top of my desk once I'm finished stamping!

It's the little things that count!

Sorry I ran out of time for a posting today - was busy with other projects (read: tidying my room....once again....but definitively this time!) I should have something for you tomorrow!

Happy Stampin' till then!


P.S - Don't forget to check out this post for a chance to win my altered notebook! I'll draw a winner tomorrow night.

August 18, 2008

One Card: Two Ways - Sketch It!

Time for a new One Card: Two Ways! I stole some time over the weekend and threw together a couple of cards, getting a couple of sets inky for the first time! I wanted to show how the same layout or sketch for a card can result in a funky or elegant look, depending on your colours and stamps.
So here's my sketch. Pretty ain't it?! I'm no artist...but I'll often make a quick plan of a layout I think will be fun. I rarely plan colours or stamps as I create in a very organic way (choosing paper or a stamp set then letting ideas "grow" from there) but I love working with a sketch. Onto the cards....
I knew I wanted to use Big Bold Birthday for this post. I haven't shared many birthday cards with you so this was overdue! This is also one of the dozen or so sets sitting in my stash unloved and uninked - so many stamps, so little time!

I started with the cupcake element and the colours I wanted to use. For the icing on the cupcake I used Heat & Stick powder and dazzling diamonds glitter. You can see a tutorial on this here. I thought the icing looked cute on an angle like this, but because it's a separate stamp you can put your cupcake together however you like!

I created the paper for the second layer using the small flower stamp and a polka dot stamp from the set. I love that you can create your own paper like this in whatever colours you like!

Stampin Supplies:
Stamp Set: Big Bold Birthday
Ink: Certainly Celery, Regal Rose, Tempting Turquoise,Versamark
Card stock: Certainly Celery, Regal Rose, Whisper White
Paper: Petals and Paisleys Designer Paper
Punches: Slit, 1/16" Handheld, 1/4" Circle and Word Window punches
Accessories: Stamp-a-ma-jig, Dazzling Diamonds, Heat & Stick powder, Tempting Turquoise ribbon, Soft Subtles brads, Stampin’ Dimensionals, SNAIL adhesive.
All supplies available from Stampin' Up

For the second card I wanted a really elegant look. You just can't go past Bloomin' with Beauty for elegance....I think it's a must-have set in any collection! I also used Wonderful Words....I've had this set since last year, but I think I'd only inked it once! I love it, will be using it more often from now on.

For this card I've used the Out of the Box technique. This is super simple...just stamp your image, then cut a square around it, making sure parts of the image go outside of the square. I do the cutting using a metal ruler, craft knife and cutting mat, then finish off around the image using my paper snips.

I coloured the image using my inkpads and aqua painter. Rather than stamp my own patterned paper this time, I just used the same paper twice. This is a really quick and easy way to achieve an elegant look - by popping up the second layer of paper you create a subtle interest point.

I've used a pearl from the Pretties kit instead of a brad this time, I love these pearls, they attach so easily using a mini glue dot!

So, which card is your favourite this time? I can't choose, they are so different! I do love that cupcake - but then, Bloomin' with Beauty is such a gorgeous set! Hmmm, maybe this is why I have a room jammed packed with Stampin' Up! goodies?!

Have a great day!


Stampin Supplies:
Stamp Set: Bloomin' with Beauty, Wonderful Words
Ink: Stazon, Pale Plum, Perfect Plum, Mellow Moss, So Saffron
Card stock: Pale Plum, Perfect Plum, Very Vanilla
Paper: Le Jardin Designer Paper
Punches: Slit and Word Window punches
Accessories: Stamp-a-ma-jig, Very Vanilla Wide Grosgrain, Pretties Kit, Mini Glue Dots, Aquapainter, Paper Snips, Stampin’ Dimensionals, SNAIL adhesive.
All supplies available from Stampin' Up!

August 15, 2008

Naughty or Nice? A Giveaway!

I know a promised a new One Card: Two Ways today....but I didn't deliver! So I guess that puts me on the naughty list? (read on for a giveaway to make up for it!)

I have a semi-good excuse though...I cleaned my stamp room! Then I played with my markers and watercolour paper and messed it all up again. Then I cleaned up some more! Then....I just HAD to play with a pack of the ugliest notepads I picked up for cheap last night!

Here's the end result - not so ugly anymore! Don't you love that Naughty or Nice element? It's actually a sticky back die-cut from the awesome Hand Selected Accents and Elements pack in the Spring Mini Catalogue. This is a pack of 12 sheets of sticky die-cuts - best of all, they come packaged in the cutest hinged CD tin! Love it.

I'm a big list maker, something I get from my Mum. With Christmas on my mind I thought it would be fun to make a notebook where I can jot down gift ideas, the Christmas menu - things like that. I just love this die-cut and I actually found it after deciding to do a gift list notebook - perfect!

The papers are from the Holiday Harmony designer paper pack. I started playing with the ribbon and die cut and ended up making this medallion - a great way to use up tiny ribbon scraps! I have also used some silver cord, this is retired now (I have a roll or two stashed away because I love it so much!) but the medallion would look great without it too.

I've made two scalloped strips using the slit punch and popped this layer up on dimensionals. The brads are from the Vintage pack and were spaced using my mat pack. I attached the medallion using Pop-up glue dots.

I kept the inside plain because there's so much bulk on the cover - and I have to admit, I haven't stamped the sentiment from Sweet Serendipity on every page....but you could if you were keen!

So, to make up for my broken promise, how would you like to write YOUR Christmas lists in this notepad?! Just leave a comment on this post telling me if YOU have been naughty or nice (NZ residents only sorry!) and I'll determine a winner with random.org next week!

Have a wonderful weekend, let's hope the weather improves! Shanan and I will be at the The Great Karori Toy Sale this weekend with our store, Action Figures Online (website is currently being revamped and will redirect to our TradeMe store) so if you pop down for a look make sure to come over and say Hi!


Stampin Supplies:
Stamp Set: Sweet Serendipity
Ink: Purely Pomegranate
Card stock: Purely Pomegranate, River Rock
Paper: Holiday Harmony DP
Punches: Slit punch
Accessories: Vintage Brads, Purely Pomegranate Satin Ribbon, Silver Cord (retired), Hand Selected Accents and Elements tin, Pop-up Glue Dots, Stampin’ Dimensionals, SNAIL adhesive.
All supplies available from Stampin' Up!

August 14, 2008

Getting a head start on Christmas!

It's currently storming here in Wellington....wind, rain, hail, thunder and lightening! Luckily my internet connection is surviving so far so I can tell you about the new additions to the website!

The links bar at the top of the page is finally finished after many hours of hard work today! You can now go there to learn all about Beautiful Bundles - my monthly kit offering and my current classes and clubs.

This card is one I whipped up this afternoon using a couple of new products I received in a big parcel yesterday. This set, Season of Joy, is SO much fun! I'm getting a head start on my Christmas cards this year, being so far from my family I want to make sure I have a big pile ready to go!

We'll be making this card at my upcoming Christmas Chaos Stamp-a-Stack, and the stamps, paper and ribbon also features in one of this month's Beautiful Bundles, Dashing with Joy. The no-tie bow didn't photograph well sorry, it's much cuter in real life!

I'll be adding a couple of clubs to the site over the next week or so. Stay tuned for that! Tomorrow I plan to work on a new One Card: Two Ways so I'll see you with that soon.

Stay warm and dry if your weather is as bad as ours right now!


Stampin Supplies:
Stamp Set: Season of Joy
Ink: Real Red, Chocolate Chip, Old Olive
Card stock: River Rock, Real Red
Paper: Dashing DP
Punches: Slit and Double Rectangle punches
Accessories: Real Red Wide Grosgrain ribbon, Stampin’ Dimensionals, SNAIL adhesive.
All supplies available from Stampin' Up!

August 12, 2008

Truly Groovy Friend

Brrrrrr, it's a cold one in Wellington today! Shanan and I refer to really cold days here as "Dunedin cold" and today is definitely a Dunedin cold day! Perfect excuse to stick the heater on and spend the afternoon buried neck deep in my Stampin' Up! stash.
This is the card I mentioned yesterday with a fun new colour combo. This one came from mid air about 11am last Saturday and I'm so happy with how it turned out. I love Groovy Guava and Apricot together, but adding in a third colour can be tricky! Mellow Moss didn't work, River Rock left me cold....so Old Olive stepped up to the plate!

True Friend is a lovely set from our new Mini Catalogue. It's really versatile, this is quite a feminine card, here I've used more masculine colours.

The paper is from the Old Olive prints pack. Both patterns are from the same sheet....I love that all our papers are double sided....so much fun! The images were coloured with markers and sponges before stamping.

It's really easy to get this graduated look, just ink the stamp with the lighter colour, then sponge the darker colour directly on the rubber before stamping. This avoids any harsh colour lines. I've also lightly sponged the edges of the sentiment and images panels, as well as rounding opposing corners.

Again, I've used my mat pack to space out the brads. This pack is a must have - if I only ever used it for spacing it would be so worth it, but add in piercing and the convenience of a mini cutting mat and it's priceless!


Stampin Supplies:
Stamp Set: True Friend
Ink: Groovy Guava, Apricot Appeal, Old Olive
Card stock: Very Vanilla, Groovy Guava
Paper: Old Olive Prints DP
Punches: Corner Rounder, Slit & 1/16" Handheld punches
Accessories: SU! Markers, Groovy Guava Double Stitched ribbon, Soft Subtles Brads, Stampin' Sponges, Stampin’ Dimensionals, SNAIL adhesive.
All supplies available from Stampin' Up!

August 11, 2008

Always...and again

I figure I've been so slack lately I owe you two projects...so here's a couple using the beautiful Always. Both of these were created very late Friday/ very early Saturday as I kept an eye on the Olympic opening ceremony....a visual feast if ever there were one!
The first is a 6x6 layout. I've used Soft Sky, Purely Pomegranate, Very Vanilla and Basic Black as my colour scheme for this one....you can't go wrong with Soft Sky! I've used the lovely textured card stock and some paper from the Spring Silhouettes pack.

The rub-ons down the side are from the Eastern Elegance pack. The black brads are from the Vintage pack and are layered on little circles of Pomegranate punched with the 1/4" Circle Punch. I used my mat pack for the brad spacing, and the Stamp-a-ma-jig for sentiment positioning. Don't you just love that bird? Too adorable!

Edited to add: Oops! thanks for the emails everyone....yes, that's me and hubby, I'll have to remember to include photo info from now on!

The second project is a super simple card. I've used Pomegranate and Vanilla again, this time with Chocolate Chip. Yummy colour combo!
The paper is just a strip from the Holiday Harmony pack. The sentiment was again stamped using the Stamp-a-ma-jig. I wanted a way to use up all those ribbon scraps I'm hoarding, so came up with the little bow. It's super simple, just pleat a wide ribbon scrap and adhere it to the card with a brad. The brad holds the pleat in place and attaches it to the card at the same time!

One heart was stamped with Chocolate Chip, the other was inked with Pomegranate then "thumped" with a Chocolate Chip marker randomly to create the mottled appearance.

Thumping is THE easiest technique, you just "hit" the already inked stamped with a darker coloured marker, but it creates a lot of visual interest in a stamped image. I also stamped one of the small circle images in Chocolate Chip and punched it out with the 1/2" circle punch and attached it to the heart using a dimensional. Simple and pretty!

I always seem to reach for these same elegant colours when using Always, I may have to jump out of the box and try a crazy colour combo with it soon! Speaking of crazy combos....stay tuned, tomorrow I'll bring you a new one that I ended up really liking!


Stampin Supplies:
Stamp Set: Always
Ink: Stazon, Purely Pomegranate, Soft Sky, Chocolate Chip
Card stock: Very Vanilla, Chocolate Chip, Purely Pomegranate, Soft Sky, Basic Black
Paper: Spring Silhouettes and Holiday Harmony DP
Punches: 1/4" Circle, 1/2" Circle, 1 1/4" Circle, 1 3/8" Circle, Scalloped Circle punches.
Accessories: Chocolate Chip Wide Satin Ribbon, Vintage Brads, Eastern Elegance Rub-ons, Chocolate Chip marker, Stampin’ Dimensionals, SNAIL adhesive.
All supplies available from Stampin' Up!

August 10, 2008

Ta-Da!

Thanks for bearing with me while I worked on the new look for the site. I'll be adding some new functions over the next couple of days, for now I'm just happy I've finished the graphics! It should be a lot easier to find the info you want once I'm done, hopefully leaving you more time to be inspired!

Thanks to Shanan, my ever patient hubby for his bug fixing, tweaking and general patience as he helped get the site together!

I've just discovered my camera battery is dead, so will wait till morning to post some new cards/projects - hopefully they'll be worth the wait!

August 5, 2008

You've made your nest...

Yay! Finally...I'm posting a scrapbook page! I was so inspired by the ladies at the crop last Saturday - it was the final straw, I've given into my scrapping itch! I haven't scrapped in a couple of years (and won't be showing you my earlier attempts!) but it's about time I made something to go in my cute 6x6 linen scrapbook that came in my Stampin' Up! starter kit!

You might remember Gabriel as the printer loving feline from a previous post - You're sure to see him and his "sister" Luna (who looks NOTHING like him!) in plenty (if not all!) of my future layouts - I'm nuts about my fur babies!


I won't do step by steps for my layouts but will let you know which products I've used and how.
My colour scheme here is Brocade Blue (closest match for Gabe's eyes) Real Red, Pumpkin Pie and Old Olive. I've used linen thread inside the button and for the stitching down the side of the page.


I used my mat pack template a couple of times for this, once to lay out the spacing for the photo corner brads, and also to pre-pierce the stitching holes.


The flower is from the Pretties kit and I coloured it with a Brocade Blue marker. The letters for "nest" were inked with markers too, I "thumped" the marker on each letter before stamping to get that slightly mottled look for a tiny bit of visual interest.

The strip joining the two designer papers is a piece of Brocade Blue Wide Grosgrain ribbon. The journalling stamp from Office Accoutrement was inked with markers and the brackets were cut out and layered with teeny bits of Stampin' Dimensionals.

The over sized scallops were created with the 1 1/4" and 1 3/8" circle punches.

That's all the details I think - I'd love to hear your thoughts on my first page in forever...and I promise to pass on any virtual pats left for Gabriel!


Stampin Supplies:
Stamp Set: Office Accoutrement, Big Deal Alphabet
Ink: Stampin' Write Markers
Card stock: Brocade Blue, Real Red, Whisper White
Paper: Summer Picnic, Old Olive Prints
Punches: 1 1/4" Circle, 1 3/8" Circle, Photo Corner, 1/16" Handheld
Accessories: Mat Pack, Crafter's Tool Kit, Linen Thread, Brocade Blue Wide Grosgrain ribbon, Silver Brads (vintage pack), Earth Elements Buttons, Journalling Pen, Paper Snips, Stampin’ Dimensionals, SNAIL adhesive.
All supplies available from Stampin' Up!

August 4, 2008

New Navigation Features

If you're a regular visitor here at thINKingstamps (and I hope you are!) you may have noticed a few changes to the navigation system I'm using. Firstly, I used to list every stamp set used on a card, but with well over 100 sets, the list was just becoming too long! So here's how to find just what you're looking for...

I've removed all the stamp set names from the topic list, but you can still find the posts using your favourite set! Just use the Search box to the right hand side of the page. You can search by stamp set, technique, or a keyword - useful if you want to see lots of examples of a particular product, e.g. the word window punch!

The topic list is now a lot more meaningful. Techniques are labelled as such and I've added a few new categories:

Happy Hardware will take you to posts where Hodgepodge Hardware, Jumbo Eyelets or other metal embellishments play a key role.

Perfectly Pretty will take you to projects using the Pretties kit.

Lots of Layers are those cards just bursting with dimension, while Simple Cards are often quick, one or two layer designs.

Pretty Punches will probably become the largest category...I love punches! Pretty Punches are those projects that feature lots of punches, a punch used in a new way or a project that shows how well the punches layer together.

From time to time I will add a new category, but hopefully these changes will help you find what you need quickly and easily!

August 3, 2008

New Feature! One Card: Two Ways

About a week ago, I had an idea for a new feature...so welcome to the first One Card: Two Ways. I had the pleasure of attending a crop with a lovely group of ladies yesterday, so was able to get these created while I made a complete mess of my table!

For the first edition of One Card: Two Ways, I've made the same card, in two different colourways. The first is Soft Sky, Very Vanilla and Basic Gray. I've used a sheet of paper from the Spring Silhouettes pack for this one. The ribbon is Very Vanilla Wide Grosgrain.
The second card was created with Chocolate Chip, Purely Pomegranate and Kraft card stock. The paper here is from the new Holiday Harmony Designer Paper pack in the Spring Mini catalogue. The ribbon is Chocolate Chip Wide Grosgrain.

This is a really simple card to make, no matter what colours you use! Stamp the flower from Bloomin' with Beauty (Spring Mini Catalogue) in Basic Gray ink. Colour using a water brush or blender pen, using your ink pads as a palette. Cut out the flower. (this part is a little tricky...but worth it! Stampin' Up! paper snips make light work of this kind of detail cutting)

The scalloped strip was made using the slit punch. Edges were sponged in Soft Sky or Creamy Caramel and Chocolate Chip ink.

The flower was attached to another sponged layer using the wonderful Two Way Glue Pen - the small nib on this was perfect for sticking down the narrow stem. Three brads from the oh-so-pretty new Styled Silver Hodgepodge kit were added before adhering with Stampin' Dimensionals.Thank You from Short & Sweet was stamped and cut out to fit inside this label holder from the Hodgepodge set. I like to line these up on my card before I insert the brads, and use the fine tip of a marker to mark where you should punch the holes to thread the brads through. After the ribbon was tied around the scallop edged layer, it was attached to the card with Stampin' Dimensionals.

Which one of these do you like best? I really like the Soft Sky one....but I'm biased - I LOVE Soft Sky! I actually made the Pomegranate one first, so maybe I've just looked at that one too much! Good thing is, the Styled Silver hardware goes with any colour....I could have created this card six or seven times over with different colour combos.

Hope you're having a wonderful weekend, stay warm!


Stampin Supplies:
Stamp Set: Bloomin' with Beauty, Short & Sweet
Ink: Basic Gray, Soft Sky and Old Olive or Basic Gray, Chocolate Chip, Creamy Caramel and Purely Pomegranate.
Card stock: Basic Gray, Soft Sky and Very Vanilla or Chocolate Chip, Kraft and Purely Pomegranate
Paper: Spring Silhouettes or Holiday Harmony
Punches: Slit, 1/16" Handheld
Accessories: Chocolate Chip or Very Vanilla Wide Grosgrain ribbon, Paper Snips, Two Way Glue Pen, Styled Silver Hodgepodge Hardware, Sponge Daubers, Stampin’ Dimensionals, SNAIL adhesive.
All supplies available from Stampin' Up!