February 10, 2010

Altered Tin

I have to start this post with a confession. I'm in love. It may be puppy love, time will tell, but for now, Tangerine Tango has stolen my heart! About time right? We haven't seen eye to eye previously - but after a play this weekend, I think, with the right colour combo, I've finally warmed to Tango's charms!

After making this gift, I had one of these tins empty. Wayyyy too good to throw out. It was recycling time! I started as always, with one element, the River Rock designer paper, and things went from there.
Do you like it? I kinda love it. Covering the tin itself was pretty easy, until I came to a weird lip on the lid, hence the overhanging scallops.

I used a sentiment from the Verve set, Beautiful You. Another confession time....I cut this gorgeous stamp into three pieces! I know, radical - but the beauty of a clear stamp is I can do that and use all the elements separately, or join them up on my acrylic block to stamp it as Julee designed.

I used a long rectangle nestability die cut for my layers and the piercing template from the Mat Pack with my Chocolate Chip marker for the dots.

I wanted the tin to look good from the sides too as it will be sitting in my craft room (when I find an empty shelf!) so there's a little butterfly sitting under the gorgeous Chocolate Chip satin bow. Oh how I love this ribbon.

I didn't use any adhesive on the ribbon, just tied it nice and tight.

Here's the wee guy on top. The butterflies are from Verve as well. I added lots of pearls everywhere to finish everything off.

I have been stamping like crazy with all my new goodies, so have lots to show you, I just need to step out of the creative mess maze that is my craft room and make time for blogging!


It's time to Sale-A-Brate! Earn your free stamp set today!

February 9, 2010

Whimsical Neighbourhood...

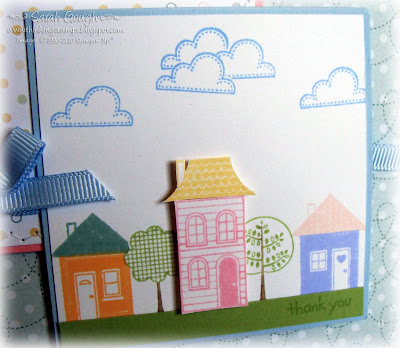
I am in stamping heaven today! My Sale-A-Bration order arrived, packed full of Summer Mini goodies and free stamp sets! I couldn't wait to play, so I quickly put everything where it should be and got inky. My weekend project will have to wait till tomorrow, because I had to show you this card!

Aren't those houses just soooo cute?! I've used three of the FREE Sale-A-Bration stamp sets on this card, the focal layer uses mostly Good Neighbours. The sketch is from Mercy, my first time with one of her beautiful sketches! - this is a large card, 5.5" square.

I've used the masking technique to create my little scene, I was inspired by the sherbet coloured neighbourhood in Edward Scissorhands so the colours are all from the Soft Subtles colour family, with the exception of the tree trunks in Close to Cocoa. The papers are from Spring Fling (retired) pack and I've used some Bashful Blue brads and ribbon.

My sewing machine was sitting out, so I stitched a border around the card and one of the layers - I think that's the first time I've used my big machine to stitch on a card, and I might be hooked!

I've stamped the Thank You sentiment from another SAB set, Happy Moments in Certainly Celery on the Certainly Celery grass. I love tonal stamping like this - it's those little details that you might not see at first glance that can make a card special. I've also popped up the middle house with dimensionals.

Here's the inside. Apparently the wind was blowing - I should have used my Stamp-a-ma-jig for that tree! The sentiment from Whimsical Words was inked with Pretty in Pink and Bashful Blue markers.

Have a creative day,


Supplies available from Stampin' Up! Email me for purchasing details.

It's time to Sale-A-Brate! Earn your free stamp set today!

Technique Spotlight: Masking

I love masking. It's such a simple technique, it costs you nothing in extra supplies, and you get such cute results. Masking allows you to put an image in front of, or behind, another image. If masking is a new technique to you, read on to see just how easy it is!

First, stamp your image. This will be the image that appears to be in front of your second stamped element.

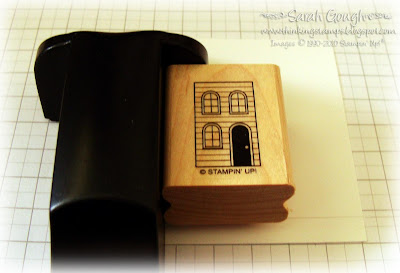
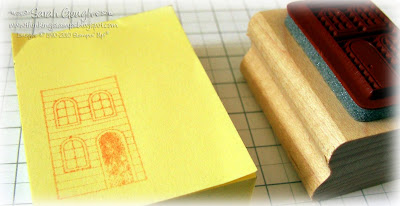
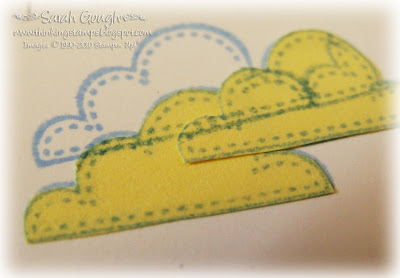
Before cleaning your stamp, stamp again onto a thin piece of scrap paper or a post-it-note. Make sure you're stamping over the sticky strip - this is helpful later. Cut out your image staying just INSIDE the lines of the image. This stops you getting a white border between your two elements.

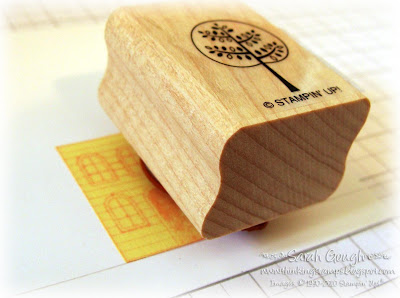
Place your mask over your stamped image. If you stamped onto a post-it your mask will stay in place nicely, otherwise you may want to use a little bit of temporary adhesive to ensure your mask stays in place.

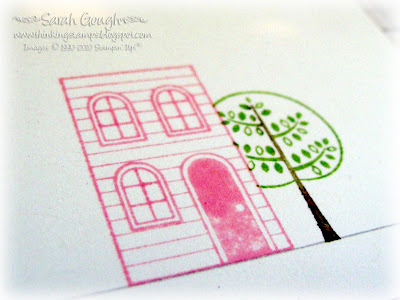
Stamp your second image, overlapping as much or as little of the mask as you wish.

Voila! It's a simple technique for sure, but just adds a little something extra to your stamping.

I especially like to layer my masked images for even more depth.

Stamp set: Good Neighbours (Free Sale-A-Bration set!)


Some supplies available from Stampin' Up! Email me for purchasing details.

It's time to Sale-A-Brate! Earn your free stamp set today!

February 8, 2010

Update...

Hi everyone,

No pretty pictures today - it was Superbowl Day, and as a huge football fan, I was a little busy! Congrats to all the Saints fans out there, I was cheering for your side today as my beloved Steelers didn't quite make it this year! I love New Orleans though, and I can't wait to see the victory parade - I'm sure the Big Easy will do it up like no one else can.

I'll be back tomorrow with a pretty project I completed over the weekend. Until then, I wanted to let you know that so far, Stampin' Up! have sold 7524 of the I (Heart) Hearts stamp set since the beginning of the promotion. As you know, $2 from every set sold goes towards much needed relief in Haiti.

I've ordered my set, and you have until the end of Feb to grab yours and help out in a small way too - every little bit counts.

See you tomorrow!


It's time to Sale-A-Brate! Earn your free stamp set today!

February 4, 2010

Happy Birdy!

After my last few projects were relatively clean and simple (for me at least!) I was ready to sink my teeth into some layers and a lot of colour this afternoon. This is one of those cards I wish I could show you in real life - it's hard to capture just how vibrant it really is!

I used Mojo Sketch 124 - it was just what I needed, lots of layers to play with! Julee's sketches are always so much fun. The stamps are Birthday Surprise by Verve, the papers and brads Eva by Basic Grey, the flowers are Prima, the ribbons, build-a-brad and Bravo Burgundy card are from Stampin' Up!

I paper pieced the cute little bird and sprayed Juneberry Wine and Olive Vine Glimmermist on the flowers. The ribbons are layered together using SNAIL adhesive. I have to show you just how sparkly those flowers are....


I decorated the inside of the card using SU! punches and an offcut of the paper. The inside layer is Pink Pirouette - it's nice to not use white or vanilla for a change.

Before I go, here's a shot of the big guy that's been keeping my crochet hook moving...

Disembodied heads are usually scary....but this one's kinda cute!


Some supplies available from Stampin' Up! Email me for purchasing details.

It's time to Sale-A-Brate! Earn your free stamp set today!

Trendy Thanks

I only spent a little time stamping yesterday (I have a crochet project on the go that's keeping me busy!) - but I love the result. I wanted to do a smaller card and matching envelope....here's what I came up with.

Cute right? I love those trees...they just make me happy. I needed a thank you card, and after seeing the sketch for CAS52, I knew it would be perfect. This card measures 4" square.

Trendy Trees is a perfect set for clean and simple cards - it has beautiful clean lines, and a gorgeous modern font. The stamp-a-ma-jig is a must for creating a scene like this, I also drew a pencil line (hidden by the paper) to ensure everything was nice and straight.

Tip: To see the Stamp-a-ma-jig in action, check out the instructions on page 124 of the NZ 2009-2010 Idea Book and Catalogue!

I stamped my trees using Close to Cocoa ink and Always Artichoke, Kiwi Kiss and Old Olive inks. The sentiment is in Old Olive. The ribbon is Always Artichoke grosgrain and the paper is from an old Close to Cocoa patterns pack (I forgot I had!)

I've also stamped a tree on the inside of the card. Simple and so cute!

Here's the envelope I made to match. I used a template - but making a square envelope is easy, just start with a square larger than your card and hand draw four rounded triangle flaps, cut and stick. I love making envelopes out of Stampin' Up! designer paper - it's the perfect weight, and being double sided, you have a coordinating pattern on the inside of your envelope without using a separate liner!

I stamped a sentiment from the Sweet Little Sentiments hostess set in Old Olive, layered on Old Olive card and attached to the envie with dimensionsals. I'm hand delivering this card - but you can make an address panel for your envelopes this way if you've used patterned paper - just use a nice strong adhesive like Tombow to ensure it stays on!

I'm pleased to report my entire craft room is all neat and tidy after a whirlwind cleaning session and last night I dreamed of stamping (I can't be the only one that does that?!) so I'm sure to have a creative day! I just need to try and remember some of the ideas I got while I was asleep...

Happy Stampin'


Some supplies available from Stampin' Up! Email me for purchasing details.

It's time to Sale-A-Brate! Earn your free stamp set today!

February 2, 2010

Bella Rose Bucket Purse

I didn't have a lot of time to stamp this afternoon - but I had to make and share this gorgeous little purse style giftbox. I used some of my favourite products on this one, and had to break out a little glitter too!

Isn't it cute?! The pattern by Mel is available here - she's done a great job. My purse is pretty self explanatory - but the papers I used are from the Bella Rose pack (this might be my favourite paper this year I think), the ribbon is my favourite Kiwi Kiss double sided satin, and the beautiful stamps are from Dreams Du Jour. I love that sentiment - it's so true!

I've used my Glitter Glue Paint method to add a little sparkle to the butterfly (and a bit of shading - you can pull a little colour from the image as you add the glitter) and to the Kiwi Kiss parts of the sentiment.

I'm off to wipe the glitter off my nose and get ready for date night! Have a great evening.


Edited to add: Oops! forgot to mention - I've added the Google Follower gadget on the right sidebar for those of you that would like to subscribe that way, otherwise you can subscribe via email or your favourite feed reader. Thanks for visiting - I appreciate it, and your comments so much!

Some supplies available from Stampin' Up! Email me for purchasing details.

It's time to Sale-A-Brate! Earn your free stamp set today!

February 1, 2010

Friend to Friend

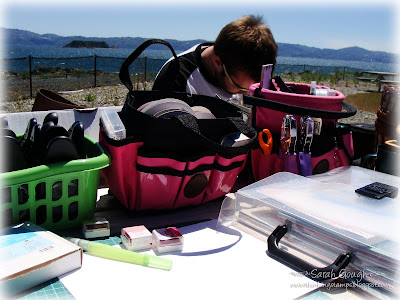
Hi everyone! I hope you had a great weekend, and haven't been affected by the heavy rain in some parts of the country. Saturday was an absolutely beautiful day here in Wellington. Shanan had some work to do over the weekend, so we packed a picnic, the laptop and *ahem* a few stamp supplies and spent the day in the sunshine....

How's that for an inspiring view? And yes, that is a basket full of punches....I don't pack lightly, as anyone who's been at a crop with me can tell you!

This morning dawned foggy and overcast at the top of our hill, it feels a little like being cushioned in clouds, perhaps that's why today's project is soft and subdued.

After a few projects last week featuring little to no stamping - I went to town on this 2-4-6-8 Box (Half a sheet of A4 card, score at 2" along the long side, then turn and score at 2", 4", 6" and 8". Cut off the smallest rectangle tab, cut alongside the bottom tabs, then adhere). I love making gift boxes, it's so satisfying, and this is one I make a lot.

I started by stamping the Linen (retired) background in Soft Sky on Soft Sky card. After scoring my box, I stamped images from Pocket Silhouettes in Soft Sky and Baja Breeze ink all around the edge of the box. I sponged the edges with Soft Sky, then stamped and embossed another image overtop. Make sure you do your sponging first to keep your white embossing nice and clean!

I've pierced all around the top edge of the box, and also distressed the cardstock a little using the tool from the Cutter Kit. I added the oval hardware over the sentiment, and some Antique Brass Jumbo Eyelets for tying the White Taffeta ribbon through. The holes for the ribbon go through all the layers for the box - but the eyelets are only set on the front layer so the box can be opened without tearing it.

Can you believe it's February already? Here's hoping you have a creative month!


Some supplies available from Stampin' Up! Email me for purchasing details.

It's time to Sale-A-Brate! Earn your free stamp set today!

January 29, 2010

Grocery List Revamp

Like many people, Shanan and I keep a grocery list on the fridge. I used to have a super cute Rachel Hale notepad up there, but once that was used up I kept the fittings, and have been making my own the last couple of years.

Here's last years notepad. I just love that Raspberry Tart paper! But it was looking a little shabby, so rather than replace the notepad, I redid it completely. It was time for a new look anyway!

I was able to salvage all these peices - back into my Pretties Kit they went! The pencil holder and magnet are from the original notepad, if you don't have a pencil clip and want to make your own, you could use a loop of card or ribbon.

I started by cutting two large scallop squares using nestabilites and lightweight chipboard. I used leftover chipboard that came with some Stampin' Up! supplies - I have a stack of it for projects like this. I cut one end of each square and joined them together to create a long, wide rectangle.

I cut the same shapes out of patterned paper and covered the chipboard. This paper is from the retired Spring Break pack - I wanted a more modern look for my notepad this year. I've just used a little sellotape to join the squares, a strip on the back, and a bit on the front that will be covered as we go along.

I cut a Pumpkin Pie mat slightly larger than the notepad and distressed the edges. At this point I'm just trying to get a feel for the overall look. Because I design on the go, I often stop and see if what I'm doing is working so far! The pumpkin mat was stuck on using dimensionals.

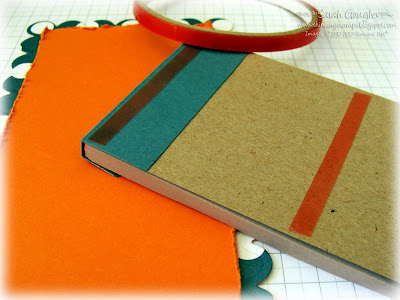
These notepads are cheap, but they have an ugly red glue edge on them. I cover it up by making a topper out of card. Take a piece the same width as your notepad and score twice, leaving enough room that your notepad slips in easily.

I scalloped the edge of mine and glued it on using Tombow adhesive - I love this stuff!

Here's the topper all stuck on. I keep the flap free so it can be lifted up when you're ripping sheets off the notepad. This stops you getting all those leftover bits of paper scraps when you tear off a sheet. You can see the buttons in the background...a plan was forming!

I used Sticky Strip to stick the notepad onto the base. If you want something to really stick, this is the best! Three small strips did the trick.

I also used Sticky Strip to adhere the pencil holder. This did double duty and held the topper down in place once it was stuck on.

I covered the pencil with more Spring Break paper. I used Sticky Strip for this too - it works great.

Time to embellish! I kept it simple - a bit of Pumpkin Pie grosgrain ribbon, some felt flowers from the Flower Fusion pack and a button. I used Sticky Strip to adhere all these elements. Because this will be on the fridge and will inevitably see a bit of wear and tear, it's best to keep embellishment on the modest side so your notepad stays looking crisp for longer.

Lastly, adhere your magnet to the back of the notepad. Sticky Strip works again here - or use a strong glue if you have some around.

All done! Grocery night is tonight, so this has already had some use. I love using my paper crafting supplies to make things like this for the home, it's great to be able to customise things just the way you want them!


Some supplies available from Stampin' Up! Email me for purchasing details.

It's time to Sale-A-Brate! Earn your free stamp set today!