Showing posts with label Crochet. Show all posts

April 30, 2011

Fabulous Floss!

Saturday means it's time for another OCC challenge - this week the lovely Jen has challenged us to use embroidery floss on our projects. I have a rather large collection of embroidery cottons because I used to do a lot of cross stitch, so it was fun to pull them out and drool over all the colours!
I decided to use my floss to crochet some trim for my card. I made it up as I went along, but it's just basic stitches in a scallop pattern. I love the sheen the gorgeous cotton has in real life - if you're interested, the colour is DMC 402.

The sketch for my card is the current MFT WSC, the image is You're So Tweet - one of my favourite Pure Innocence sets, she is coloured with copics and paper pieced.

I had a comment the other day asking how I use the Perfect Posies dienamic to create my flowers - I simply cut them, then use a foam mat and the back of my piercing tool to create an indent in each petal. Sometimes I will use the pointy end of a paper piercer to curl the edges of the petals a little and I often add some sponging around the flower edges.
Inside my card I used scraps of paper and a line of cross stitches with the floss to tie it all together.

I hope you'll join us at Our Creative Corner this week - be sure to head over and see what the rest of the design team have come up with!

Stamps: You're So Tweet, Essential Sentiments (MFT Stamps) Cardstock: Kraft, Whisper White (SU) Paper: Stella and Rose Mabel (MME) Ink: Tuxedo Black (Memento) Kraft, Early Espresso (SU) Dies: Faux Crochet Border, Perfect Posies, Rounded Banner Die-namics (MFT Stamps) Long Rectangles Nesties (Spellbinders) Other: Button (SU) Brads (Basic Grey) DMC Floss 402, Copic Markers

April 27, 2011

The Luna Scarf

Brrrr! It feels like the middle of winter here in NZ at the moment, not autumn like at all. I got up this morning to find my kitchen floor covered in water that had blown in under the door - you can imagine how wet and cold it is!

So while I'm all snuggled up in my slippers and merino wool sweater, I thought I'd share a recent crochet project. I'll apologise in advance for the terrible photos - it was a dreary day when I took these!
This is the Luna Scarf. Somewhat famous in the crochet and knitting world - it's been made hundreds, if not thousands of times by crafters all over the world. It's my favourite free scarf pattern, this red one is the second I have finished, my first was a pale green and I have a ball of burnt orange yarn waiting to be turned into my third Luna Scarf.

Why Luna? This scarf is based on one worn by the character Luna Lovegood in one of the Harry Potter movies, the pattern was kindly created and shared by PinkLeo on Craftster.   
It's a long thin scarf, so fun to crochet, and depending on the yarn used is suitable for many seasons. I tend to use a soft acrylic 8 ply, so my scarf comes out a little thicker, but if you scroll through the crafster photos you'll see lots of examples in many different types and weights of yarn.
This is a scarf that begs to be blocked. Blocking helps the scarf lay the way it should and seperates the pattern out so you can see all the gorgeous detail. With natural fibres, you simply wet, shape, then let dry. Because I use acrylic, I "kill" the fibres using steam which gives the scarf a super soft finish - you'd never believe it was such cheap yarn! The left side of the photo is the pinned and steamed scarf, the right side is how the scarf lay before being blocked.
Apologies for the super low-res webcam photo! This is how I wear my red luna scarf - I seamed it together with a twist in the middle so it can be worn cowl style. I find it plenty warm enough on most days, and if it gets too warm, it's easy to untwist and wear long and loose - I love that particularly when going out to a basketball game, where I want to keep my stuff at hand and not put my scarf on the floor. 

I'm currently crocheting a lovely thick and warm grey scarf from another pattern (that I think I'm going to change and make into a buttoned cowl) then I'll get started on my orange Luna Scarf.

I'll be back late late tonight (my post is scheduled for 1am NZ time) with my first Creations by AR Blog Hop - that means prizes for you! Yippee!

May 12, 2010

Catching up on some Housekeeping!

Hi everyone! I have a post made up of lots of bits and bobs today...lots of things to catch-up on!

First - over the weekend I bypassed the 100,000 hit mark - wooohoo! Thank you SO much for all your visits, being able to share my creative pursuits is so much fun, and it's lovely to read your comments, they always make me smile! I'll definitely be putting together some blog candy (hint: you might want to be one of my followers!) soon, but it probably won't be this week by the time I get around to it :-)

I was so excited to be one of Taylor's Top Crops with my 'Hi Cupcake!' card! I LOVE Taylor's work, it's always so bright and cheerful.  

It must be blog award season again - last week I receive a big bunch of them - thanks so much everyone! Rather than spend a few hours fufilling all the very detailed requirements, I'm going to cheat and share three of my daily craft reads. I love Dawn's stamping - she has that cool, clean but embellished style I love. Drew has my favourite recipe blog - lots of step-by-step photos, and unlike a lot of bloggers - makes everything from scratch and is always VERY honest about the results! Planet June is where I taught myself to crochet, she has some very cute free patterns and her tutorials are fantastic!

I didn't get chance to make a Project Tuesday sample this week - but head on over to find the very cool paper fortune cookie project and to see the wonderful design team creations!  


I better leave you with some eye candy right? I made my Mum this crocheted brooch as part of her Mother's Day gift - I love these for brightening a winter coat or top. I so loved the red and cream, that I made her card and a box filled with chocolate kisses to match....

I made the matching flower with the Scalloped Circle punch. A little embossing with the Manhattan Flower folder, some pleated ribbon and a gorgeous sentiment finished off this clean and simple card. For the Pillow Box, I used the Pillow Box die then ran the resulting die cut through the embossing folder. Simple and elegant!

Lastly, congrats to my Mum who received her New Zealand citizenship yesterday! Mum was born in Wales and got to have a lovely reception with the mayor, and a day off work - that's always good!


Stamps: Occasional Greetings, Teeny Tiny Sentiments
Paper & Card:
Very Vanilla
Ink:
Real Red
Punches:
Word Window & Scalloped Circle punches
Big Shot:
Manhattan Flower Embossing Folder, Pillow Box Die
E-mail me to purchase.

Other: Satin Ribbon, Button

March 23, 2010

Flower Giftbox

Just a quick post today - I have my Project Tuesday photos waiting to be edited, and I've been playing with one of the challenges for April - lots of fun stuff coming up.

On Sunday my friend Janine had a great birthday party, complete with some crafting. This was one of my offerings, a little gift box to hold the earrings we made. It's a super simple monochromatic design but anything small and with a flower and ribbon has to be cute!

I hope this set, A Beautiful Thing, makes it into the big catalogue in September - it's one of my favs - especially that lovely sentiment, that fits perfectly in the large oval punch.

I'll leave you with a very quick tag I made to package up one of the presents I created (I was doing crafty things last week - they were just all gifts!) this is using a long retired set - Genuine Article that I love for using on handmade gifts.


Stamps: A Beautiful Thing
Paper & Card: Regal Rose, Pink Pirouette
Ink: Regal Rose
Punches: Large Oval & Scalloped Oval Punches
Other: White Gel Pen
E-mail me to purchase.


Other:White Satin Ribbon, Jumbo Brad, Prima Flowers

February 4, 2010

Happy Birdy!

After my last few projects were relatively clean and simple (for me at least!) I was ready to sink my teeth into some layers and a lot of colour this afternoon. This is one of those cards I wish I could show you in real life - it's hard to capture just how vibrant it really is!

I used Mojo Sketch 124 - it was just what I needed, lots of layers to play with! Julee's sketches are always so much fun. The stamps are Birthday Surprise by Verve, the papers and brads Eva by Basic Grey, the flowers are Prima, the ribbons, build-a-brad and Bravo Burgundy card are from Stampin' Up!

I paper pieced the cute little bird and sprayed Juneberry Wine and Olive Vine Glimmermist on the flowers. The ribbons are layered together using SNAIL adhesive. I have to show you just how sparkly those flowers are....


I decorated the inside of the card using SU! punches and an offcut of the paper. The inside layer is Pink Pirouette - it's nice to not use white or vanilla for a change.

Before I go, here's a shot of the big guy that's been keeping my crochet hook moving...

Disembodied heads are usually scary....but this one's kinda cute!


Some supplies available from Stampin' Up! Email me for purchasing details.

It's time to Sale-A-Brate! Earn your free stamp set today!

January 9, 2010

Hooky Goodness

Hi everyone. As promised, here are just a couple of my recent crochet projects. I've spent a lot of time hook in hand lately - and I'm loving the results. If you don't know how to crochet, I highly recommend learning - I taught myself in an afternoon just using resources found on the web.

The stitches are really basic, the hardest thing is probably coming to terms with the abbreviations in patterns and the fact that the US and British terminolgy call different stitches by the same names! Once you get the hang of that you're set though - I've been crocheting for six months now and can see I'll do it for as long as I can hold a hook!

Grab yourself a ball of yarn and a hook (I bet your mum or grandma have one - but they're really cheap regardless) and just give it a go. It's easy to pull out stitches and start again!
Here's a set of coasters I whipped up on Thursday morning. I used Moda Vera's Cupcake yarn - I can't remember the make-up at the moment, I think it's partly Nylon - but it's soooo soft. I love working with it. The pattern for these is in a great book by Melissa Leapman called Cozy Crochet. I had enough of my ball of yarn (yup - the whole set from one ball, I used a 4mm hook) to make a fifth coaster and added a picot edge so it would look pretty sitting under my Nana's vase (I guess it's really my vase now, but I think of it as Nana's vase).
Probably my favourite project this past week has been this GORGEOUS headband from Susan in Stitches. I love, love, love it! I used the same cupcake yarn in a lovely cream colour and found the pattern so much fun I did it all in one sitting. I added some single crochet rows to get the length I needed. Here's a bad webcam pic of it on.
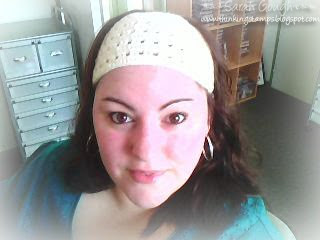
I'm forever tying my mane back, so this was perfect for me. I intend to make many, many more!
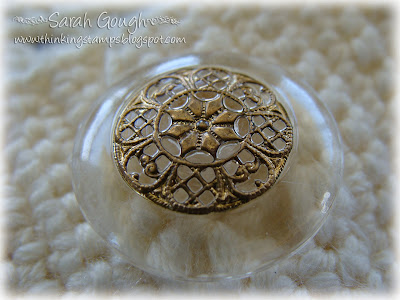
My favourite part of the headband is this gorgeous button from my Grandma's button stash. I love being able to use her buttons like this and wear them everyday. I already have a fancy black one picked out for next time, I just need the yarn to go along with it.
Here's a pic of the kerchief I made on Boxing Day. Same Cupcake yarn (there's a reason for that - I originally bought 5 balls in different colours to make granny squares but quickly lost interest!) The pattern for this is also in Cozy Crochet. Love it!
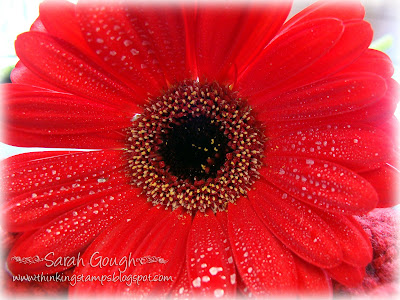
In case any of you wondered, as did my darling hubby, just WHAT that is on my Gerbera's - it's Glimmermist (Shanan thought it looked like mould from a distance! Needless to say, I won't be using the pearl on red flowers again!). It's pretty and sparkly in real life, trust me! Is it wrong to add decoration to something already so beautiful? Not if you're a die-hard crafter, right?!

Have a wonderful weekend,