Showing posts with label Happy Hardware. Show all posts

May 4, 2010

Project Tuesday: Altered Tin


It's time for another fun challenge from Project Tuesday! This week we're altering a tin or box. I had this round tin sitting in my craft room and I quickly turned it into a place to store cat treats for my ever-present feline companions. (if you ever receive a card from me with a little extra embellishment it's likely cat fur!)

I really kept this tin VERY simple - I wanted a bright, preppy look. I used Real Red ribbon and papers from the Summer Picnic pack. I embellished simply with circle punches and bright silver hardware.

I've used both sizes of grommets and a jumbo brad to finish off my tin. I love how well the large grommets work with the 1/2" circle punch.

To see another altered tin I've made previously, please see this post.

Head on over to Project Tuesday to see the wonderful design team creations and link your project!


Paper & Card: Real Red card, Summer Picnic DP
Ink:
Black
Punches:
1&3/8", 1&1/4" and 1/2" Circle Punches
Other:
Grommets, Jumbo Brad, Real Red Grosgrain Ribbon
E-mail me to purchase.

Stamps: Kitty Cat - Scrappy Cat

March 19, 2010

Tangerine Tiger (ok, so it's really a cat!)

Good morning everyone! I'm posting nice and early today - I've been up since 6am because today is one of the best sporting days of the year - the start of the NCAA tourney (go Pitt!) I have a long day of basketball and crafting planned and couldn't think of a better way to spend the day. I know a lot of you in North America probably have hubbies glued to the TV, so hopefully you're getting lots of crafting done too!

This is a card I made a few weeks ago - an attempt to use a little of my Tangerine Tango cardstock! The colour combo I came up with is Tangerine Tango, Rose Red and Certainly Celery.

I love that little cat from the Pun Fun set. I've created the large scalloped strip using the Slit Punch.

This was actually the first card I created where I realised how perfectly the jumbo brads fit into the smaller grommets - love this effect!


Stamps: Pun Fun
Paper & Card: Tangerine Tango, Certainly Celery, Rose Red
Ink: Tangerine Tango, Stazon
Punches: Scalloped Circle, Circle & Slit Punches
Other: Brayer, Flower Fusion Felt Flowers, Jumbo Brads, Small Grommets,
Certainly Celery Ribbon, Silver Cord, Earth Elements Buttons, Soft Subtles Brads
E-mail me to purchase.


Other: D'vine Swirl Cuttlebug Folder

March 4, 2010

Fun is Good

Have you ever made something and gone away thinking, "eh, it's ok" but then come back to it with fresh eyes and really liked it? That's how I feel about this card. I made it last night - under the harsh glare of a halogen bulb I just wasn't digging it - but this morning, I love these colours! I've used the first Mojo sketch of the month. I like grouping focal elements like this sometimes, it's a fun look. I'm definitely loving anything with circles right now too! I also kept the Crazy 4 Challenges (which I am) challenge in mind, and used three or more textures on my card. I have the smooth texture of the chipboard, the embossed polka dot texture, the ric rac, the soft feel of the flower petals....it goes on and on.

I had a distinct look I wanted for the flower behind the circle. Folding the flower in half looked weird, so I cut and adhered each petal separately.
I thought this should probably be a birthday card as it seems so bright and cheerful. I wish I had bought the On Your Birthday set sooner - it has to be my most used set so far this year.

I've decided to go back to my original "recipe" style of listing supplies. So from now on, everything I've used will be listed at the end of the blog post - just scroll to find the info you need. I'm also going to add a new category - Marvelous Markers - for those cards where I use multiple markers on one stamp for that cool multi colour look.


Stamps: On Your Birthday
Paper & Card: Rose Red, Green Galore, Pink Pirouette, Whisper White
Punches: Scallop Edge punch
Other: Basic Small Grommets, Stampin' Write Markers,
Circle Scissor Plus
E-mail me to purchase.


Stamps: Beautiful You - Verve
Paper & Card: Euphoria - Basic Grey
Other: American Crafts Chipboard & Ric Rac, Franchville Brads,
Cuttlebug Embossing Folder, Prima Flower

February 25, 2010

Inspired by Challenges....

I have a busy day coming up, so thought I'd blog nice and early. This is a card I whipped up last night - it was fun to do some straight stamping - no colouring this time. I'm enjoying my silhouette stamps at the moment.

Before I move on - Happy Birthday Michelle! (I'm not sure you'll see this as you're busy with the move, but if you do, love ya) I can't wait to show you what I've done for my little sister - it won't be until March though after I've hand delivered her present.

I love challenges - it's great to have a colour combo, sketch or inspiration piece to jump off from. This card uses two challenges, SCS Sketch 269 and Color Throwdown 81. My specific colours are Chocolate Chip, Pink Pirouette and Old Olive.

I've used the Inspired by Nature flower stamp - I inked it with Pink Pirouette first, sponged on some Pretty in Pink, sponged on Chocolate Chip then finished with an Old Olive marker. You can get great effects combining inking techniques like this!

I think this sentiment from Occasional Greetings might be my fav ever. It's so fun to ink it up with markers and get this beautiful result.

To embellish I've used some discount store ribbon, Old Olive and Chocolate Chip designer paper, the Polka Dot background stamp and some grommets/jumbo brads. This is my newest embellisment addiction! I wanted to further decorate something I'd used grommets on last week and found that jumbo brads sit beautifully in the middle! I think I've made three cards doing this already - I'll have to share the others soon.

Here's the inside. I love all the sentiments in On Your Birthday. It's one of those large sentiment sets you can use again and again forever.

Have a wonderful day!


Some supplies available from Stampin' Up! Email me for purchasing details.

It's time to Sale-A-Brate! Earn your free stamp set today!

February 1, 2010

Friend to Friend

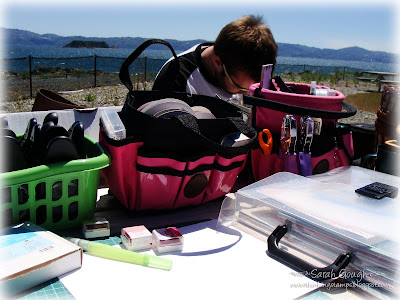
Hi everyone! I hope you had a great weekend, and haven't been affected by the heavy rain in some parts of the country. Saturday was an absolutely beautiful day here in Wellington. Shanan had some work to do over the weekend, so we packed a picnic, the laptop and *ahem* a few stamp supplies and spent the day in the sunshine....

How's that for an inspiring view? And yes, that is a basket full of punches....I don't pack lightly, as anyone who's been at a crop with me can tell you!

This morning dawned foggy and overcast at the top of our hill, it feels a little like being cushioned in clouds, perhaps that's why today's project is soft and subdued.

After a few projects last week featuring little to no stamping - I went to town on this 2-4-6-8 Box (Half a sheet of A4 card, score at 2" along the long side, then turn and score at 2", 4", 6" and 8". Cut off the smallest rectangle tab, cut alongside the bottom tabs, then adhere). I love making gift boxes, it's so satisfying, and this is one I make a lot.

I started by stamping the Linen (retired) background in Soft Sky on Soft Sky card. After scoring my box, I stamped images from Pocket Silhouettes in Soft Sky and Baja Breeze ink all around the edge of the box. I sponged the edges with Soft Sky, then stamped and embossed another image overtop. Make sure you do your sponging first to keep your white embossing nice and clean!

I've pierced all around the top edge of the box, and also distressed the cardstock a little using the tool from the Cutter Kit. I added the oval hardware over the sentiment, and some Antique Brass Jumbo Eyelets for tying the White Taffeta ribbon through. The holes for the ribbon go through all the layers for the box - but the eyelets are only set on the front layer so the box can be opened without tearing it.

Can you believe it's February already? Here's hoping you have a creative month!


Some supplies available from Stampin' Up! Email me for purchasing details.

It's time to Sale-A-Brate! Earn your free stamp set today!

January 27, 2010

Delightful Silhouette

When I saw the Colour Throwdown challenge for this week, I knew right away I wanted to do a silhouette card. Even better, the new sketch challenge at SCS worked for this card too!

So here's the card I just whipped up. To get the main image, I brayered and sponged Baja Breeze ink on glossy white card, using a circle punched post-it mask to leave a white area for the moon. This is perhaps the simplest of the masking techniques, and you can use it to make really interesting backgrounds too.

I stamped the grass image from Inspired by Nature in Elegant Eggplant, and after waiting for a few seconds, heat embossed it with clear embossing powder. I waited for a reason - I wanted the ink to partially dry to give me this almost shadowy look - the embossing powder only stuck to the really wet areas. (You can click the photos to get a super duper huge version so you can see the details!

The Delightful sentiment from It's All Good (retired) was stamped in Elegant Eggplant on Whisper White and punched out with a 1" Circle punch. This was layered twice, an epoxy sticker was placed over top, and the whole thing was stuck to an Aluminum Circle tag.

The background paper is an old Certainly Celery piece from a 6x6 promotional pad. I used a ribbon slide from the Hodgepodge Hardware set on my Certainly Celery grosgrain ribbon.

I really like these colours together - I think this is probably just masculine enough that you could give it to a guy.

Stay tuned tomorrow - I'll show you the other card I made today, which is definitely NOT masculine!


Some supplies available from Stampin' Up! Email me for purchasing details.

It's time to Sale-A-Brate! Earn your free stamp set today!

September 29, 2008

Stylin' in Silver!

Of all the wonderful accessories I love to put on my cards and projects, Styled Silver Hodgepodge Hardware is probably my favourite. It's just so elegant and I'm a silver girl at heart - I've always loved Sterling Silver jewellery so this hodgepodge is perfect for me!

Because everyone should have the chance to use these gorgeous embellishments, but buying a full pack at $68.95 + postage just isn't always an option, I'm doing a share on this gorgeous kit.

For $14.80 (including postage) you'll receive:

~ 10 Label holders - 2 each of the Circle, Square, Rectangle, Beaded Oval and Beaded Designer Label shapes
~ 8 Cast Brads - 2 each of the 4 designs in the pack (these are big brads, not mini size!)
~ 2 Ribbon Sliders (flower shape)
~ 20 Styled Silver matching Brads, enough for all the label holders

The photo above shows the hardware each person in the share will receive (as well as something stamped by me!) If you would like two shares, the price is $28.60. Please email me to book your place in the share. Visa, Mastercard and Bank Deposit all accepted. First come, first served, Nationwide orders welcomed! (Demos are welcome too of course!)

I couldn't write about how much I love Styled Silver Hodgepodge without showing you a project, so here's a box I whipped up last night. The hardware really gives it that something extra special!

For all the instructions on making this box, please see here. I've used paper from the Spring Silhouettes pack (I'm embracing Wild Wasabi and loving it!) For instructions on constructing the Dahlia please see here.
Did you know our punches coordinate with the Hodgepodge perfectly? (you could cut the paper to size if you don't have the punch). I've punched the Designer Label from the Spring Silhouettes paper. The sentiment from Circle of Friendship was stamped in Wild Wasabi, then punched out with the 1" Circle punch. One of the cast brads in the pack fit perfectly in the center of the stamped image - It's so much fun layering embellishments like this!

Don't forget to email me if you'd like to grab some hardware at a great price! Today is also the last day to email me with your Free Wheelin' orders, if you've been thinking about grabbing one of these stamp sets don't miss out on your chance to receive the matching Jumbo Wheel FREE!

Have a fantastic day!


Stampin Supplies:
Stamp Set: Circle of Friendship
Ink: Wild Wasabi
Card stock: Wild Wasabi, Certainly Celery, Very Vanilla
Paper: Spring Silhouettes
Punches: Designer Label, 1" Circle, 1 3/8" Circle, Corner Rounder
Accessories: Styled Silver Hodgepodge Hardware, Certainly Celery Wide Grosgrain Ribbon, Stampin’ Dimensionals, SNAIL adhesive.
All supplies available from Stampin' Up! Please email me to place an order.

August 20, 2008

Sweet Boho and a Winner!

Here's another card using the gorgeous Sweet Serendipity set along with one of my favs, Boho Backgrounds.
I wanted to have another play with the Old Olive/Apricot Appeal/Groovy Guava combo. This time I used more Apricot Appeal. Really simple card, all the focus is on the stamping.

I inked the Boho Background stamp with Groovy Guava then reinked the flower stems with an Old Olive marker. Once I'd stamped the image repeatedly and cut to size (don't forget to clean your stamp between inkings!) I sponged the edges heavily with Apricot Appeal ink. Don't you love the warmth this creates?

The sentiment was inked the same way, with a marker and Groovy Guava. It was punched out with the large oval punch and mounted in an oval label holder from the Antique Brass Hodgepodge kit.

Two rows of piercing border the ribbon/cord bow. The ribbon and copper cord is retired now, but some Taffeta ribbon would look gorgeous too! The Apricot layer is adhered to an Old Olive mat with Dimensionals. I'm not going to lie...that bow was tricky to tie and took awhile....but it was worth it!

Now for the notepad winner....random.org chose....

#4 which is....Kelly! Wooohooo, I think you should buy a lotto ticket this week, you're one lucky chick winning competitions left right and center! The notepad is coming your way tomorrow!
Chris Millar sent me this award today, what a sweetheart, thank you! I've been given blog awards before and alwaysss forget to pass them on, so I'm doing it now while I remember!

The rules of the award are...

(1) The winner can put the logo on their blog. (2) Link the person you received your award from. (3) Nominate at least 7 other blogs. (4) Put links of those on yours. (5) Leave a message on the blogs of the girls or boys you’ve nominated.

...but I'm a rebel and running out of time before a DVD night with Shanan, so I'll leave you with two AMAZING artists that inspire me constantly. Beate and Silke. They both use lots of Stampin' Up! products and have really distinct styles that I love.

Happy Stampin!


Stampin Supplies:
Stamp Set: Boho Backgrounds, Sweet Serendipity
Ink: Old Olive, Groovy Guava, Apricot Appeal
Card stock: Very Vanilla, Old Olive, Apricot Appeal
Accessories: Mat pack, Hodgepodge Hardware, Copper Cord and Olive Organza (retired), Stampin’ Dimensionals, SNAIL adhesive.
All supplies available from Stampin' Up!

August 3, 2008

New Feature! One Card: Two Ways

About a week ago, I had an idea for a new feature...so welcome to the first One Card: Two Ways. I had the pleasure of attending a crop with a lovely group of ladies yesterday, so was able to get these created while I made a complete mess of my table!

For the first edition of One Card: Two Ways, I've made the same card, in two different colourways. The first is Soft Sky, Very Vanilla and Basic Gray. I've used a sheet of paper from the Spring Silhouettes pack for this one. The ribbon is Very Vanilla Wide Grosgrain.
The second card was created with Chocolate Chip, Purely Pomegranate and Kraft card stock. The paper here is from the new Holiday Harmony Designer Paper pack in the Spring Mini catalogue. The ribbon is Chocolate Chip Wide Grosgrain.

This is a really simple card to make, no matter what colours you use! Stamp the flower from Bloomin' with Beauty (Spring Mini Catalogue) in Basic Gray ink. Colour using a water brush or blender pen, using your ink pads as a palette. Cut out the flower. (this part is a little tricky...but worth it! Stampin' Up! paper snips make light work of this kind of detail cutting)

The scalloped strip was made using the slit punch. Edges were sponged in Soft Sky or Creamy Caramel and Chocolate Chip ink.

The flower was attached to another sponged layer using the wonderful Two Way Glue Pen - the small nib on this was perfect for sticking down the narrow stem. Three brads from the oh-so-pretty new Styled Silver Hodgepodge kit were added before adhering with Stampin' Dimensionals.Thank You from Short & Sweet was stamped and cut out to fit inside this label holder from the Hodgepodge set. I like to line these up on my card before I insert the brads, and use the fine tip of a marker to mark where you should punch the holes to thread the brads through. After the ribbon was tied around the scallop edged layer, it was attached to the card with Stampin' Dimensionals.

Which one of these do you like best? I really like the Soft Sky one....but I'm biased - I LOVE Soft Sky! I actually made the Pomegranate one first, so maybe I've just looked at that one too much! Good thing is, the Styled Silver hardware goes with any colour....I could have created this card six or seven times over with different colour combos.

Hope you're having a wonderful weekend, stay warm!


Stampin Supplies:
Stamp Set: Bloomin' with Beauty, Short & Sweet
Ink: Basic Gray, Soft Sky and Old Olive or Basic Gray, Chocolate Chip, Creamy Caramel and Purely Pomegranate.
Card stock: Basic Gray, Soft Sky and Very Vanilla or Chocolate Chip, Kraft and Purely Pomegranate
Paper: Spring Silhouettes or Holiday Harmony
Punches: Slit, 1/16" Handheld
Accessories: Chocolate Chip or Very Vanilla Wide Grosgrain ribbon, Paper Snips, Two Way Glue Pen, Styled Silver Hodgepodge Hardware, Sponge Daubers, Stampin’ Dimensionals, SNAIL adhesive.
All supplies available from Stampin' Up!

July 14, 2008

Bloomin' with New Goodies!

As promised, here's the first of my cards using the new products from the upcoming Spring Mini Catalogue. Isn't that image beautiful? This card uses stamps from the Bloomin' with Beauty set. I did lots of sponging and masking on this one, here's the step by step:

  • Stamp the vase image in Stazon ink on Whisper White twice. Stamp it again on a post-it note or scrap paper before cleaning your stamp.


  • Cut the vase part of the image out of your scrap paper. Adhere your mask over the image as shown below and colour the vase by sponging River Rock ink using a sponge dauber.

  • Colour the flowers of your second image by sponging with Pretty in Pink, Regal Rose and Purely Pomegranate ink. Sponge the leaves with Old Olive and cut out the coloured part of the image. Adhere on the image with the sponged vase using Stampin' Dimensionals.


  • Here's my favourite tip for die-cut stamp sets: When you peal off the backing paper as you mount your stamps, make sure to keep it, it's the perfect mask for your image! Adhere the backing paper mask over your coloured image and sponge around the edges using Soft Sky ink. Continue the sponging around the edges of your Whisper White square, paying particular attention to the corners.


  • Sponge heavily at the base of the vase, again with Soft Sky ink, to ground the image.


  • Distress the sides of your card stock using the distressing tool from the Cutter kit. Mount on a slightly larger piece of Purely Pomegranate card.


  • Adhere a piece of Designer Paper from the upcoming Holiday Harmony pack on a Purely Pomegranate card base. Stamp "Bloom" in Purely Pomegranate ink.


  • Stamp the bee image on Whisper White card stock and also on the designer paper. Colour lightly, cut out and adhere with half a Stampin' Dimensional.


  • Create a bow using the new Satin ribbon in Purely Pomegranate and a ribbon slide from the beautiful new Styled Silver Hodgepodge Hardware kit. I LOVE this hardware, it's so so so gorgeous. Adhere the bow using a mini glue dot.
  • Lastly, run a two-way glue pen lightly over the flowers and bee wings. Dip a toothpick in Dazzling Diamonds glitter and tap the glitter lightly on the glue. This gives you a "barely there" sparkle for sophisticated shimmer. It's always so hard to take a good photo of glitter, but hopefully you can see a little in the photo above!
Aren't these new products gorgeous? They will all be available from August 1st. The satin ribbon also comes in Chocolate Chip, I can't wait to play with that! If you're in the Wellington area and would like to see these products in person (all while earning free stamp sets and shopping dollars!) please email me to find out all about having your very own fun and free Stampin' Up! workshop!


Stampin' Supplies:
Bloomin' with Beauty stamp set.
Whisper White and Purely Pomegranate card stock.
Stazon, Soft Sky, Purely Pomegranate, River Rock, Pretty in Pink, Regal Rose and Old Olive ink.
Holiday Harmony Designer Paper.
Styled Silver Hodgepodge Hardware.
Purely Pomegranate Satin Ribbon.
Sponge Daubers.
Cutter Kit.
Stampin' Dimensionals.
SNAIL Adhesive.
All supplies available from Stampin' Up! Some supplies not available until August 1st, 2008.

May 29, 2008

Thanks Mum!

Here's a card I made earlier in the week - I'm sharing it now because I think my Mum should receive it today! I hope so - if not, here's a card for you Mum! When I visited a couple of weekends ago, Mum had a copy of a cookbook I love and have always wanted (20c at the Salvation Army shop - can't beat that!) and she also let me brazenly steal the cutest set of plates right from her display shelf! They are adorable, dessert plates with chocolate truffles and other yummy things engraved in them. The cookbook is an old one by Alison Holst for Microwaves - it has some really great recipes in it, good microwave recipes can be hard to find!

I've noticed I'm using a lot of blues in my cards lately! I think it's because I'm so inspired by our new In Colours for the year. This one uses something very different though.....Not Quite Navy! This is a colour I had never used and I wanted to challenge myself to make something nice with it. I used the Colour Wheel tool to help me decide what to pair it with - Bashful Blue. I then noticed some gorgeous So Saffron paper on my desk from this months promotion - and I was ready to go!

I also used a stamp set I've never inked. I have had a play with this one before, courtesy of my upline Louise (Every demo worldwide got this set as a gift from Stampin' Up! last year - just a little bit before I joined! Isn't that a great perk to being a demo though, what's better than free stamps?!) It's called Time Well Spent and is one of our wonderful hostess sets this year. I just had to earn it, it's a wonderful set, and has soooo many images. Here's the step by step:

  • Stamp the butterfly image from Time Well Spent randomly over a Not Quite Navy card base using Versamark ink. This will give a lovely watermark appearance.
  • Stamp the large flower on Whisper White using Basic Gray. I meant it when I said Basic Gray is the new black - it's so nice to colour with.
  • Colour with blender pens and Watercolour Wonder Crayons. I used Not Quite Navy, Bashful Blue and So Saffron. Cut out.
  • Colour a flower from the Pretties kit also using your watercolour wonder crayons and a blender pen or water brush. This is my favourite way to colour these flowers, you can shade them exactly as you want them and it dries almost instantly.
  • Adhere the flower to your stamped and cut out image, then punch a large hole using the Crop-a-dile and set a Pewter Jumbo Eyelet in the center. Add a clear Rhinestone Brad, also from the pretties kit, by threading it through the eyelet.
  • Cut a Bashful Blue scalloped edge using the Slit Punch. Adhere behind a piece of the So Saffron prints paper which has a piece of Bashful Blue Striped Grosgrain ribbon tied around it. Adhere another strip of Bashful Blue behind the other side of the So Saffron - this is a cheats way to get a layered look. Perfect to use up little scraps of card.
  • Attach the So Saffron layer to the card base. Adhere the flower using Stampin' Dimensionals.
  • Stamp "Hugs & Kisses" from the So Many Sayings stamp set (level one - hostess) by inking with a Not Quite Navy marker on Bashful Blue card.
  • Punch out using the Word Window punch and cut off one edge. Sponge lightly using Bashful Blue ink around the edges.
  • Add a Pewter brad from the Vintage collection to the round end of the punch, and attach to your card using Dimensionals. That's the front done!

  • For the inside, adhere a piece of Whisper White card stock. Stamp the butterfly in Basic Gray.
  • Adhere a strip of the So Saffron paper, partially covering the butterfly.
  • Stamp the butterfly again onto scrap card and colour with Watercolour Wonder crayons and a blender pen.
  • Cut out the body of the butterfly, omitting the antenna. Adhere this over the first stamped image using Dimensionals for a 3d effect and making sure to line up the antenna where they should be.
I hope my Mum likes this little thank you, I had so much fun making it for her!

If you would like to find out how you can earn the Time Well Spent or So Many Sayings sets for FREE please send me an email. Stampin' Up! is also looking for demonstrators New Zealand wide - please email me if you would like to make your hobby a fun and rewarding business opportunity, I'd love to have you join my fun and enthusiastic team!

Happy Stampin'
Sarah

Stampin' Supplies:
Time Well Spent and So Many Sayings stamp sets.
Not Quite Navy, Whisper White and Bashful Blue card. So Saffron Prints paper.
Basic Gray and Versamark ink.
Watercolour Wonder Crayons.
Blender Pens.
Slit and Word Window punches.
Sponge Daubers.
Pewter Jumbo Eyelets.
Crop-a-dile.
Pretties Kit.
Vintage Brads.
1/16" Handheld Punch.
Bashful Blue Striped Grosgrain ribbon.
Stampin' Write marker - Not Quite Navy.
Stampin' Dimensionals.
SNAIL adhesive.
All supplies available from Stampin' Up!

May 28, 2008

In Colour Carte Postale

Carte Postale is a set I've been admiring for a long time. It has been on my shelf, unloved, the last three weeks - but only because of time restraints! So here's my first effort with this beautiful set. I used a colour challenge combo, Certainly Celery, Blue Bayou and Soft Sky. Don't they look great together? Here's the step by step:

  • Cut a Soft Sky circle and stamp the leaf image in Certainly Celery multiple times. Stamp in between inkings to get a shaded effect to the foliage.
  • Stamp the bird and sentiment in Blue Bayou.
  • Sponge the edges of the circle, Certainly Celery for the Bottom and Soft Sky for the top.
  • Stamp the square flower image in Blue Bayou on Soft Sky and punch out using the 1 1/4" Circle Punch. Layer onto a 1 3/8" Certainly Celery circle, then onto a Blue Bayou Scalloped Circle.
  • Add White Gel pen highlights to the bird, the flower and the scalloped circle.
  • Layer a strip of Certainly Celery Designer Series paper onto Soft Sky. I love how this designs mimics the stamped foliage.
  • Attach two Antique Brass Jumbo Eyelets at the end of the strip, and tie a length of Soft Sky ribbon through them.
  • Stamp the flowers in Versamark onto your Blue Bayou card base.
  • Adhere the strip with dimensionals, the circle layer with SNAIL and the scalloped circle with dimensionals and you're done!
This was a bit of a different layout for me, I so often use squares or rectangles. I've been making an effort this week to finish the inside of my cards nicely before putting away all my supplies - usually I leave it until I'm ready to send the card, but this is so much easier.

Here's the inside view of this card. The bird is cut out and attached with dimensionals. This is going to one of my hostesses who loves Carte Postale. Hope she likes it!

Happy Stampin'
Sarah

Stampin' Supplies:
Carte Postale stamp set.
Blue Bayou and Soft Sky card. Certainly Celery prints designer paper.
Blue Bayou, Soft Sky and Certainly Celery ink.
White Gel Pen.
Scalloped Circle, 1 1/4" and 1 3/8" Circle punches.
Crop-a-dile.
Jumbo Eyelets.
Soft Sky ribbon.
Stampin' Sponge.
Stampin' Dimensionals.
SNAIL adhesive.
All supplies available from Stampin' Up!