Showing posts with label Perfectly Pretty. Show all posts

April 6, 2010

Project Tuesday: Diaper Fold Pouch

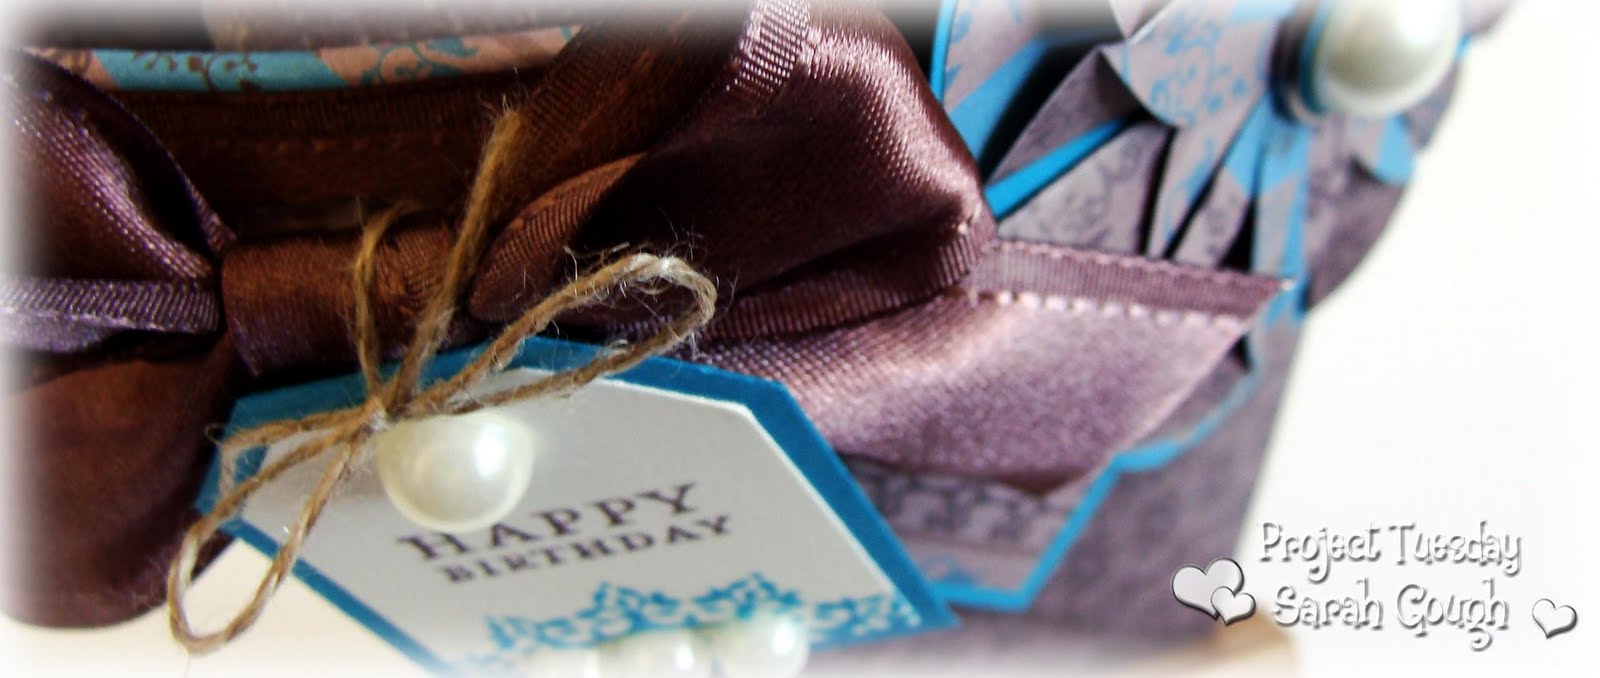
It's time for another awesome Project Tuesday challenge! This week Rose has asked us to create a Diaper Fold Pouch. I love getting to create all these things I've been meaning to try for years!

This is a great project, because all you need is a square of paper. I started with a 8" square.

You can use these pouches as a base for a pull-out card or tag or as gift wrapping, I've filled mine with a bag of chocolate.

I stamped the scalloped circle image from Vintage Labels and punched my tag so just the top of the circle was showing. A simple sentiment and some pearls from the Pretties Kit finished this off.

I've used the Dahlia Fold for my large accent. The Pretties Kit pearl is mounted inside a Build-a-Brad.

Head on over to Project Tuesday to see the fantastic Design Team creations and to link your own Diaper Fold Pouch so we can all take a peek!


Stamps: Vintage Labels
Paper & Card: Taken With Teal, Very Vanilla card
Ink: Taken with Teal
Punches: Small & Large Tag & 1 3/8" Circle punches
Other: Pretties Kit, Mini Glue Dots, Chocolate Chip Satin Ribbon, Linen Thread, Build-a-Brad
E-mail me to purchase.

Paper & Card: Together Stripe DP - Chatterbox

January 12, 2010

Clear Sleeve Gift box

While laying awake a few nights ago I decided I wanted to make a clear-top gift box. Something simple that could be embellished prettily. This morning I pulled out the stamps I wanted to use, grabbed some paper and luckily remembered to take photos! Here's how you can make one too.

Start with a square of cardstock. I've used Close to Cocoa. Mine is 6x6" but you can use any size you want. Score all four sides at the height you need. I scored at 1 inch.

Snip each side as shown. Pre-fold all your score lines. If you are going to stamp your box base, now is the time to do it.

Using some adhesive on the inside of the tabs, stick your box together. Simple right? I've made teeny tiny boxes this way or quite large ones. You could repeat the process with a slightly larger square to make a lid....or carry on as I did...

Decorate your box base (if you didn't pre-stamp it). I used strips of Outlaw (retired) designer paper and sponged with Creamy Caramel and Close to Cocoa ink.

Cut a strip of acetate (overhead transparency) the same width as your box (mine is 4 inches). You can also use patterned paper for this step, or try vellum for a lovely semi-opaque effect.

Score your sleeve four times according to the height of your box sides. Make sure to score a little larger than the height of each side of your box so it will fit over your base. Adhere together with Sticky Strip. You can stop here or dip into your ribbon stash and adhere a length on each side of the sleeve, again with Sticky Strip. I used Chocolate Chip narrow grosgrain.

Time to embellish! I used a gorgeous stamp from the Oval All set, along with the Large Oval and Scallop Oval punches. The card stock is Sage Shadow and the ink is Chocolate Chip. The pearls and flower are from the Pretties kit and I used glue dots to adhere these to the acetate.

I waited until I had assembled my sleeve to use a rub-on so I could place it exactly where I wanted it - just place the rub-on on your sleeve, then turn upside down and rub on the inside of the sleeve to avoid misshaping it.

I made a tag by stamping an initial using the Wild West alphabet and punching it out using the Curly Label punch. Layer this on more Close to Cocoa card stock and cut around to get a nice border. A jumbo eyelet and hemp twine finish off your tag. Some more sponging - a bit of piercing and I was done!

I love packaging homemade and store bought gifts in boxes I've made myself - it really adds something special (and of course I can make a card to match!)

Have a creative day,


Supplies available from Stampin' Up!

August 18, 2008

One Card: Two Ways - Sketch It!

Time for a new One Card: Two Ways! I stole some time over the weekend and threw together a couple of cards, getting a couple of sets inky for the first time! I wanted to show how the same layout or sketch for a card can result in a funky or elegant look, depending on your colours and stamps.
So here's my sketch. Pretty ain't it?! I'm no artist...but I'll often make a quick plan of a layout I think will be fun. I rarely plan colours or stamps as I create in a very organic way (choosing paper or a stamp set then letting ideas "grow" from there) but I love working with a sketch. Onto the cards....
I knew I wanted to use Big Bold Birthday for this post. I haven't shared many birthday cards with you so this was overdue! This is also one of the dozen or so sets sitting in my stash unloved and uninked - so many stamps, so little time!

I started with the cupcake element and the colours I wanted to use. For the icing on the cupcake I used Heat & Stick powder and dazzling diamonds glitter. You can see a tutorial on this here. I thought the icing looked cute on an angle like this, but because it's a separate stamp you can put your cupcake together however you like!

I created the paper for the second layer using the small flower stamp and a polka dot stamp from the set. I love that you can create your own paper like this in whatever colours you like!

Stampin Supplies:
Stamp Set: Big Bold Birthday
Ink: Certainly Celery, Regal Rose, Tempting Turquoise,Versamark
Card stock: Certainly Celery, Regal Rose, Whisper White
Paper: Petals and Paisleys Designer Paper
Punches: Slit, 1/16" Handheld, 1/4" Circle and Word Window punches
Accessories: Stamp-a-ma-jig, Dazzling Diamonds, Heat & Stick powder, Tempting Turquoise ribbon, Soft Subtles brads, Stampin’ Dimensionals, SNAIL adhesive.
All supplies available from Stampin' Up

For the second card I wanted a really elegant look. You just can't go past Bloomin' with Beauty for elegance....I think it's a must-have set in any collection! I also used Wonderful Words....I've had this set since last year, but I think I'd only inked it once! I love it, will be using it more often from now on.

For this card I've used the Out of the Box technique. This is super simple...just stamp your image, then cut a square around it, making sure parts of the image go outside of the square. I do the cutting using a metal ruler, craft knife and cutting mat, then finish off around the image using my paper snips.

I coloured the image using my inkpads and aqua painter. Rather than stamp my own patterned paper this time, I just used the same paper twice. This is a really quick and easy way to achieve an elegant look - by popping up the second layer of paper you create a subtle interest point.

I've used a pearl from the Pretties kit instead of a brad this time, I love these pearls, they attach so easily using a mini glue dot!

So, which card is your favourite this time? I can't choose, they are so different! I do love that cupcake - but then, Bloomin' with Beauty is such a gorgeous set! Hmmm, maybe this is why I have a room jammed packed with Stampin' Up! goodies?!

Have a great day!


Stampin Supplies:
Stamp Set: Bloomin' with Beauty, Wonderful Words
Ink: Stazon, Pale Plum, Perfect Plum, Mellow Moss, So Saffron
Card stock: Pale Plum, Perfect Plum, Very Vanilla
Paper: Le Jardin Designer Paper
Punches: Slit and Word Window punches
Accessories: Stamp-a-ma-jig, Very Vanilla Wide Grosgrain, Pretties Kit, Mini Glue Dots, Aquapainter, Paper Snips, Stampin’ Dimensionals, SNAIL adhesive.
All supplies available from Stampin' Up!

August 5, 2008

You've made your nest...

Yay! Finally...I'm posting a scrapbook page! I was so inspired by the ladies at the crop last Saturday - it was the final straw, I've given into my scrapping itch! I haven't scrapped in a couple of years (and won't be showing you my earlier attempts!) but it's about time I made something to go in my cute 6x6 linen scrapbook that came in my Stampin' Up! starter kit!

You might remember Gabriel as the printer loving feline from a previous post - You're sure to see him and his "sister" Luna (who looks NOTHING like him!) in plenty (if not all!) of my future layouts - I'm nuts about my fur babies!


I won't do step by steps for my layouts but will let you know which products I've used and how.
My colour scheme here is Brocade Blue (closest match for Gabe's eyes) Real Red, Pumpkin Pie and Old Olive. I've used linen thread inside the button and for the stitching down the side of the page.


I used my mat pack template a couple of times for this, once to lay out the spacing for the photo corner brads, and also to pre-pierce the stitching holes.


The flower is from the Pretties kit and I coloured it with a Brocade Blue marker. The letters for "nest" were inked with markers too, I "thumped" the marker on each letter before stamping to get that slightly mottled look for a tiny bit of visual interest.

The strip joining the two designer papers is a piece of Brocade Blue Wide Grosgrain ribbon. The journalling stamp from Office Accoutrement was inked with markers and the brackets were cut out and layered with teeny bits of Stampin' Dimensionals.

The over sized scallops were created with the 1 1/4" and 1 3/8" circle punches.

That's all the details I think - I'd love to hear your thoughts on my first page in forever...and I promise to pass on any virtual pats left for Gabriel!


Stampin Supplies:
Stamp Set: Office Accoutrement, Big Deal Alphabet
Ink: Stampin' Write Markers
Card stock: Brocade Blue, Real Red, Whisper White
Paper: Summer Picnic, Old Olive Prints
Punches: 1 1/4" Circle, 1 3/8" Circle, Photo Corner, 1/16" Handheld
Accessories: Mat Pack, Crafter's Tool Kit, Linen Thread, Brocade Blue Wide Grosgrain ribbon, Silver Brads (vintage pack), Earth Elements Buttons, Journalling Pen, Paper Snips, Stampin’ Dimensionals, SNAIL adhesive.
All supplies available from Stampin' Up!

July 30, 2008

Dream in 3D

One of my favourite things about Stampin' Up! is the versatility of the products. Not only are they perfect to make beautiful boxes, bags, cards and scrapbooks, they are also wonderful for home decor. I thought I'd show you what I worked on yesterday.

This started as a plain, raw wood word and with a little paint, varnish and lots of coordinating Stampin' Up! products, it became something to inspire me as it hangs above my computer. I used my favourite colour - Soft Sky. The paper is from the Spring Silhouettes pack, the ribbon is double stitched and the retired organza. All other embellishments are from the beautiful Pretties kit - the flowers are easily coloured using a Sponge Dauber and a little ink. Instantly dry and they match perfectly!

UStamp

We're down to the last couple of days for UStamp sign-up at the special low price. Follow the link on the right before the price goes up $5 next month. UStamp class kits are still available, kits will start going out this Friday! The kit will be available for purchase throughout the UStamp class duration, payment can be made via cheque, cash, bank deposit or credit card. For everyone already signed up - I can't wait to go to Stampin' University with you - keep an eye on your inbox for the notice your kit has shipped!

Stay tuned for a cute home decor idea using the class kit supplies too!

Hope everyone had a good day and that this wild weather hasn't affected you too much!

May 29, 2008

Thanks Mum!

Here's a card I made earlier in the week - I'm sharing it now because I think my Mum should receive it today! I hope so - if not, here's a card for you Mum! When I visited a couple of weekends ago, Mum had a copy of a cookbook I love and have always wanted (20c at the Salvation Army shop - can't beat that!) and she also let me brazenly steal the cutest set of plates right from her display shelf! They are adorable, dessert plates with chocolate truffles and other yummy things engraved in them. The cookbook is an old one by Alison Holst for Microwaves - it has some really great recipes in it, good microwave recipes can be hard to find!

I've noticed I'm using a lot of blues in my cards lately! I think it's because I'm so inspired by our new In Colours for the year. This one uses something very different though.....Not Quite Navy! This is a colour I had never used and I wanted to challenge myself to make something nice with it. I used the Colour Wheel tool to help me decide what to pair it with - Bashful Blue. I then noticed some gorgeous So Saffron paper on my desk from this months promotion - and I was ready to go!

I also used a stamp set I've never inked. I have had a play with this one before, courtesy of my upline Louise (Every demo worldwide got this set as a gift from Stampin' Up! last year - just a little bit before I joined! Isn't that a great perk to being a demo though, what's better than free stamps?!) It's called Time Well Spent and is one of our wonderful hostess sets this year. I just had to earn it, it's a wonderful set, and has soooo many images. Here's the step by step:

  • Stamp the butterfly image from Time Well Spent randomly over a Not Quite Navy card base using Versamark ink. This will give a lovely watermark appearance.
  • Stamp the large flower on Whisper White using Basic Gray. I meant it when I said Basic Gray is the new black - it's so nice to colour with.
  • Colour with blender pens and Watercolour Wonder Crayons. I used Not Quite Navy, Bashful Blue and So Saffron. Cut out.
  • Colour a flower from the Pretties kit also using your watercolour wonder crayons and a blender pen or water brush. This is my favourite way to colour these flowers, you can shade them exactly as you want them and it dries almost instantly.
  • Adhere the flower to your stamped and cut out image, then punch a large hole using the Crop-a-dile and set a Pewter Jumbo Eyelet in the center. Add a clear Rhinestone Brad, also from the pretties kit, by threading it through the eyelet.
  • Cut a Bashful Blue scalloped edge using the Slit Punch. Adhere behind a piece of the So Saffron prints paper which has a piece of Bashful Blue Striped Grosgrain ribbon tied around it. Adhere another strip of Bashful Blue behind the other side of the So Saffron - this is a cheats way to get a layered look. Perfect to use up little scraps of card.
  • Attach the So Saffron layer to the card base. Adhere the flower using Stampin' Dimensionals.
  • Stamp "Hugs & Kisses" from the So Many Sayings stamp set (level one - hostess) by inking with a Not Quite Navy marker on Bashful Blue card.
  • Punch out using the Word Window punch and cut off one edge. Sponge lightly using Bashful Blue ink around the edges.
  • Add a Pewter brad from the Vintage collection to the round end of the punch, and attach to your card using Dimensionals. That's the front done!

  • For the inside, adhere a piece of Whisper White card stock. Stamp the butterfly in Basic Gray.
  • Adhere a strip of the So Saffron paper, partially covering the butterfly.
  • Stamp the butterfly again onto scrap card and colour with Watercolour Wonder crayons and a blender pen.
  • Cut out the body of the butterfly, omitting the antenna. Adhere this over the first stamped image using Dimensionals for a 3d effect and making sure to line up the antenna where they should be.
I hope my Mum likes this little thank you, I had so much fun making it for her!

If you would like to find out how you can earn the Time Well Spent or So Many Sayings sets for FREE please send me an email. Stampin' Up! is also looking for demonstrators New Zealand wide - please email me if you would like to make your hobby a fun and rewarding business opportunity, I'd love to have you join my fun and enthusiastic team!

Happy Stampin'
Sarah

Stampin' Supplies:
Time Well Spent and So Many Sayings stamp sets.
Not Quite Navy, Whisper White and Bashful Blue card. So Saffron Prints paper.
Basic Gray and Versamark ink.
Watercolour Wonder Crayons.
Blender Pens.
Slit and Word Window punches.
Sponge Daubers.
Pewter Jumbo Eyelets.
Crop-a-dile.
Pretties Kit.
Vintage Brads.
1/16" Handheld Punch.
Bashful Blue Striped Grosgrain ribbon.
Stampin' Write marker - Not Quite Navy.
Stampin' Dimensionals.
SNAIL adhesive.
All supplies available from Stampin' Up!

April 16, 2008

In Colour Birdy

I wanted to try colouring an image with all the new In Colour ink pads. I used the technique shown in this post:
http://thinkingstamps.blogspot.com/2008/03/watercolouring-with-su-inkpads.html I used a blender pen instead of an Aqua Painter for this image though. It blends the colours together beautifully. If you look carefully you can see I used Wild Wasabi and River Rock on the flower so all six new colours are there!

I was so excited to find out my favourite bird image fits in the new Scallop Circle punch! You have to line it up really carefully, but it looks great. Here's the step by step:

  • Stamp the bird image in Stazon. Colour using the above technique. I blended Soft Sky and Blue Bayou on the Bird, and Groovy Guava and Purely Pomegranate on the flower petals.
  • Cut bird image out using Scallop Circle punch. Sponge around the edges with Soft Sky ink, and a tiny bit of Blue Bayou. Dot around the edge with a white gel pen.
  • Stamp Polka Dot background on Groovy Guava textured card stock with Purely Pomegranate. Sponge the edges with Guava and Pomegranate.
  • Use the 1/2" Circle punch to cut the corner detail on the Guava layer. Add silver brads to the corners of the Pomegranate layer.
  • Layer onto Blue Bayou and Soft Sky textured card.
  • Sponge three small flowers from the Pretties Kit with Groovy Guava. Attach to card stock with silver brads.
  • Stamp the Get Well sentiment onto Whisper White card stock. Follow the same sponging and dotting guidelines as the focal image. Cut out using the Word Window punch and layer onto a Blue Bayou layer cut using the Small Oval Punch.
  • Layer everything together, using SNAIL for the largest Guava layer and Stampin' Dimensionals for the Blue Bayou layer, bird image and sentiment.

I'm addicted to our new colours already! They are so rich and work well with each other or many of our regular colours. The new textured card stock is so lovely to work with too, it adds real dimension to your work.

Just a hint: When lining up brads on your work, use the clear template from the Mat Pack - perfect brad or eyelet placement every time!

Hope you're having a great week,
Sarah

Stampin' Supplies:
Fun & Fast Notes and Polka Dot Background Stamp Sets.
Blue Bayou, Soft Sky, River Rock, Purely Pomegranate, Groovy Guava and Wild Wasabi Ink for sponging and colouring.
In Colour Textured Card. Whisper White card.
Stazon Ink.
Blender Pen.
Sponges.
Word Window, Scallop Circle, Small Oval and 1/2" Circle Punches.
3/16" Handheld Punch.
Signo White Gel Pen.
Pretties Kit.
SNAIL adhesive.
Stampin' Dimensionals.

All supplies available from Stampin' Up!

April 13, 2008

Priceless in Blue

I promised a card using one of our new stamp sets, and here it is! This was one of the cards I demonstrated at workshops last week, using lots of our beautiful new releases. I apologise for the poor photo - I had to keep the blue tinge so the colours would be as true to life as possible!
Here's the step by step:

  • The Butterfly was stamped using the Rock and Roll technique. This is a really simple one, but I'll try and get a tutorial up this week so you can see it in photos. All you have to do is ink your image in a light colour, here I've used one of our gorgeous new In Color releases - Soft Sky. Then simply move your image in a circular motion around a darker inkpad, here I've used Blue Bayou, trying to only get ink on the outer edges of your image. Try it - you'll see why it's called Rock and Roll!
  • I stamped the butterfly again using the same technique onto a piece of scrap card then carefully cut it out.
  • I then stamped the smaller swirl image behind the butterfly as a trail. Part of this stamp is dotted, so I pierced the dots for added interest.
  • The sentiment is stamped in Blue Bayou - aren't this years new colours gorgeous?!
  • I used the new Photo Corner Punch to make the corner piece with some of our new textured cardstock. This comes in packs of 24 12x12 sheets for $25.95, so it's a great deal. Before layering the corner together with dimensionals cut in half, I added three silver brads.
  • The flower in the bottom right corner is from the amazing Pretties Kit. All the flowers are white, and are so easily coloured using almost all the colouring tools Stampin' Up! offer. Here I've just lightly sponged the flower with Soft Sky ink, then used a mini glue dot to attach a half pearl center.
  • The second butterfly was attached with a mini glue dot and the wings were slightly curled.
  • The card was layered together using SNAIL adhesive. The total card size is 4"x4" - it fits into a regular sized envelope for cheaper postage.

I hope you like this one, I just adore these colours together and this stamp set is fantastic to work with. The images are so versatile!

Happy Stampin'
Sarah

Stampin' Supplies:
Priceless Stamp Set.
Soft Sky and Blue Bayou textured card stock. Whisper White card stock.
Blue Bayou and Soft Sky inkpads.
Photo Corner Punch.
Silver Brads.
Handheld 1/16" Punch.
Pretties Kit.
Stampin' Sponge.
Stampin' Dimensionals.
SNAIL Adhesive.
Mini Glue Dots.
All Supplies available from Stampin' Up!