April 30, 2011

Fabulous Floss!

Saturday means it's time for another OCC challenge - this week the lovely Jen has challenged us to use embroidery floss on our projects. I have a rather large collection of embroidery cottons because I used to do a lot of cross stitch, so it was fun to pull them out and drool over all the colours!
I decided to use my floss to crochet some trim for my card. I made it up as I went along, but it's just basic stitches in a scallop pattern. I love the sheen the gorgeous cotton has in real life - if you're interested, the colour is DMC 402.

The sketch for my card is the current MFT WSC, the image is You're So Tweet - one of my favourite Pure Innocence sets, she is coloured with copics and paper pieced.

I had a comment the other day asking how I use the Perfect Posies dienamic to create my flowers - I simply cut them, then use a foam mat and the back of my piercing tool to create an indent in each petal. Sometimes I will use the pointy end of a paper piercer to curl the edges of the petals a little and I often add some sponging around the flower edges.
Inside my card I used scraps of paper and a line of cross stitches with the floss to tie it all together.

I hope you'll join us at Our Creative Corner this week - be sure to head over and see what the rest of the design team have come up with!

Stamps: You're So Tweet, Essential Sentiments (MFT Stamps) Cardstock: Kraft, Whisper White (SU) Paper: Stella and Rose Mabel (MME) Ink: Tuxedo Black (Memento) Kraft, Early Espresso (SU) Dies: Faux Crochet Border, Perfect Posies, Rounded Banner Die-namics (MFT Stamps) Long Rectangles Nesties (Spellbinders) Other: Button (SU) Brads (Basic Grey) DMC Floss 402, Copic Markers

Winner!

Congrats to lucky commenter #15 - Patti J from Cherish Each Precious Day - you have won your choice of the two new templates from Creations by AR! Please email Adela with your pick - wooohoo!

April 28, 2011

New Templates from Creations by AR!

 Read on for your chance to win!

I'm so excited it's time to finally show you the two newly released templates at Creations by AR! Let's jump right to it, first up is the Ribbon Keeper!
Isn't it great! I have a lot of ribbon and I love this storage solution - best of all - this template comes with TWO different sized boxes, this is the smaller ribbon keeper which also stores embellishment containers - the larger one is perfectly sized for those big spools of ribbon. Enough chatter - you want to see how it works, right?!
Cute right?! Best of all, the ribbon keeper goes together so quick and easy. I've decorated mine simply with some punches and die cuts and I just love it.

Ready for another amazing storage solution?
This is the Menu Keeper....
I was so delighted when I saw this template - I can't tell you how long I've had all the stamps to make my recipe cards and just haven't bothered to use them - now I can organise all my favourite recipes cutely! This template comes with the box design, the interior dividers and also a stand for your recipe cards!
My box used just a couple of sheets of cardstock and ONE sheet of 12x12 paper - love that! Best of all, this template isn't just for recipe cards - you could use it to sort photos, as a card organiser, or how about somewhere attractive to store all those pesky bills that seem to always fill your mailbox?

You can get the templates now at Creations by AR....
....but how about a chance to win the template of your choice for FREE?! Simply leave a comment on this post and one lucky person will win their choice of ribbon or menu keeper!

Want more chances to win? Hop along to see the other amazing design team creations and be sure to leave comments so you'll be in the draw!

Ribbon Keeper: (all supplies from SU!)
Stamps: Calender Alphabet Cardstock: Kiwi Kiss Paper: Bella Rose Ink: Chocolate Chip Dies: Little Leaves Punches: Owl Punch, Eyelet Border, 1/4" Circle Other: Kiwi Kiss Ribbon, White Gel Pen

 Menu Keeper:
Stamps: Lovin from the Oven (MFT Stamps) From the Kitchen Of (SU) Cardstock: Wild Wasabi, Marina Mist, Whisper White (SU) Paper: Kaisercraft Ink: Wild Wasabi, Marina Mist (SU) Dies: 1/4" Rosette Die-namic (MFT Stamps) Nestabilities Punches: Scallop Edge, Circle Punches (SU) Other: Marina Mist Ribbon (SU)

April 27, 2011

The Luna Scarf

Brrrr! It feels like the middle of winter here in NZ at the moment, not autumn like at all. I got up this morning to find my kitchen floor covered in water that had blown in under the door - you can imagine how wet and cold it is!

So while I'm all snuggled up in my slippers and merino wool sweater, I thought I'd share a recent crochet project. I'll apologise in advance for the terrible photos - it was a dreary day when I took these!
This is the Luna Scarf. Somewhat famous in the crochet and knitting world - it's been made hundreds, if not thousands of times by crafters all over the world. It's my favourite free scarf pattern, this red one is the second I have finished, my first was a pale green and I have a ball of burnt orange yarn waiting to be turned into my third Luna Scarf.

Why Luna? This scarf is based on one worn by the character Luna Lovegood in one of the Harry Potter movies, the pattern was kindly created and shared by PinkLeo on Craftster.   
It's a long thin scarf, so fun to crochet, and depending on the yarn used is suitable for many seasons. I tend to use a soft acrylic 8 ply, so my scarf comes out a little thicker, but if you scroll through the crafster photos you'll see lots of examples in many different types and weights of yarn.
This is a scarf that begs to be blocked. Blocking helps the scarf lay the way it should and seperates the pattern out so you can see all the gorgeous detail. With natural fibres, you simply wet, shape, then let dry. Because I use acrylic, I "kill" the fibres using steam which gives the scarf a super soft finish - you'd never believe it was such cheap yarn! The left side of the photo is the pinned and steamed scarf, the right side is how the scarf lay before being blocked.
Apologies for the super low-res webcam photo! This is how I wear my red luna scarf - I seamed it together with a twist in the middle so it can be worn cowl style. I find it plenty warm enough on most days, and if it gets too warm, it's easy to untwist and wear long and loose - I love that particularly when going out to a basketball game, where I want to keep my stuff at hand and not put my scarf on the floor. 

I'm currently crocheting a lovely thick and warm grey scarf from another pattern (that I think I'm going to change and make into a buttoned cowl) then I'll get started on my orange Luna Scarf.

I'll be back late late tonight (my post is scheduled for 1am NZ time) with my first Creations by AR Blog Hop - that means prizes for you! Yippee!

April 25, 2011

Easel Card

Here it is - a little late - but it's OCC time! This week Vicki has asked us to create easel cards. If you need instructions, you can find a tutorial here - from there you should be able to create any size you desire.

I've used this weeks MFT sketch and my stamps are from the last MFT release - this is one of the Pure Innocence images I hadn't made a sample for yet (I still have a couple more!) I made this card for my little brother who had a special graduation at his school - hopefully he'll love it.
The image was coloured with copics, and I made the flowers using the Perfect Posies Die-namic. The sentiment on the flag is two seperate stamps put together on one block.
I've used the Upper Crest punch from Fiskars, and the papers are Basic Grey.

I hope you'll play along this week at Our Creative Corner, don't forget to head over and see what the rest of the team came up with!

Stamps: Graduation Boy & Girl (MFT Stamps) Cardstock: Buckaroo Blue, Real Red, Whisper White, More Mustard (SU) Paper: Granola (Basic Grey) Ink: Real Red (SU) Dies: Pretty Posies Die-namic (MFT Stamps) Punches: Upper Crest (Fiskars) Other: Ribbon, Buttons (SU) Copic Markers, Twine

April 24, 2011

Checking In....

Don't worry, I haven't forgotten I owe you all an OCC card! Shan and I went away for a little romantic getaway  at the last minute, leaving my sample half finished. It's done now - but the weather is making it impossible to get a decent photo, so I'll take it tomorrow. I hope your Easter break has been just as fun - enjoy spending time with loved ones!

April 21, 2011

April SFYTT

If you haven't heard about Jen's SFYTT challenge - first, you've been missing out! Second, you really should play along, and it's never too late to start! Jen has great sketches, she's one of my fave stampers and just an all around cool chick. This card uses her April sketch. You'd think it would be easier to find time to play with a monthly sketch - but I always seem to leave it to the last minute!
This is a pretty simple card for me - but I loved the layout and image so much I wanted to keep it clean. My PI girl is paper pieced and coloured with copics. The image layer was sponged while still inside the nestability frame and dotted with a chocolate chip marker.
The papers are MME - Tickled Pink. Have a wonderful Easter - I have some school work and lots of crafty stuff planned, as well as a basketball game and some time out with hubby - doesn't get any better! *hugs*

Stamps: Blooming Good Day (MFT Stamps) Cardstock: Chocolate Chip, Whisper White (SU) Paper: Tickled Pink (MME) Ink: Tuxedo Black (Memento) Dies: Square Nestabilities (Spellbinders) Punches: Eyelet Border (SU) Other: Orchid Ribbon, Choc Chip Marker, Crystal Effects (SU) Copic Markers, Buttons, Twine

April 19, 2011

Introducing....

Riley! You may have met this cute-as-a-button character before, but if not, prepare to fall in love with this adorable Moose!
I'm so excited to be a moose-mate on the newly extended Riley design team, there are some talented stampers in this bunch, let me tell you! You can visit the Riley blog here and the Riley store here. Riley and Company are also on Facebook.

Riley is offered in gorgeous rubber (wood, cling or unmounted) and is almost too cute for words. I hope you'll enjoy seeing my Riley creations - and there will be blog candy for each release so you may win a Riley for your collection, yippee!

Today's Riley challenge is a colour combo from the wonderful Cindy - Aqua, Yellow and any shade of Brown. I've used Praying Riley for my card and added some flocking to the pom-pom on his little nightcap.

You might notice something new on my cards in the coming weeks - I did it...I finally caved and bought some Copic markers! I resisted for so long, but recently have been frustrated with the limitations of colouring with water-based markers - I'm in love already! I'm waiting for a set of 72 markers to arrive from America, but until then expect to see a lot of browns, grays and skin tones because I have a very limited collection!

We'd love to see you play along with the Riley and Company challenge (challenges happen every two weeks) if you upload to an online gallery, please use the keyword Riley0811 and be sure to head over to the Riley blog for the full list of designers inspiring you today!

Stamps: Praying Riley (Riley and Company) Cardstock: Chocolate Chip, Daffodil Delight, Whisper White (SU) Paper: Stella & Rose Mable and Gertie (MME) Dies: Oval Nestabilities (Spellbinders) Punches: Apron Lace (Fiskars) Other: Pearls (Kaisercraft) Swiss Dots Embossing Folder (Provocraft) Copic Markers, Satin Ribbon, Button, Caribbean Twine, Brads

April 16, 2011

OCC Easter Projects

Hi everyone, it's time for another fun OCC challenge. This week we're making 3D (not cards!) Easter projects. I have some fun news first - the lovely Adela from Creations by AR has asked me to join her very talented design team, and I'm delighted to be able to share her wonderful templates with you!
Please be sure to visit the store to see the amazing cutting files available for purchase. Best of all for those of us without electronic cutting machines, there's a PDF version too! My project today uses the adorable Carrot Box - isn't it cute? and it's only $1!
I printed the template on Tangerine Tango cardstock and stamped in the same ink with a Linen background stamp. I cut the carrot tops from some Pear Pizzazz paper, and sponged both these and the carrot. After scoring and adhering the box (it came together SO easy!) I created a cute little tag to adorn my box.
The tag base is a diecut from the Sweet Stack Labels Die-namic. The stamp and sentiment are from Verve. I added some shading on the bunny with a watercolour crayon and finished the tag with some twine, twill and a button.

Be sure to head on over to Our Creative Corner and see all the wonderful Easter projects! Thanks for stopping by!

Template: Carrot Box Stamps: Some Bunny (Verve Stamps) Linen Background (SU) Cardstock: Tangerine Tango, Very Vanilla, Crumb Cake (SU) Paper: Pear Pizzazz & Peach Parfait DSP (SU) Ink: Early Espresso, Tangerine Tango, Pear Pizzazz (SU) Dies: Sweet Stack Labels Die-namics (MFT Stamps) Oval Nestabilities (Spellbinders) Other: Twill, Button (SU) Rhinestones (Kaisercraft) Twine (MFT Stamps)

April 15, 2011

Addicted...

TGIF! ok...in New Zealand at least. Tonight is the opening night of Wellington Saints basketball - we have season tickets this year, so my Fridays will be spent in a (cold) stadium. Good excuse to wear my growing collection of self-crocheted scarves - todays dilemma is do I want to take the one I'm working on right now with me to crochet during time outs or is that just too geeky?(I'll probably end up taking it - it'll keep my hands warm)

So I have an addiction - and I'll admit it right now because you MUST have noticed. I LOVE this Fishtail Banner Die-namic (it's only $8.95! crazy!), and I also seem to be sponging everything with crumb cake ink lately. It's not a problem...yet...I probably could make a card without these two things....but, I just don't want too! Let me know if you think I need an intervention further down the road.
I've used this weeks awesome WSC #15 - I've missed two sketches so far this year, I need to go back and catch up because they have all been awesome! I'm also playing along in the Ways To Use It challenge at SCS to use people stamps on your creation.

The papers are from the Stella and Rose Hazel pack by MME, and I think that might be one of my favourite Pure Innocence images, that giant heart is just too cute. I'm in love with these colours - aqua and red together rock my world - I have an entire Pinterest board dedicated to this combo.
Whew...that gorgeous sentiment JUST fit on my layer - which is great, because it is perfect.

Wishing YOU, all my lovely visitors a wonderful day and lots of happiness! Have a great weekend!  

Stamps: Happy Thoughts, Love You With All My Heart (MFT Stamps) Cardstock: Ruby Red, Basic Gray, Very Vanilla (SU) Paper: Stella and Rose - Hazel (MME) Ink: Graphite Black (Brilliance) Riding Hood Red, Crumb Cake (SU) Dies: Scalloped Scallops, Fishtail Banner Die-namics (MFT Stamps) Punches: 1/4" Circle (SU) Other:  Brads, Markers (SU) Flower Embellies (Heidi Grace) Velvet Ribbon, Spica Glitter Pen (Copic)

April 13, 2011

Take Joy

I'm back - and with yet another unusually shaped card. It seems I've been making a bunch of scalloped or square cards lately - my nesties and other die cuts have been getting a work out!

I made this card for two challenges, the April Get Your Diva On challenge, and this weeks SCS colour combo. Normally I dislike recipe challenges....but Amber's diva challenge was so cool, the recipe depended on your first initial! My recipe was to use rhinestones, lace, glitter, make a long and tall card using green, yellow and pink!
I pulled out what I think has to be my favourite Verve set ever. Polka dots, flowers and butterflies - you just can't go wrong! Hopefully you can see all the recipe elements - if you're looking for the glitter, I ran those banners through my xyron, and they are coated in crystal fine glitter from Martha Stewart.
Inside I've left a nice long panel for writing a message and couldn't resist adding more bling and another cute flower. Have a wonderful day, thanks for stopping by! 

Stamps: Petals & Stems (Verve) Cardstock: Pear Pizzazz, So Saffron, Whisper White (SU) Paper: Blushing Bride and Pear Pizzazz (SU) Ink: Pear Pizzazz, So Saffron, Blushing Bride (SU) Dies: Faux Crochet border and Fishtail Banner Die-namics (MFT Stamps) Long Rectangles Nestabilities (Spellbinders) Punches: Scallop Oval (SU) Other: Ric Rac (American Crafts) Rhinestones (Kaisercraft) Crystal Fine Glitter (Martha Stewart) Eyelets, Lace, Twine 

April 12, 2011

Friendship is Shelter

Happy Tuesday! It is a gorgeous day here today - I've just come in from sitting in the sun, 10 minutes and I was starting to burn. Today I've got my card for WSC #14 - this was a really fun sketch, I made a large 5-1/2" square card.
I've used this adorable Jolinne that I won a few months back - about time I inked her up! I watercoloured her (I know, I'm such a dinosaur, I need to get some copics already!) and added some crystal effects, white gel pen and liquid applique accents.
Those papers are so fun - they are MME Tickled Pink. Have a wonderful day!    

Stamps: Jolinne - Friendship is Shelter (MFT Stamps) Cardstock: Whisper White, Chocolate Chip (SU) Paper: Tickled Pink (MME) Ink: Graphite Black (Brilliance) Baja Breeze, Going Gray (SU) Dies: Textile Rectangle Die-namic (MFT Stamps) Circle Nestabilities (Spellbinders) Punches: Upper Crest Border Punch (Fiskars) Other: Chocolate Chip Ribbon, Crystal Effects, White Gel Pen (SU) Rhinestones (Kaisercraft) Twine (MFT Stamps) Liquid Applique

April 11, 2011

Two Hearts...

Uh oh - I have a bad case of Monday-itis. So while I procrastinate about finishing the essay I have due tonight, I thought I'd share the Anniversary card I made for Shan, that's semi-constructive, right? I'm also drinking coffee, so I'm multi-tasking! (that's my excuse and I'm sticking with it)

I used the awesome Mojo 185 sketch (I have to find time to play more of Julee's sketches, they are amazing!) and the colours from Color Throwdown 136 - LOVE this combo!
Permit me a moment of ego? I love this card! Those birds are just too cute. The stamps are from Verve's Anniversary Birds set. The papers are the Stella and Rose Mabel pack that served as inspiration for the colour challenge. I HAD to work that wood print in as my neutral - the 5th Anniversary is 'Wood' so it was perfect!

The rolled flowers are, of course, MFT Die-namics as are the jumbo scallops.
Apologies for the bad photo of the inside, I had to take it with the flash before I wrote all the mushy stuff!

Ok, my coffee has kicked in - time to go jump into some poetry critique!

Stamps: Anniversary Birds (Verve Stamps) Cardstock: Kraft, Early Espresso, Very Vanilla (SU) Paper: Stella & Rose - Mabel (MME) Ink: Graphite Black (Brilliance) Early Espresso (SU) Dies: Jumbo Scallops, Rolled Rose and Mini Rolled Rose Die-namics (MFT Stamps) Oval Nestabilities (Spellbinders) Other: Button (SU) Jumbo Brads (Making Memories) Ribbon (American Crafts) Embossing Folder (Provocraft) Twine (MFT Stamps)

April 9, 2011

OCC - Afternoon Tea

Happy Saturday! It's time for another Our Creative Corner challenge - and this week Sharon wants to see creations using the theme "Afternoon Tea". I'm sharing the Marie Antoinette themed afternoon tea party invites I made for my friend Janine's birthday. You've already seen the cake I made in this post here.
This is the inspiration photo Janine gave me....and here's the card...
I took the colours, the top note shape, pearls, flourishes, doily accents and the bling and incorporated them into the card. It took awhile....but it's so nice to see a pile of matching cards at the end of a long crafting session!
I hope you'll join us this week at OCC - I can't wait to see your creations. Be sure to leave the design team some love too!

April 8, 2011

Love Yourself

Hi - thanks for stopping by! As this posts, I should be out enjoying a lovely brunch with Shan, it's our 5th wedding anniversary today, and this year we will have been together (hang on, I have to count on my fingers AND toes...) 14 years! Yup, sweethearts since our second year of high school. Shan's taken the day off work and we've got a fun day of good food, relaxing and shopping for presents planned - bliss!

It seemed appropriate to take a closer look at this little box I shared during the MFT release party earlier in the week, I went all shabby with this one, and I love how it turned out.  
I created the central piece using the 1/4" Rosette die-namic die, then running it through a border punch. If you look closely you'll see I didn't take too much care to line that punch up very well - oops - it's supposed to be shabby, so I just went with it lol I can't wait to try this with a few different border punches.
I did some rough cross stitching on the lid of the box using twine....then grunged it up a little with a sponge dauber. I also used my little air blowy thing (why can't I remember what that's called?!) with a marker, and dripped some reinker in random spots.

I distressed the ribbon a little by running my piercing tool through it and giving it a bit of a twist. The swirl stamped randomly on the box and the sentiment are from the new Own Your Story set by MFT Stamps.

Have a wonderful day!

Stamps: Own Your Story (MFT Stamps) Cardstock: Riding Hood Red, Basic Black, Very Vanilla (SU) Paper: Stella and Rose Hazel (MME) Ink: Graphite Black (Brilliance) Dies: 1/4" Rosette Die-namic (MFT Stamps) Box #2 (Sizzix) Punches: Threading Water (Fiskars) Other: Striped Ribbon, Markers, Reinker, Antique Brads, Crochet Trim, Button Brads (SU) Twine (MFT Stamps)

April 6, 2011

MFT Shop & Hop!

It's time! all those amazing sets and dies we've been seeing the last five days are available now at My Favorite Things! Thank you SO much for all your support and comments over my time as guest designer, it's been a blast and I'm so sad it's over. I've said it before - the MFT team is AMAZING and creating alongside them has been a dream come true.

If you're blog hopping along with us, you will have reached me via the ever-so-talented Melody, if you need to start at the beginning (and you don't want to miss a single project!) you'll want to click over to Kim's blog to start the hop. 

I've saved one last card for you (that's not really true, I have a couple more in the vault that I shared at the release party) and this one is my favourite of all the cards I created for the release. It uses the cute-as-a-button Flopsey Fishing set.
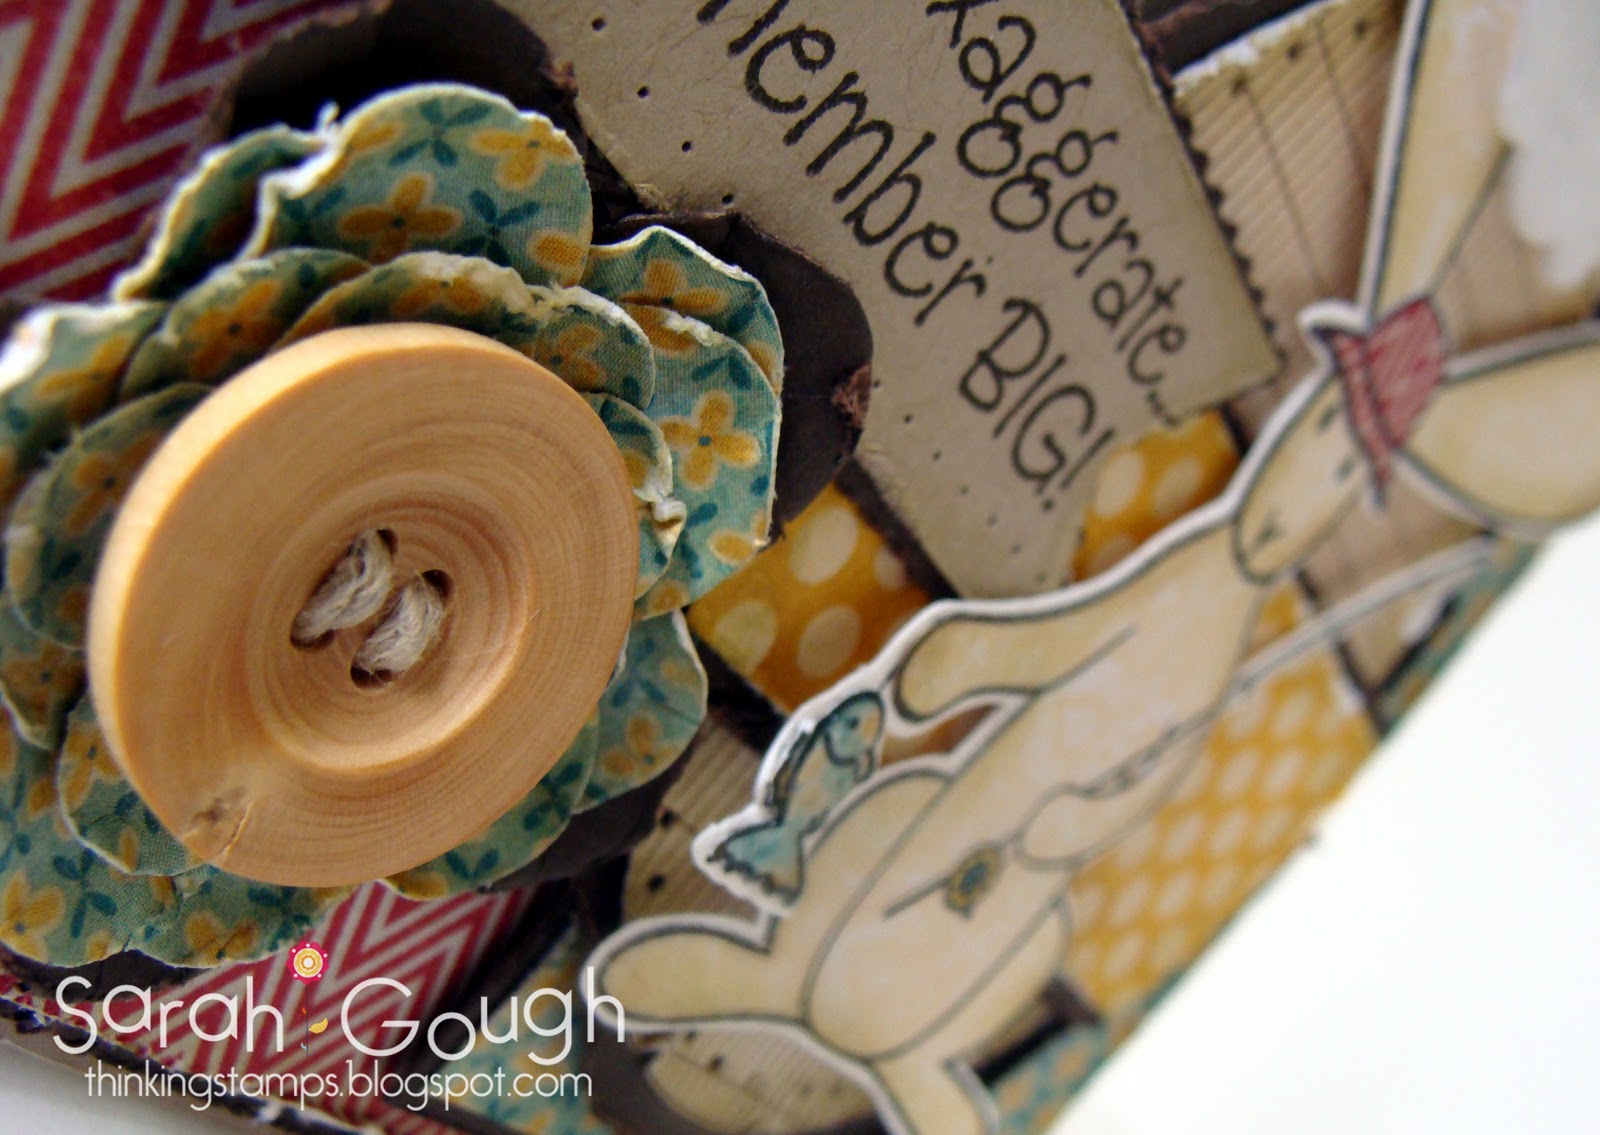
Isn't he adorable? I was a little nervy about colouring him, so I paper pieced and sponged instead. All the layers are sponged and distressed. The papers are from the MME Stella and Rose Gertie collection.  I've used a couple of the new Die-namics again - and see that sentiment layer? I used the new Fishtail Banner for that one too!

I cut two of the plain sided banners, taped them together and used them as a template to hand cut a solid piece for stamping on. If the join doesn't bother you, you could just use them as is. I cut two of the scalloped banners and taped them together to layer my sentiment on - voila, perfect sentiment banner!
Such cute sentiments in this set! I created my flowers with the Perfect Posies die by sponging, distressing, then using my soft piercing mat and the handle of my piercing tool to create an indentation in each petal.

Here are the Die-namics I've used:


Thanks again for stopping by - thanks for all the love, and happy shopping!!!
   
Stamps: Flopsey Fishing (MFT Stamps) Cardstock: Kraft, Early Espresso (SU) Paper: Stella & Rose - Gertie (MME) Ink: Graphite Black (Brilliance) River Rock, Early Espresso & Kraft (SU) Dies: Cloud Trio, Pretty Posies & Fishtail Banner Die-namics (MFT Stamps) Oval and Square Nestabilities (Spellbinders) Punches: 1/2" Circle (SU) Other: Hemp Twine, Sponge Daubers, Crystal Effects, Distressing Tool (SU) Embossing Folder (Provocraft) Felt, Wooden Button, Eyelets