January 13, 2010

Thank You Always

Last night I made a thank you card using the colours from SCS CC253. It's just as well I got it done last night, because the banging caused by 6 men currently installing a new roof on our house isn't exactly conducive to creativity! My poor cats are both hiding under the bed - can't say I blame them!
The colours were Chocolate Chip, Elegant Eggplant, Pretty in Pink plus any neutrals (I used Very Vanilla) I knew these colours would lend themselves well to a pretty card, so out came the satin ribbon, Scallop Border punch and what has to be one of my all time favourite stamp sets, Always.

The long tall layer, bird and photo corner are all popped up on Stampin' Dimensionals.

My camera always has trouble with these darker colours, so excuse the poor photos. You'll probably see a bunch of thank you cards from me over the next wee while - I need lots of them!


Supplies available from Stampin' Up!

January 12, 2010

Clear Sleeve Gift box

While laying awake a few nights ago I decided I wanted to make a clear-top gift box. Something simple that could be embellished prettily. This morning I pulled out the stamps I wanted to use, grabbed some paper and luckily remembered to take photos! Here's how you can make one too.

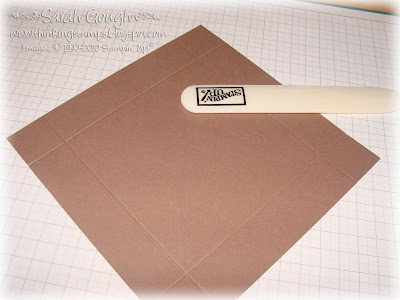
Start with a square of cardstock. I've used Close to Cocoa. Mine is 6x6" but you can use any size you want. Score all four sides at the height you need. I scored at 1 inch.

Snip each side as shown. Pre-fold all your score lines. If you are going to stamp your box base, now is the time to do it.

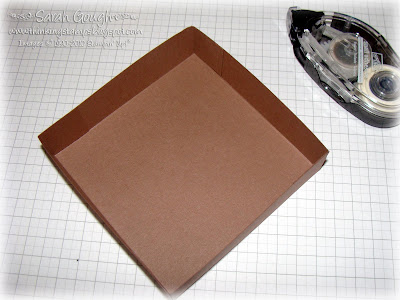
Using some adhesive on the inside of the tabs, stick your box together. Simple right? I've made teeny tiny boxes this way or quite large ones. You could repeat the process with a slightly larger square to make a lid....or carry on as I did...

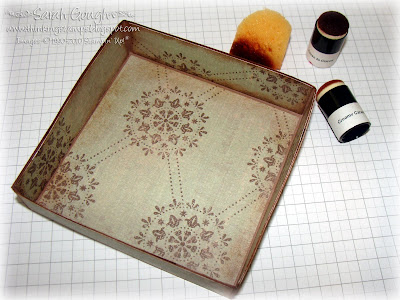
Decorate your box base (if you didn't pre-stamp it). I used strips of Outlaw (retired) designer paper and sponged with Creamy Caramel and Close to Cocoa ink.

Cut a strip of acetate (overhead transparency) the same width as your box (mine is 4 inches). You can also use patterned paper for this step, or try vellum for a lovely semi-opaque effect.

Score your sleeve four times according to the height of your box sides. Make sure to score a little larger than the height of each side of your box so it will fit over your base. Adhere together with Sticky Strip. You can stop here or dip into your ribbon stash and adhere a length on each side of the sleeve, again with Sticky Strip. I used Chocolate Chip narrow grosgrain.

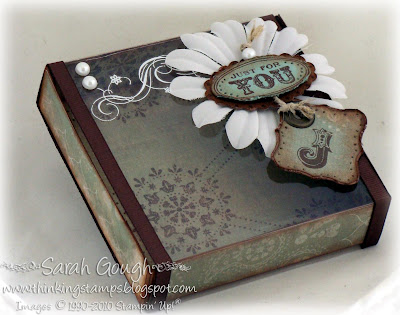
Time to embellish! I used a gorgeous stamp from the Oval All set, along with the Large Oval and Scallop Oval punches. The card stock is Sage Shadow and the ink is Chocolate Chip. The pearls and flower are from the Pretties kit and I used glue dots to adhere these to the acetate.

I waited until I had assembled my sleeve to use a rub-on so I could place it exactly where I wanted it - just place the rub-on on your sleeve, then turn upside down and rub on the inside of the sleeve to avoid misshaping it.

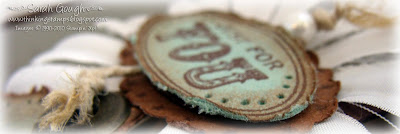
I made a tag by stamping an initial using the Wild West alphabet and punching it out using the Curly Label punch. Layer this on more Close to Cocoa card stock and cut around to get a nice border. A jumbo eyelet and hemp twine finish off your tag. Some more sponging - a bit of piercing and I was done!

I love packaging homemade and store bought gifts in boxes I've made myself - it really adds something special (and of course I can make a card to match!)

Have a creative day,


Supplies available from Stampin' Up!

January 9, 2010

Hooky Goodness

Hi everyone. As promised, here are just a couple of my recent crochet projects. I've spent a lot of time hook in hand lately - and I'm loving the results. If you don't know how to crochet, I highly recommend learning - I taught myself in an afternoon just using resources found on the web.

The stitches are really basic, the hardest thing is probably coming to terms with the abbreviations in patterns and the fact that the US and British terminolgy call different stitches by the same names! Once you get the hang of that you're set though - I've been crocheting for six months now and can see I'll do it for as long as I can hold a hook!

Grab yourself a ball of yarn and a hook (I bet your mum or grandma have one - but they're really cheap regardless) and just give it a go. It's easy to pull out stitches and start again!
Here's a set of coasters I whipped up on Thursday morning. I used Moda Vera's Cupcake yarn - I can't remember the make-up at the moment, I think it's partly Nylon - but it's soooo soft. I love working with it. The pattern for these is in a great book by Melissa Leapman called Cozy Crochet. I had enough of my ball of yarn (yup - the whole set from one ball, I used a 4mm hook) to make a fifth coaster and added a picot edge so it would look pretty sitting under my Nana's vase (I guess it's really my vase now, but I think of it as Nana's vase).
Probably my favourite project this past week has been this GORGEOUS headband from Susan in Stitches. I love, love, love it! I used the same cupcake yarn in a lovely cream colour and found the pattern so much fun I did it all in one sitting. I added some single crochet rows to get the length I needed. Here's a bad webcam pic of it on.
I'm forever tying my mane back, so this was perfect for me. I intend to make many, many more!
My favourite part of the headband is this gorgeous button from my Grandma's button stash. I love being able to use her buttons like this and wear them everyday. I already have a fancy black one picked out for next time, I just need the yarn to go along with it.
Here's a pic of the kerchief I made on Boxing Day. Same Cupcake yarn (there's a reason for that - I originally bought 5 balls in different colours to make granny squares but quickly lost interest!) The pattern for this is also in Cozy Crochet. Love it!
In case any of you wondered, as did my darling hubby, just WHAT that is on my Gerbera's - it's Glimmermist (Shanan thought it looked like mould from a distance! Needless to say, I won't be using the pearl on red flowers again!). It's pretty and sparkly in real life, trust me! Is it wrong to add decoration to something already so beautiful? Not if you're a die-hard crafter, right?!

Have a wonderful weekend,

January 7, 2010

Projects from days gone by!

I had intended to share some of my recent crochet projects with you today - but I've run out of natural light for photos. I'll take some tomorrow (providing the sun comes out here in Welly!)

Here are some projects from last year instead, including a Mother's Day ensemble, the door hanger for my craft room - and a cute card using one of my fav Stampin' Up! images with liquid applique.

I can't remember all the details for these projects, but I'll probably make one of those boxes again soon to share.

Hope you had a creative day!


Some supplies available from Stampin' Up!

January 6, 2010

Christmas Crafting

This Christmas I kept things super simple on the crafting front by opting to make all my Christmas cards the same, and all my gift tags the same design but in different colours. Previous years I've tried to make a bunch of different Christmas Cards...and...you guessed it - just never got finished! This is actually the first year I've posted out handmade cards (shock horror!) although I have made place cards and other handmade gifts before.
I kept the layout for my card super simple. In fact, you've probably seen this layout a dozen times from me before - but I love it, and it's super quick to mass produce using the Scallop Edge punch. I used paper (Ski Slope) and stamps (Tree Trimmings) from the last mini catty, and my oh-so-gorgeous favourite ribbon (Kiwi Kiss double sided satin). The colours are Red Riding Hood Red, Baja Breeze & Kiwi Kiss. The sentiment is from the Best Yet hostess set.

The red ornament is cut out and popped up, and the glitter on both was made mixing Crystal Effects with Fine Supernova glitter. I just dabbed it on with a toothpick - it looks rather overwhelming due to the macro setting on my camera, but had a pretty sparkle in real life.
My tags were quick too. A simple rectangle, edged with the Scallop punch, a cut out and raised tag image, a big bow and some glitter glue and they were done. I used lots of retired colours on these to use up my stash of wide ribbons - the above is Purely Pomegranate.


January 5, 2010

Happy New Year!

2010! When writing my last post, I never thought I'd go this long without blogging - but here we are! I've had a wonderful six months or so, very full, very happy - our new place is perfect for us and we feel more at home in Wellington than ever.

So what have I been up to? Lots of crafting - but not all stamping! In the last few months I re-taught myself to crochet, rediscovered my love of beading and jewellery making, have tackled the fearsome beast that lives in my craft room (a.k.a my sewing machine - very lovely, but with an inexperienced handler) and have dabbled in lots of different areas. I'm pleased to say I got my Christmas cards made, and sent this year (before Christmas....just!) and I'll share my design with you soon. I've also been doing a lot of reading - novels and craft books, so you're sure to see some of that inspiration over the coming weeks.

The holiday season came and went very fast, with a trip to Christchurch to visit my sister Michelle (and her new fiance Terry! - congrats!) and see a concert, then a wonderful visit from my parents and brothers over Christmas. It was our first Christmas in Wellington and it was great. I'll share some snaps below, if you look closely you may see some crafty bits here and there.

My goal in 2010 is to RELAX and not stress about the little things so much. I won't promise to blog everyday - but I do have a lot of things I'd like to share. You'll see some changes, not everything will be stamping related, but hopefully you'll still find plenty of inspiration when you come stop by.

I hope your holidays were great and that 2010 is a productive, creative year for you!


Shanan and Dad at Adventure Golf in Porirua.My first baked ham (under my Mum's expert supervision!) yummy!
Christmas morning - complete with snacks in case lunch was disastrously late. It wasn't. Whew!
One of many gift tags I made. All the same design, but different colours. More on those soon.
A simple table setting - a lovely view! I wanted some new napkin rings - so made them myself (with the help of the fearsome beast)
Leroy and I. He's so grown up!
Shanan and Luna.
Gabriel and moi.
Luna giving Leroy her "what IS that miniature human doing?!" look.
My brother Chris.
Mum and Dad.
Good things come in these pretty little boxes!
Shanan and Leroy and the crocheted wrestler I made Shanan. He has a buddy - I sense crocheted wrestler fights when Shan goes back to work!
Leroy, Christmas night at the Telecom Christmas Tree by the waterfront. He's still so cute - Shanan and I "awwwwwed" when he picked up the phone and said "Hi Santa, it's me."
New Years Day picnic at....um...some beach close to Levin? Trying out the crocheted kerchief I made Boxing day. Don't ask what's up with that weird loop of hair. Shanan didn't tell me it was there when he took the photos because he "thought it looked cute". I guess I need more practice tying it on!
Shanan at the mystery location picnic.

June 16, 2009

Thanks everyone and an update!

Hi all. First off, thank you so very much for all the lovely replies and emails about my Grandma's passing. I read each and every one, and they were so special to me. Thank you for taking the time to share your thoughts, and I'm so pleased many of you were reminded of your own loved ones.

Secondly, where have I been?! Well - in the unexpected news front, we got an email (hmmm, yes, apparently this news comes via email now!) recently saying our rental was being put on the market. With our lease due to expire, we were on the lookout for a new house! So that kept us really busy, but I'm happy to report we got our first choice, and so will be making the move into Wellington......THIS FRIDAY! ahhhhh! So does that explain my absence?

I haven't had time for stamping at all, and sadly had to put off plans for this month's classes (watch out for them next month!) I also haven't had time to blog....and really, what would I show you. Oh? That wee teaser up there?
These are a couple of cute wee boxes I made, oh goodness, it's forever ago now. I had to show you something today and these were in my folder all edited and raring to go! Here's the deal, forgive me for the tardy blog posts...and in exchange, I promise a tutorial for these wee babies, as well as lots of pics of all the crafty goodness that will come out of my brand new craft room! Woohoo! Now that's going to be a fun room to unpack! That said, I do have to pack it first! So I'm off, happy crafting till I see you again - send me positive moving karma while you're enjoying all your inks and beautiful stamps!