Showing posts with label Technique: Masking. Show all posts

February 28, 2013

WSC 113 - Happy Birthday


Hi everyone - it's time for another wonderful sketch from MFT!

Today I've used Doodle Garden - Sweet Friend and created a background using masking and sponging. The sentiments and flourishes are from Finishing Flourishes.
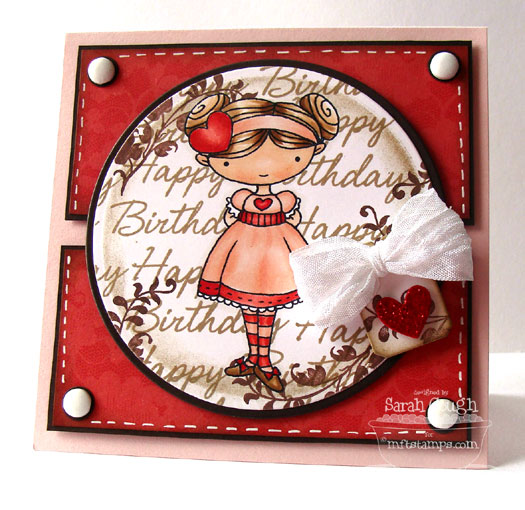
First I stamped and coloured the image with copics. I then created a mask and overstamped the Happy Birthday sentiment from Finishing Flourishes repeatedly. I left the mask on, and cut the image with a Circle STAX, sponging the edges before removing the Die-namics. Lastly I stamped one of the flourish images and removed the mask.


I used the Notched Tag Die-namics and covered the heart in Xmas Red stickles.

The edges of my patterned paper are also sponged with Kraft ink and I faux stitched with a white gel pen.
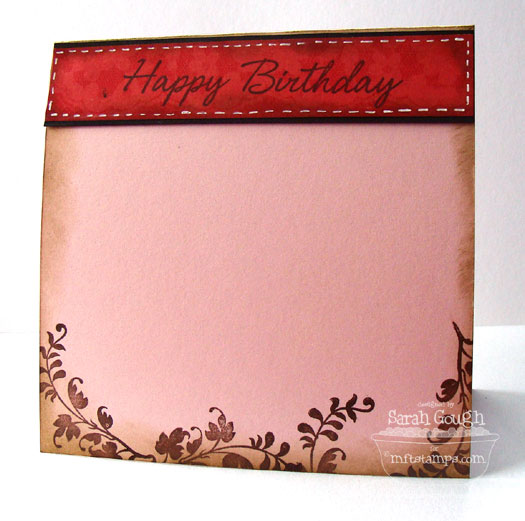
Inside the card I've repeated some of the stamped elements and created a sentiment panel.

Here are the wonderful My Favorite Things goodies I've used today:


Be sure to check out Kim's blog for all the designers playing along this week - you won't want to miss their gorgeous creations!

To play along with WSC, create a card with the provided sketch and upload it to SCS using the keyword MFTWSC113. A new sketch will be posted each Wednesday on the MFT blog and also in the forum. Each week one random winner will win a $15 voucher to spend at MFT, and if you use MFT stamps on your creation, you'll get a $5 bonus taking your voucher win up to $20! We'll be chatting each week on the sketch thread, so come join us in the MFT forum!

 Stamps: Doodle Garden - Sweet Friend (MFT Stamps) Paper: Pretty Party (Crate Paper) Ink: Premium Dye Ink in Kraft (MFT Stamps) Memento Black, Versamagic Jumbo Java  Dies: MFT Die-namics - Circle STAX, Notched Tag (MFT Stamps) Other: Jumbo Brads, Seam Binding, White Gel Pen, Copic Markers

September 8, 2011

WSC #36 - Spa Day


It's time for another awesome sketch from the MFT team! Today I'm using one of the just released Pure Innocence sets - Spa Day.


I wanted to go soft and pretty with this one so tried to keep my copic colouring light. Colouring is still something I want to improve on, I was pretty happy with how this cutie came out. After colouring her up, I masked the image and overstamped the layer with the script stamp from First Class Friend - I love this look!

I also tried my hand at stitching around the oval. Want to know a secret? Those rolled roses don't just look pretty, they also hide the spots that my stitching went a little wild! Fake it till you make it baby! I use my full size sewing machine for sewing on my cards so it can be a little powerful at times, but I'm starting to get the hang of it.


Because I had the mask already cut, I used it on the inside of the card too, adding a little more script under my sentiment.
Be sure to check out Kim's blog for all the designers playing along this week - you won't want to miss their gorgeous creations!

To play along with WSC, create a card with the provided sketch and upload it to SCS using the keyword MFTWSC36. A new sketch will be posted each Wednesday on the MFT blog and also in the forum. Each week one random winner will win a $15 voucher to spend at MFT, and if you use MFT stamps on your creation, you'll get a $5 bonus taking your voucher win up to $20! We'll be chatting each week on the sketch thread, so come join us in the MFT forum!  

Here are the Die-namics I've used today:


 Thanks for stopping by!
 
Stamps:PI - Spa Day (MFT Stamps) Cardstock: Kraft, Vanilla, Blushing Bride (SU) Paper: Dwell (MME) Ink: Tuxedo Black (Memento) Pumice Stone, Tattered Rose Distress Ink (Ranger) Dies: First Class Award Ribbon, Mini Rolled Rose Die-namics (MFT Stamps) Oval Nestabilities (Spellbinders) Other: Pearls, Stick Pin, Sewing Machine, Copic Markers
July 14, 2010

Explosion Box


Today I thought I'd share an Explosion Box I made for Project Tuesday last month but unfortunately didn't get photographed before I got the flu. There was lots of stamping in this one - no designer paper at all and it's a Stampin' Up! only project.

First, here's the stamped background card I came up with...

I've used the Medallion stamp & Itty Bitty Backgrounds as well as some sponging. The colour combo for this project was Riding Hood Red, Soft Suede and Baja Breeze.

Here's my box all folded up and decorated. I love the way these colours look together.

These wee boxes are great, they're like packaging and a card all in one. I'll definitely be replicating that background again in different colours, sometimes it's fun to focus on the special effects you can achieve using just ink.


Stamps: Medallion, Wanted, Itty Bitty Backgrounds
Paper & Card:
Soft Suede, Very Vanilla, Baja Breeze
Ink:
Soft Suede, Riding Hood Red, Baja Breeze
Punches:
Scalloped Oval Punch, Large Oval, Eyelet Border
Other:
Soft Suede Ribbon, Sponge Daubers

May 18, 2010

Project Tuesday: Card & Bookmark


It's time for another great Project Tuesday challenge! This week we're making cards with a matching bookmark! You can make a separate bookmark, or make your card with a detachable bookmark like I did.

I made my card and bookmark for my youngest brother Leroy. When he comes to stay with me we have "quiet reading time" in the afternoons. I get a little peace and quiet and to indulge in one of my biggest passions - reading - and he loves the time together. We're already planning a trip to the library when he comes to stay for over a month this Christmas - can't wait!

The sketch for the front of my card comes from Card Patterns. It's nice and simple, perfect for highlighting a special image. I watercoloured and paper pieced the image. My colour combo is Baja Breeze, Riding Hood Red, Old Olive, Pumpkin Pie & Chocolate Chip.

Here's the inside of my card, showing the detachable bookmark. I've used the perforating blade from the Cutter Kit to score the bookmark so it can be torn off. (If you'd like a tutorial - leave a comment, I'll whip one up if there's some interest).

How cute is this little guy? I masked the bookworm so I could stamp the bookshelf behind him.

Here's the inside of the card when it's opened right out. I was a little sick of colouring, so just stamped the books in Going Gray behind the sentiment - love this look!

Head on over to Project Tuesday to see the rest of the design team creations - I hope you'll play along with us this week!


Paper & Card: Baja Breeze, Riding Hood Red & Whisper White
Ink:
Baja Breeze, Riding Hood Red, Old Olive, Pumpkin Pie, Going Gray & Chocolate Chip
Punches:
Word Window
Other:
Riding Hood Red Ribbon, Antique Brass Brad, Aquapainter, Cutter Kit
E-mail me to purchase.

Stamps: I {heart} Books - MFT
Paper & Card:
Offbeat - Basic Grey
Punches:
Upper Crest punch - Fiskars
Other: Oval Nestabilities

April 24, 2010

OCC: Blossoms

Hi everyone, it's time for another wonderful OCC challenge. This week Dana has challenged us to use blossoms on our cards.

I've been under the weather the last couple of days, so I thought a nice simple, one layer card would be a great way to ease into some creative time - and it's perfect for Kristina's challenge too.

I went ultra simple. One colour (plus Kraft), one ribbon, one stamp set. I stamped the flower image repeatedly, then fussy cut around it to create the shaped border. I find it easiest to trace my cut out border then cut the back layer rather than cutting both at once.

Piercing is a great technique to use on one layer cards - lots of interest with no height!

I hope you'll head over to see the other OCC girls and link up your card featuring blossoms!


Stamps:
Vintage Vogue
Paper & Card:
Kraft card
Ink:
Riding Hood Red
Other: Mat Pack, Piercing Tool, Kraft Taffeta Ribbon
E-mail me to purchase.

February 9, 2010

Whimsical Neighbourhood...

I am in stamping heaven today! My Sale-A-Bration order arrived, packed full of Summer Mini goodies and free stamp sets! I couldn't wait to play, so I quickly put everything where it should be and got inky. My weekend project will have to wait till tomorrow, because I had to show you this card!

Aren't those houses just soooo cute?! I've used three of the FREE Sale-A-Bration stamp sets on this card, the focal layer uses mostly Good Neighbours. The sketch is from Mercy, my first time with one of her beautiful sketches! - this is a large card, 5.5" square.

I've used the masking technique to create my little scene, I was inspired by the sherbet coloured neighbourhood in Edward Scissorhands so the colours are all from the Soft Subtles colour family, with the exception of the tree trunks in Close to Cocoa. The papers are from Spring Fling (retired) pack and I've used some Bashful Blue brads and ribbon.

My sewing machine was sitting out, so I stitched a border around the card and one of the layers - I think that's the first time I've used my big machine to stitch on a card, and I might be hooked!

I've stamped the Thank You sentiment from another SAB set, Happy Moments in Certainly Celery on the Certainly Celery grass. I love tonal stamping like this - it's those little details that you might not see at first glance that can make a card special. I've also popped up the middle house with dimensionals.

Here's the inside. Apparently the wind was blowing - I should have used my Stamp-a-ma-jig for that tree! The sentiment from Whimsical Words was inked with Pretty in Pink and Bashful Blue markers.

Have a creative day,


Supplies available from Stampin' Up! Email me for purchasing details.

It's time to Sale-A-Brate! Earn your free stamp set today!

Technique Spotlight: Masking

I love masking. It's such a simple technique, it costs you nothing in extra supplies, and you get such cute results. Masking allows you to put an image in front of, or behind, another image. If masking is a new technique to you, read on to see just how easy it is!

First, stamp your image. This will be the image that appears to be in front of your second stamped element.

Before cleaning your stamp, stamp again onto a thin piece of scrap paper or a post-it-note. Make sure you're stamping over the sticky strip - this is helpful later. Cut out your image staying just INSIDE the lines of the image. This stops you getting a white border between your two elements.

Place your mask over your stamped image. If you stamped onto a post-it your mask will stay in place nicely, otherwise you may want to use a little bit of temporary adhesive to ensure your mask stays in place.

Stamp your second image, overlapping as much or as little of the mask as you wish.

Voila! It's a simple technique for sure, but just adds a little something extra to your stamping.

I especially like to layer my masked images for even more depth.

Stamp set: Good Neighbours (Free Sale-A-Bration set!)


Some supplies available from Stampin' Up! Email me for purchasing details.

It's time to Sale-A-Brate! Earn your free stamp set today!