June 22, 2008

Whimsy in Sky

Hi everyone! Well, we're finally coming to the end of our motel stay - thank goodness! I just can't wait till Monday night, being able to sleep in your own bed is a simple luxury I've been missing! Of course, as soon as the bed is made - I'll be getting to work on my craft room! I was out scouting for new furniture today - it will be a work in progress for awhile, but will share pics when I'm done.

The above card is one I made way back in April, but hadn't shared until now. I won't do a step by step as it was so long ago, but the key points are:

  • The Butterfly was inked using the "Rock 'n Roll" technique.
  • A lot of the layers are popped up for dimension.
  • The small ladybird and the sentiment were inked with Markers so I could omit the portions of the images I didn't want to stamp.
  • The sentiment was split in two and positioned using the Stamp-a-ma-jig.

A pretty simple card, but I just loved that butterfly and wanted to make it the focal point. I'm pretty sure I gave this to one of my lovely hostesses, it's not in my box of finished cards anymore!

Quick note: For those of you who have emailed on my Xtra email addy, I haven't been able to reply yet. Xtra blocks sending emails through their system while on wireless hotspot connections, so I'll get those answered ASAP after Monday.

Until then, Happy Stampin!


Stampin' Supplies:

Garden Whimsy, Polka Dot Background, Short & Sweet stamp sets.

Basic Gray, Soft Sky and Whisper White card.

Basic Gray and Soft Sky ink.

Markers.

Scalloped Circle, 1 1/4" and 1" Circle punches.

Silver Brads.

Crafter's Tool Kit.

Stampin' Dimensionals.

SNAIL adhesive.

All supplies available from Stampin' Up!

June 19, 2008

Can't wait to get settled!

Hi everyone,

Just wanted to say hi and thanks for all the emails. The move is going great so far, just sitting in the ferry terminal now - my time is about to run out so I'll be off, but can't wait to be back and sharing with you!

Happy Stampin'
Sarah

June 13, 2008

Blissful Dahlia

Hi everyone! Well, this is what I was doing this afternoon when I should have been packing! Procrastination is a fantastic excuse to stamp! Between moving and preparing for the SU! Regional Seminar (lots of swaps to make!) you probably won't hear from me much until after the 26th of this month. I'll try and get another post up over the weekend, and do have some cards in my files I haven't shown you yet though, so who knows, I might be online more than I think.

I wanted to have a go at making another Dahlia fold medallion - they are just so much fun. For instructions on this fold (I tried to explain it in a way that made sense to me - I'm so bad at following directions!) please see this post: Dahlia Fold Here's the step by step for this card:
  • Make a Dahlia out of Berry Bliss Designer Series Paper. I just love the colours in this paper pack!
  • Layer the Dahlia onto Purely Pomegranate card and cut out. Repeat this step using Chocolate Chip card.
  • Use a rub-on from the Urban West pack on a Clear Button. This is so much fun to do! It looks great on coloured buttons too. Because I chose a pretty solid design, it even covers the button holes. There are lots of designs in all of our rub-on packs that would work well for this step.
  • Attach the button to your medallion using a mini glue dot. Nice and invisible!
  • Stamp Tres Chic background on Pretty in Pink card with Close to Cocoa ink. Sponge the edges with Pretty in Pink ink. Layer onto Chocolate Chip.
  • Stamp the polka dot type image from Boho Backgrounds onto Purely Pomegranate card using Whisper White craft ink. I let this dry naturally while I did something else, but you could heat emboss it or use your heat tool to speed up the process.
  • Tie a length of Chocolate Chip ribbon around the Purely Pomegranate layer, then attach to the Chocolate Chip cardbase using plenty of Dimensionsals.
  • Attach the Tres Chic layer with SNAIL then the Dahlia with Dimensionals and you're done!

This was pretty simple to throw together, the Dahlia can take a few minutes to fold, but it's so worth it. This would be a great card for lots of different occasions - it all depends on the sentiment used on the inside of the card.

Hopefully I'll have time to post soon, until then - Happy Stampin'!

Stampin' Supplies:
Tres Chic and Boho Backgrounds stamp sets.
Purely Pomegranate, Chocolate Chip and Pretty in Pink Card.
Berry Bliss paper.
Close to Cocoa, Whisper White and Pretty in Pink ink.
Urban West rub-ons.
Clear Buttons.
1 3/8" and 1" Circle punches.
Chocolate Chip wide grosgrain ribbon.
Paper Snips.
Stampin' Dimensionals.
SNAIL adhesive.
All supplies available from Stampin' Up!

June 11, 2008

Love Notes

This month's promotion consists of some really cute products for a great price, so today I wanted to use one of them, Love Notes. Love Notes are these cute little square cards and envelopes - they are so much fun to create with! I used a colour challenge combo for this one - Regal Rose, Real Red and So Saffron. Stay tuned for more info on the promo at the bottom of this post. For now, here's how this came together!
  • Stamp the hugs and kisses image from the Sealed with a Kiss stamp set onto Whisper White using Basic Gray ink.
  • Cut out using the 1 3/8" Circle Punch. Colour with Real Red, So Saffron and Regal Rose markers.
  • Layer onto a Real Red scalloped circle (I love this punch!) and dot the scallops with the White Gel pen.
  • Colour "Love you" using markers and stamp on Whisper White. Punch out with the Word Window punch.
  • Punch two Regal Rose Word Windows. Layer behind the Whisper White sentiment.
  • I used a scrap of So Saffron prints paper from last month's promotion as my background. The Polka Dot background stamp would look really cool too.
  • Tie scraps of ribbon around the background layer before attaching to the Whisper White love note. I had both these pieces in my scrap bag, the knot was even tied for me already!
  • Punch two 1/16" holes with the handheld punch on Whisper White. Punch around these with the 1/4" circle punch and add two So Saffron brads through the holes. I love the way this helps the brads "pop" from the background!
  • Layer everything together and adhere using Dimensionals for height and added interest.
  • Stamp "Sending Love" on the envelope front, colouring each element with markers.
  • For the inside of the card, I added a layer of background paper, then coloured the "Love" image with markers, cut it out and attached with a dimensional.
  • Roughly trace around the envelope flap onto the patterned paper, then cut out with scissors within that line. I just eyeball this, it usually turns out pretty good. Adhere with SNAIL. You’re done!

It’s so much fun making these note cards, you can use up all those scraps of card stock you’ll have laying around if you’re anything like me!

eScape with Stampin’ Up! During June, you can eScape with Stampin’ Up by purchasing the special bundle of products. The bundle consists of the Circle of Friendship stamp set, the 1 ¼” Circle Punch and a pack of Love Notes and Envelopes – 10 each in Whisper White and Very Vanilla. Separately these products would cost a total of $92.15 – but this month only, the bundle has 25% off – get all three products for just $69.11! (plus postage) If you’re in New Zealand and would like to purchase the bundle and make some adorable cards for yourself, please email me at sarah.eternal@yahoo.com Please see the link at the right hand side of this post for more information!

Happy Stampin’
Sarah

Stampin Supplies:
Sealed with a Kiss stamp set.
Love Note – Whisper White.
Regal Rose, Whisper White & Real Red Card. So Saffron Prints paper.
Basic Gray ink.
Stampin’ Write Markers.
Word Window, 1 3/8” Circle, 1/16” Handheld, ¼” Circle & Scalloped Circle punches.
So Saffron brads.
Real Red and Regal Rose Grosgrain ribbon.
Stampin’ Dimensionals.
SNAIL adhesive.
All supplies available from Stampin’ Up!

June 5, 2008

Bluebird Thanks

Sorry for the lack of updates over the last week, I've been very busy organising our move. I might only be posting sporadically over the next couple of weeks, but once we're all settled again I'll be back with updates as often as possible!

This card was made with one of this years hostess sets - Spring Solitude. It's a really fun set with great images that can be combined to make lots of different images. Here's the step by step:

  • Ink the branch stamp with Wild Wasabi, and go over the branches with a Chocolate Chip marker. Stamp overlapping images on Very Vanilla card.
  • Stamp the bottom image, inking with Purely Pomegranate and the Chocolate Chip marker. Stamp the bird using Blue Bayou.
  • Layer onto Purely Pomegranate card, and attach a scalloped accent punched from Chocolate Chip and Wild Wasabi card, using the slit punch.
  • Stamp the sentiment on a Very Vanilla rectangle, then round the corners using the Corner Rounder punch. I used last years now retired punch on this element.
  • Offset a circle of Fall Flowers designer paper on a layer of Wild Wasabi.
  • Pierce the edges of the circle, the sentiment layer and the scallops. Fill in the pierced holes with the white gel pen.
  • Stamp the polka dot background in Soft Sky on Soft Sky card and adhere to a Chocolate Chip card base.
  • Attach three Pewter Jumbo Eyelets to the circle layer using the Crop-a-dile. Adhere Purely Pomegranate card behind them and fill with Crystal Effects. Tie a length of Purely Pomegranate ribbon around the circle, then adhere to the card using Stampin' Dimensionals.
  • Attach the bird layer, and add two pewter brads to the sentiment layer before adhering with Stampin' Dimensionals. This is the inside of this card. I repeated images from the front, an easy way to tie the whole card together.

There are a few separate pieces to this card, but they go together really easily. I had a lot of fun making this one, that little bird is really cute!

Happy Stampin’
Sarah

Stampin’ Supplies:
Spring Solitude stamp set.
Very Vanilla, Chocolate Chip, Purely Pomegranate, Wild Wasabi and Soft Sky card.
Fall Flowers designer paper.
Wild Wasabi, Purely Pomegranate and Blue Bayou ink.
Chocolate Chip marker.
Jumbo Eyelets – Pewter.
Pewter Brads.
Crop-a-dile.
Purely Pomegranate double stitched ribbon.
Crystal Effects.
White Gel Pen.
Stampin’ Dimensionals.
SNAIL adhesive.
All supplies available from Stampin’ Up!

May 29, 2008

Thanks Mum!

Here's a card I made earlier in the week - I'm sharing it now because I think my Mum should receive it today! I hope so - if not, here's a card for you Mum! When I visited a couple of weekends ago, Mum had a copy of a cookbook I love and have always wanted (20c at the Salvation Army shop - can't beat that!) and she also let me brazenly steal the cutest set of plates right from her display shelf! They are adorable, dessert plates with chocolate truffles and other yummy things engraved in them. The cookbook is an old one by Alison Holst for Microwaves - it has some really great recipes in it, good microwave recipes can be hard to find!

I've noticed I'm using a lot of blues in my cards lately! I think it's because I'm so inspired by our new In Colours for the year. This one uses something very different though.....Not Quite Navy! This is a colour I had never used and I wanted to challenge myself to make something nice with it. I used the Colour Wheel tool to help me decide what to pair it with - Bashful Blue. I then noticed some gorgeous So Saffron paper on my desk from this months promotion - and I was ready to go!

I also used a stamp set I've never inked. I have had a play with this one before, courtesy of my upline Louise (Every demo worldwide got this set as a gift from Stampin' Up! last year - just a little bit before I joined! Isn't that a great perk to being a demo though, what's better than free stamps?!) It's called Time Well Spent and is one of our wonderful hostess sets this year. I just had to earn it, it's a wonderful set, and has soooo many images. Here's the step by step:

  • Stamp the butterfly image from Time Well Spent randomly over a Not Quite Navy card base using Versamark ink. This will give a lovely watermark appearance.
  • Stamp the large flower on Whisper White using Basic Gray. I meant it when I said Basic Gray is the new black - it's so nice to colour with.
  • Colour with blender pens and Watercolour Wonder Crayons. I used Not Quite Navy, Bashful Blue and So Saffron. Cut out.
  • Colour a flower from the Pretties kit also using your watercolour wonder crayons and a blender pen or water brush. This is my favourite way to colour these flowers, you can shade them exactly as you want them and it dries almost instantly.
  • Adhere the flower to your stamped and cut out image, then punch a large hole using the Crop-a-dile and set a Pewter Jumbo Eyelet in the center. Add a clear Rhinestone Brad, also from the pretties kit, by threading it through the eyelet.
  • Cut a Bashful Blue scalloped edge using the Slit Punch. Adhere behind a piece of the So Saffron prints paper which has a piece of Bashful Blue Striped Grosgrain ribbon tied around it. Adhere another strip of Bashful Blue behind the other side of the So Saffron - this is a cheats way to get a layered look. Perfect to use up little scraps of card.
  • Attach the So Saffron layer to the card base. Adhere the flower using Stampin' Dimensionals.
  • Stamp "Hugs & Kisses" from the So Many Sayings stamp set (level one - hostess) by inking with a Not Quite Navy marker on Bashful Blue card.
  • Punch out using the Word Window punch and cut off one edge. Sponge lightly using Bashful Blue ink around the edges.
  • Add a Pewter brad from the Vintage collection to the round end of the punch, and attach to your card using Dimensionals. That's the front done!

  • For the inside, adhere a piece of Whisper White card stock. Stamp the butterfly in Basic Gray.
  • Adhere a strip of the So Saffron paper, partially covering the butterfly.
  • Stamp the butterfly again onto scrap card and colour with Watercolour Wonder crayons and a blender pen.
  • Cut out the body of the butterfly, omitting the antenna. Adhere this over the first stamped image using Dimensionals for a 3d effect and making sure to line up the antenna where they should be.
I hope my Mum likes this little thank you, I had so much fun making it for her!

If you would like to find out how you can earn the Time Well Spent or So Many Sayings sets for FREE please send me an email. Stampin' Up! is also looking for demonstrators New Zealand wide - please email me if you would like to make your hobby a fun and rewarding business opportunity, I'd love to have you join my fun and enthusiastic team!

Happy Stampin'
Sarah

Stampin' Supplies:
Time Well Spent and So Many Sayings stamp sets.
Not Quite Navy, Whisper White and Bashful Blue card. So Saffron Prints paper.
Basic Gray and Versamark ink.
Watercolour Wonder Crayons.
Blender Pens.
Slit and Word Window punches.
Sponge Daubers.
Pewter Jumbo Eyelets.
Crop-a-dile.
Pretties Kit.
Vintage Brads.
1/16" Handheld Punch.
Bashful Blue Striped Grosgrain ribbon.
Stampin' Write marker - Not Quite Navy.
Stampin' Dimensionals.
SNAIL adhesive.
All supplies available from Stampin' Up!

May 28, 2008

In Colour Carte Postale

Carte Postale is a set I've been admiring for a long time. It has been on my shelf, unloved, the last three weeks - but only because of time restraints! So here's my first effort with this beautiful set. I used a colour challenge combo, Certainly Celery, Blue Bayou and Soft Sky. Don't they look great together? Here's the step by step:

  • Cut a Soft Sky circle and stamp the leaf image in Certainly Celery multiple times. Stamp in between inkings to get a shaded effect to the foliage.
  • Stamp the bird and sentiment in Blue Bayou.
  • Sponge the edges of the circle, Certainly Celery for the Bottom and Soft Sky for the top.
  • Stamp the square flower image in Blue Bayou on Soft Sky and punch out using the 1 1/4" Circle Punch. Layer onto a 1 3/8" Certainly Celery circle, then onto a Blue Bayou Scalloped Circle.
  • Add White Gel pen highlights to the bird, the flower and the scalloped circle.
  • Layer a strip of Certainly Celery Designer Series paper onto Soft Sky. I love how this designs mimics the stamped foliage.
  • Attach two Antique Brass Jumbo Eyelets at the end of the strip, and tie a length of Soft Sky ribbon through them.
  • Stamp the flowers in Versamark onto your Blue Bayou card base.
  • Adhere the strip with dimensionals, the circle layer with SNAIL and the scalloped circle with dimensionals and you're done!
This was a bit of a different layout for me, I so often use squares or rectangles. I've been making an effort this week to finish the inside of my cards nicely before putting away all my supplies - usually I leave it until I'm ready to send the card, but this is so much easier.

Here's the inside view of this card. The bird is cut out and attached with dimensionals. This is going to one of my hostesses who loves Carte Postale. Hope she likes it!

Happy Stampin'
Sarah

Stampin' Supplies:
Carte Postale stamp set.
Blue Bayou and Soft Sky card. Certainly Celery prints designer paper.
Blue Bayou, Soft Sky and Certainly Celery ink.
White Gel Pen.
Scalloped Circle, 1 1/4" and 1 3/8" Circle punches.
Crop-a-dile.
Jumbo Eyelets.
Soft Sky ribbon.
Stampin' Sponge.
Stampin' Dimensionals.
SNAIL adhesive.
All supplies available from Stampin' Up!

May 27, 2008

Style Watch - Tapestry

Here's another of the cards I've been demonstrating the last six weeks or so. I wanted to design a card using the colours and products from the Tapestry style in our new catalogue. The colours are straight from that page, and they look wonderful together. Here's the step by step:

  • Stamp the large swirl from Baroque Motifs on Very Vanilla card using River Rock ink. To get a shadow effect, I stamp lining up the corners of the card and wood mount, then stamp again in Old Olive making sure to move the stamp in from the corner a little. This is a really quick way to get a lovely shadow. You can't really go wrong with this gorgeous image!
  • Stamp the small flower randomly over the vine using Groovy Guava ink. I coloured in the middle of the flowers using a Chocolate Chip marker.
  • Round the corners of your image and a piece of River Rock card and adhere together. Tie a piece of Groovy Guava double stitched ribbon around the edge of the Very Vanilla Piece.
  • Stamp a sentiment from Wonderful Words using Chocolate Chip ink. I like to then tear the bottom of the River Rock and sponge on a little Chocolate Chip to accentuate the torn edge.
  • Adhere the entire layer to a Groovy Guava card base.
  • Make a medallion by stamping the image in Groovy Guava, inking the dotted border with a Chocolate Chip marker before stamping. Stamp the small flower once more in Chocolate Chip.
  • Cut both these pieces out, and layer together using a Rhinestone brad in the center of your flower. I've used both the circle and square brads, and they all look wonderful.
  • Attach to a Chocolate Chip Scallop Circle punch out with a Stampin' Dimensional and stick to your card.

Using the catalogue colour schemes for inspiration is a wonderful way to jump start your creativity. I also like to look through the book for layout ideas and cool embellishment tricks. It really is so much more than just a catalogue!

Happy Stampin'
Sarah

Stampin' Supplies:
Baroque Motifs and Wonderful Words stamp sets.
Groovy Guava, River Rock, Chocolate Chip and Very Vanilla card.
River Rock, Old Olive, Groovy Guava and Chocolate Chip ink.
Chocolate Chip marker.
Rhinestone Brads.
1/16" Handheld Punch.
Groovy Guava Double Stitched Ribbon.
Scallop Circle Punch.
Sponge Dauber.
Stampin' Dimensionals.
SNAIL adhesive.
All supplies available from Stampin' Up!

May 26, 2008

Unfrogettable

With my workshops over for the month, I thought I'd share a couple of the cards I made during May over the next couple of days. This card was made using the Palette o' Prints designer paper from this month's promotion - but the good news is, this paper is also available year round in 12x12 size! Here's the step by step:
  • Stamp the frog using Stazon ink onto Whisper White card. Stamp again onto a post it note, and cut out to make a mask for the stamped image. I like to keep my masks in the box with my stamps so I only ever have to cut out each image once!
  • Adhere your mask over the frog, then stamp the toadstool making sure to overlap the images. When you remove the mask, the frog looks like he is sitting on the toadstool!
  • Colour your image using a blender pen and ink pads as shown here: http://thinkingstamps.blogspot.com/2008/03/watercolouring-with-su-inkpads.html I used Certainly Celery, Rose Red and So Saffron.
  • Outline the image using a Going Gray marker to help make the image "pop". Mat with Rose Red card.
  • Add three gold brads to the top left corner of your piece.
  • Cut two scallop strips using the slit punch and layer behind the frog image. Dot the scallops using the white gel pen.
  • Using a black marker, colour just the "unfrogettable" part of the sentiment stamp. Punch out with the Word Window punch.
  • Punch a 1" Certainly Celery circle and layer onto a Rose Red Designer Label punch out.
  • Dot with the white gel pen and add two gold brads. Attach the sentiment using Stampin' Dimensionals for interest.
  • Use a piece of Certainly Celery prints paper for the background on a Rose Red card. Attach the frog layer with SNAIL adhesive and the sentiment layer with Stampin' Dimensionals and you're done!

The gold brads on the frog layer help even out the heaviness of the scallops on the other side of the piece. I love these colours together, they are really eye catching!

Happy Stampin'
Sarah

Stampin' Supplies:
Unfrogettable stamp set.
Rose Red, Certainly Celery and Whisper White card. Certainly Celery prints paper.
Rose Red, Certainly Celery, So Saffron and Stazon ink.
Blender Pens.
Gold Brads.
1/16" Handheld punch.
Neutral Markers.
Slit, Word Window, 1" Circle and Designer Label punches.
Stampin' Dimensionals.
SNAIL adhesive.
All supplies available from Stampin' Up!

May 25, 2008

Asian Elegance

Artfully Asian is a set that's been on my wish list for a long time! I finally got it a week or so ago, and promptly made this card. I just hadn't found the time to upload it till now! It's a beautiful set, so fun for colouring - I know I'll be using it often. Here's the step by step:

  • Cover a Mellow Moss card with Designer Series Paper from the Brocade Backgrounds pack. This is one of my favourite paper packs from the new catalogue, the designs are gorgeous!
  • Stamp the Cherry Blossom image on Very Vanilla twice using Basic Gray ink. Basic Gray is the new black! For cards with a softer focus like this one, Basic Gray is perfect - it's waterproof too, so perfect for colouring.
  • Colour the image. I used Watercolour Wonder Crayons (Rich Regals) and a blender pen. I love our blender pens, they give you the control of a marker with whatever colouring medium you use.
  • Distress the edges of your cherry blossom image. I used the distressing tool from the Cutter Kit, another new purchase. It's so fast and easy, and much safer than using scissors. Layer onto a piece of Rose Red card, also distressed. Add two Rose Red brads in the top corner.
  • Stamp the leaf image on Very Vanilla using Mellow Moss ink. I inked my stamp, then stamped off once onto scrap paper before stamping to get that soft effect. Stamp randomly, making sure to go over the edges for a true random effect.
  • Scallop the edge of this layer using the Corner Rounder punch. I used the now retired larger punch we had in last year's catalogue, but the new smaller one will work perfectly.
  • Using the 1/16" Handheld punch, punch inside each scallop for ever more detail.
  • Layer a Mellow Moss piece scalloped in the same way behind this layer, attaching with snail. Layer another strip at the top and distress both this and the Vanilla layer.
  • Tie a piece of Mellow Moss Taffeta around this layer. Add three Rose Red brads at either side then attach to your card base using dimensionals.
  • Attach your main image also using dimensionals. I used two dimensionals layered on top of each other in the top corners of the image, just to accommodate the leafy layer which was already popped up.

This was a really simple card to put together, and I just love how the colours look together. I've left the front free of a sentiment and will stamp one on the inside when I use this card - it would be perfect for any number of occasions.

Have a wonderful and relaxing Sunday,
Sarah

Stampin' Supplies:
Artfully Asian stamp set.
Mellow Moss, Very Vanilla and Rose Red card stock. Brocade Backgrounds paper.
Basic Gray and Mellow Moss ink.
Rose Red (Rich Regals) brads.
1/16" Handheld punch.
Corner Rounder punch.
Cutter Kit.
Watercolour Wonder Crayons - Rich Regals.
Blender pen.
Mellow Moss Taffeta ribbon.
Stampin' Dimensionals.
SNAIL adhesive.
All supplies available from Stampin' Up!

May 20, 2008

Flower Power

When I'm going to be giving a card in person, it's sometimes fun to make one that is really 3D! This card was really easy to put together, and surprisingly fast. Here's the step by step:

  • Stamp and cut out a variety of flowers. I used the stamps from Office Accoutrement for the largest and smallest blossoms, stamping in Ruby Red and Bashful Blue. The medium sized flowers were created by stamping Paisley in Pumpkin Pie on Whisper White, then punching out with the 5 Petal Flower punch.
  • You can create a different effect with your solid stamps, such as the large flower, by "kissing" an uninked stamp with an inked pattern stamp as I have for the bottom blue flower. I inked Paisley in Bashful Blue, kissed my uninked flower to the Paisley stamp, then stamped as normal. You can get great results using this simple technique.
  • Layer the flowers together in different formations, and attach to a Whisper White layer using SNAIL and dimensionals.
  • Punch the Photo Corner from Pumpkin Pie and Bashful Blue, and attach three silver brads to the smallest layer before sticking together with a dimensional cut in half.
  • Stamp "Happy" from the Polka Dots and Paisley set using markers to colour directly on the rubber.
  • Layer onto Bashful Blue, and attach three tabs of Bashful Blue striped grosgrain ribbon before layering onto the Ruby Red card base.

A card like this would look good in so many different colour combinations - and it really looks like it took a lot more time than it actually did!

Happy Stampin'
Sarah

Stampin' Supplies:
Office Accoutrement, Paisley Background and Polka Dots and Paisley stamp sets.
Pumpkin Pie, Bashful Blue, Ruby Red and Whisper White card stock.
Pumpkin Pie, Bashful Blue and Ruby Red ink.
Stampin' Write Markers.
Striped Bashful Blue Grosgrain ribbon.
5 Petal Flower punch.
Silver Brads.
Photo Corner Punch.
Stampin' Dimensionals.
SNAIL adhesive.
All supplies available from Stampin' Up!

May 19, 2008

Baroque Fantasy

Hi everyone, hope you had a good weekend. We had a great visit down in Invercargill with our family, we hadn't been down since just after Christmas, so was a great trip. This is a card I finished last week, in between lots of fun stamping at workshops and delivering huge boxes filled with goodies to my wonderful hostesses!

I wanted to create a really whimsical design using that wonderful swirl image from Baroque Motifs - so had a play with embossing and my brayer, and this is what I came up with. Here's the step by step:

  • Stamp the swirl image in Purely Pomegranate and Bashful Blue by first loading your stamp with Versamark, then the coloured ink you've chosen. This allows you to heat emboss with our wonderful dye inks! I stamped onto Whisper White.
  • Heat emboss the swirls with Clear Embossing Powder.
  • Load your brayer with Pumpkin Pie ink and brayer over the entire piece. The heat embossed areas resist the ink, and once you've finished brayering you can just wipe over the piece with a paper towel or tissue to get rid of the excess ink.
  • Sponge the edges heavily using Pumpkin Pie, Purely Pomegranate then Chocolate Chip ink and a sponge dauber.
  • Outline the swirls using a white gel pen. This seems like a tedious task, but it's actually quite easy and relaxing!
  • Create the "Kind" label by stamping the sentiment onto Bashful Blue then sponging the edges with Purely Pomegranate. Cut out using the Small Oval Punch. Layer onto a piece of Pumpkin Pie cut with the Large Oval Punch. Dot around the Pumpkin oval with a black marker.
  • Did you know our oval punches are sized to perfectly fit inside the Hodgepodge Hardware? I love this feature of the punches, it makes things so easy!
  • I distressed my Hodgepodge label holder by colouring it with a black permanent marker like a Sharpie or a Vivid, then used a sanding block to scrub away some of the black in places.
  • Attach your Hodgepodge label using Dimensionals and a Black grosgrain ribbon tie.
  • Add three black brads in the upper corner, then layer onto a piece of Purely Pomegranate using Stampin' Dimesnionals for height.
  • Layer onto Bashful Blue sponged with Purely Pomegranate and dotted with the wide end of your black marker.
  • Attach the whole thing to a Basic Black card base and you're done!

This card is so vibrant in real life, the colour combination, white gel pen and black card base makes it look so dramatic! I hope you'll try brayering over a heat embossed image, it's a lot of fun and you can create some spectacular effects.

Have a great week and look out for more posts here very soon!
Sarah

Stampin' Supplies:
Baroque Motifs stamp set.
Whisper White, Purely Pomegranate, Pumpkin Pie, Bashful Blue and Basic Black card stock.
Versamark, Bashful Blue, Purely Pomegranate, Pumpkin Pie and Basic Black ink.
White Gel Pen.
Sponge Daubers.
Black Brads.
Hodgepodge Hardware - Antique Brass.
Small and Large Oval punches.
Black marker.
Stampin' Dimensionals.
SNAIL adhesive.
Heat tool.
Clear embossing powder.
All supplies available from Stampin' Up!

May 12, 2008

Be Happy

What a busy weekend! It was great to have a weekend full of workshops and stamping, I hope everyone had as much fun as I did! After carting around all my supplies I had a big tidy-up today....but didn't quite get to sorting out my "scrap basket". I have a basket where I put all my bits and pieces of card as I work, it's been awfully full lately so I decided to make a card using only card from that basket.

This card measures approx 9.5cm square, it's a lot of fun to make these smaller cards sometimes, you can make those little stamps the focus of the card easily. Here's the step by step:

  • Stamp the circles image from the Sprinkles stamp set on Soft Sky card using Real Red ink.
  • Pierce a border using the mat pack for placement.
  • Stamp the flowers from Fabulous Flowers in Real Red and Apricot Appeal. Cut out.
  • Put a small red Rhinestone Brad through the center of the red flower.
  • Attach the flowers using Snail adhesive and a Dimensional dot for the Red flower.
  • Stamp the sentiment from So Many Sayings (level one hostess set) onto Whisper White card using a Real Red marker to just highlight the phrase you want.
  • Cut this out with the Word Window Punch and attach to the Soft Sky layer using silver brads. Tie a piece of Real Red grosgrain ribbon around the layer.
  • Layer the Soft Sky with Real Red then Apricot Appeal card.
  • Stick onto a Soft Sky card base and you're done!


This is a quick and simple card - but don't these colours look great together? My photo is a little off, the ribbon and ink match perfectly in real life. I also wanted to show you how I finished the inside of this card...

It's always nice to tie the inside of your card with the outside, and it's usually as simple as bringing the colours and a stamped image together. It's those little details that make a handmade card so special to the recipient!

Have a fantastic week,
Sarah

Stampin' Supplies:
Fabulous Flowers, Sprinkles and So Many Sayings stamp sets.
Soft Sky, Apricot Appeal, Whisper White and Real Red card.
Apricot Appeal and Real Red ink.
Real Red grosgrain ribbon.
Silver Brads.
Round Fire Rhinestone Brads.
Mat Pack.
Stampin' Dimensionals.
SNAIL adhesive.
All supplies available from Stampin' Up!

May 8, 2008

Masculine Might

Often masculine cards are the hardest to make, especially cards for an adult male. The Wanted stamp set makes them easy though! I got a big box of goodies today, and just had to play! Here's the step by step:

  • Make your medallion by stamping in Blue Bayou three times onto Very Vanilla card stock. Cut one layer with the Scallop Punch, one with the 1 1/4" punch, and one with the 1/2" punch. Layer the 1 1/4" piece onto a 1 3/8" punched Close to Cocoa circle. Sponge the layers with Creamy Caramel, Close to Cocoa and Chocolate Chip, working towards the edges with the darkest shade. Attach an Antique Brass brad in the center of the smallest layer, then assemble using Stampin' Dimensionals. You can find that brad in the Hodgepodge Hardware kit or the Vintage Brads pack.
  • To create the Blue Bayou background stamp the paisley image in Blue Bayou onto Blue Bayou card stock. Sponge roughly around each paisley with Blue Bayou ink. Randomly stamp the paisley again, this time in Whisper White. Set with your heat tool. Stamp the smallest circle image in Creamy Caramel over the entire layer and sponge the edges with Close to Cocoa and Chocolate Chip.
  • Stamp the sentiment in Stazon Black onto the Blue Bayou layer and attach to a Chocolate Chip card base.
  • Cut a piece of Outlaw Designer Series paper. The patterns in this pack are gorgeous! Sponge the edges with Chocolate Chip ink.
  • Stamp the horse image twice onto a Very Vanilla scrap. Once with Creamy Caramel and once with Close to Cocoa. Cut out.
  • Assemble the card, attaching the horses and medallion with Stampin' Dimensionals.
  • Set three Antique Brass Jumbo Eyelets with the Crop-A-Dile, using the template from the mat pack for perfect placement. Tie pieces of Hemp Twine through the eyelets.
With the right accessories it's possible to make a "guy card" that still has lots of embellishment and interest, without making it too girly! The twine is the perfect replacement for ribbon on any masculine card, best of all, it's really cheap!

Happy Stampin'
Sarah

Stampin' Supplies:
Wanted stamp set.
Chocolate Chip, Blue Bayou, Very Vanilla, Close to Cocoa card stock.
Creamy Caramel, Close to Cocoa, Chocolate Chip, Whisper White, Blue Bayou ink.
Outlaw designer paper.
Jumbo Eyelets.
Crop-A-Dile.
Sponge Daubers.
Hemp Twine.
Stampin' Dimensionals.
Scallop Circle, 1 1/4", 1 3/8"& 1/2" punches.
SNAIL adhesive.
All supplies available from Stampin' Up!

May 7, 2008

Guava Appeal

Sorry for having such a long gap in posting, it's been a busy week so far! The trial versions of all the software on my new laptop have expired, so until my new Microsoft Office Pro pack arrives, I've been locked out of all my files and my Xtra email account. A bit of a pain, but hopefully I'll have it all fixed up soon.

Thanks to all the ladies that made last Saturday's workshop such a success, it was great to see you all! This weekend I have a lovely group on Saturday, and two groups at Mornington Kindy on Sunday, so it's going to be a great weekend full of stamping! If you'd like to come on Sunday, please let me know, I'm sure I can arrange it.

The above card is a slightly more time intensive version of a card I showed last Saturday. I love Groovy Guava and Apricot Appeal together, it looks fantastic. Here's the step by step:

  • Stamp the large flower from Fabulous Flowers three times on Whisper White card stock. I inked with Apricot Appeal, then sponged Groovy Guava on the edges of the petals with a Stampin' Sponge directly on the rubber. This gives a nicely diffused effect where the colour graduates.
  • Cut out three different layers of the flower. Edge the petals with the 2 Way Glue Pen and cover with Dazzling Diamonds. I use a powder pal to return all the excess glitter to the tub. No waste and clean-up is a snap!
  • Construct the flower using a Stampin' Dimensional in between each layer.
  • Stamp Polka Dot background in Groovy Guava on a piece of Apricot Appeal. Sponge the edges with Apricot Appeal. Layer onto Groovy Guava.
  • Stamp the sentiment on Whisper White, inking with Apricot Appeal and again sponging with Groovy Guava before stamping. Ink the edges of this layer with Apricot Appeal then Groovy Guava just on the very edge. Layer onto Groovy Guava.
  • Create a scalloped accent piece using the Slit Punch. This punch is such great value at only $13.50! I love the scallops it makes. Just punch continually along a strip of card stock, slightly overlapping each punch slightly. Sponge the edges with Groovy Guava.
  • Add two Jumbo Eyelets (I used Pewter) to the Polka Dot layer. Cut the holes and set with the Crop-A-Dile. I use the clear template from the Mat Pack to make sure my spacing is even, it's a great wee tool.
  • Attach two Rhinestone Brads through the eyelets. I chose the yellow brads from the Fire pack.
  • Tie a length of Apricot Appeal ribbon around your dotted layer before attaching to your card. Assemble the card as shown in the photo and you're done!

I love that hint of sparkle the Dazzling Diamonds glitter gives, it's beautiful. I hope you'll try Apricot Appeal and Groovy Guava together, it's such a nice, warm look.

I'm off to work on my Mother's Day parcel to be posted tomorrow (Hi Mum!)

Happy Stampin'
Sarah

Stampin' Supplies:
Fabulous Flowers and Polka Dot Background stamp sets.
Apricot Appeal and Groovy Guava card stock.
Apricot Appeal and Groovy Guava ink pads.
Stampin' Sponges.
Apricot Appeal Grosgrain ribbon.
Jumbo Eyelets, Pewter.
Crop-A-Dile.
Slit Punch.
Rhinestone Brads, Fire.
2 Way Glue Pen.
Dazzling Diamonds glitter.
Stampin' Dimensionals.
SNAIL adhesive.
All supplies available from Stampin' Up!

May 2, 2008

In Love with In Colour!

Well, I come back from the long weekend then promptly disappear again! My internet has been iffy at best this week, yesterday I couldn't get online at all! I finally had time to sit down and upload this for you, even though I should be finishing my preparation for the huge workshop we'll be having tomorrow!

It's wet and cold here today, perfect stamping weather, and this is what I came up with using some of our gorgeous new colours! Here's the step by step:
  • Stamp the branch and berries image from Touch of Nature with Basic Brown ink onto Very Vanilla card. Using the stamp-a-ma-jig, stamp the bird image with the branches overlapping.
  • Stamp the bird again onto scrap paper or a post-it note. Cut around just the bird to create a mask, and adhere with temporary adhesive - I used the 2 Way Glue Pen.
  • Ink the leafy branch image with River Rock ink and stamp onto scrap paper once, then onto your image, over top of the bird. Repeat, then stamp the image full force at the top, bottom and side of the bird. You'll go over the branches and berries a bit, but once we colour it won't matter.
  • Remove the mask from your bird image. Colour the image using ink pads and a blender pen using this technique: http://thinkingstamps.blogspot.com/2008/03/watercolouring-with-su-inkpads.html
  • I'm not sure if this kind of bird could come in blue, but that's the beauty of stamping, you create what you want to see! I used Soft Sky and Close to Cocoa to colour the bird, River Rock for the leaves and a touch of Purely Pomegranate and Close to Cocoa on the berries.
  • My bird turned out a little dark, so I created highlights by dotting and dashing with the white gel pen. It gives a really great effect!
  • Sponge the edges of your image using River Rock and Soft Sky, concentrating your sponging in the corners.
  • Layer your image with River Rock then Chocolate Chip card. Create a scalloped edge using the corner rounder and adhere at the back of your piece.
  • Using the Crop-a-dile punch holes for the Jumbo Eyelets. This took is amazing!!! So many times I'd be stuck not being able to punch holes after layering a piece - not anymore! The Crop-a-dile punches through all these layers and more with ease.
  • Set the jumbo eyelets with the Crop-a-dile, I used Antique Brass eyelets, then tie a piece of Soft Sky Double Stitched ribbon through the holes.
  • Layer the entire piece onto a piece of River Rock, using Stampin' Dimensionals to accommodate the back of the eyelets and ribbon. Distress the edges of the layer, I used the back of my scissors - but have just ordered the Cutter Kit with the Distressing Tool - this will be much safer, can't wait to try it out!
  • Layer a strip of paper from the Le Jardin pack onto Chocolate Chip card.
  • Stamp your Soft Sky card base with the large swirl from Baroque Motifs. I used Soft Sky ink, Versamark would give a lovely effect too.
  • Assemble your card using SNAIL adhesive and you're done!
I know just who this card is going too - but I'm keeping it quiet, they might be reading this right now!

Have a safe and warm weekend,
Sarah

Stampin' Supplies:
Touch of Nature and Baroque Motifs stamp sets.
Soft Sky, Chocolate Chip, River Rock and Very Vanilla card stock. Le Jardin Designer Paper.
Soft Sky, Close to Cocoa, Basic Brown, River Rock and Purely Pomegranate ink.
Stampin' Sponges.
Jumbo Eyelets.
Crop-a-dile.
Soft Sky Double Stitched ribbon.
Blender Pen.
Corner Rounder punch.
Stampin' Dimensionals.
SNAIL Adhesive.
All supplies available from Stampin' Up!

April 29, 2008

Paisley Piecing

I'm back and finally stamping! My husband and I spent the long weekend at the Armageddon Expo in Christchurch with our store, Action Figures Online. It was a great weekend, but tiring - and I didn't get to stamp at all Thursday-Monday! The good news is, when I got home last night, all my goodies that had arrived last week and hadn't even been opened were waiting for me!

I love the Polka Dots and Paisley stamp set and the matching paper is gorgeous! I knew I wanted to use both this morning, and this is what I came up with. Here's the step by step:
  • Stamp the paisley image on scraps of patterned paper and card stock. This is a great way to use up all those little pieces of card you may have lying around. If you're anything like me, you keep every tiny scrap - you never know when it might be useful!
  • Cut out the three different parts of the image from all your different colours. Layer them together in different ways then glue together with the 2 Way Glue Pen. This is called Paper Piecing and it can give you lots of great looks with your stamps.
  • Stamp the sentiment in Old Olive on your square of Whisper White card stock. This was in my scrap bin too, my white layer measures 4" square.
  • Punch a hole using the 3/16" handheld punch in the middle of the "o" in joy. Attach a silver brad through the hole.
  • Pierce a border around the layer using the Mat Pack. I used the second line of holes for this border.
  • Tie a piece of Old Olive Wide Grosgrain around the layer, then attach to an Old Olive card base with Stampin' Dimensionals. Using Dimensionals helps to accommodate the back of the brad and the ribbon.
  • Attach your paper pieced paisleys (try saying that three times fast!) in any pattern that looks good to you. Use Dimensionals to give one or two some height.
  • Trim your ribbon ends and you're done!
This was a really easy card, it takes a little time to cut out the shapes but I use the Stampin' Up! paper snips and they make all my cutting so much more precise. They have a really sharp tip, perfect for getting into the tight spots.

I hope everyone had a safe and fun long weekend. I'm off to tackle all the unpacking and the mess we made before we left on Thursday!

Happy Stampin'
Sarah

Stampin' Supplies:
Polka Dots & Paisley stamp set.
Old Olive, Pretty in Pink, So Saffron and Petals and Paisley Designer Paper scraps.
Old Olive and Basic Black ink.
Old Olive Wide Grosgrain ribbon.
Silver Brad.
3/16" Handheld punch.
SNAIL adhesive.
2 Way Glue Pen.
Stampin' Dimensionals.
Mat Pack and Piercing Tool from the Crafter's Tool Kit.
Paper Snips.
All supplies available from Stampin' Up!

April 23, 2008

Stripes, Stripes and more Stripes!

I had so much fun making this card today, I started just fooling around with the tree image and somehow ended up with this! Here's what I did:
  • Stamp the image from Lovely as a Tree on Very Vanilla card stock with Stazon ink.
  • I coloured the branches with a drop of Certainly Celery reinker and a blender pen. Just drip the reinker onto the inside lid of your inkpad, it makes a great palette and you get such a vibrant colour using them this way!
  • The tree trunk was coloured using my Chocolate Chip ink pad. See my previous post on Watercolouring with SU! inkpads if you want to learn how to do this.
  • I cut the corners of the image and the Certainly Celery piece it is layered on by partially punching with my 1/2" Circle Punch. Layered this onto Chocolate Chip and added Silver Brads.
  • Then I decided I wanted some striped background paper, so I made my own! I used a metal ruler and my Stampin' Write markers in Pretty in Pink, Certainly Celery and Chocolate Chip. I kept the lines varying widths. The effect is fantastic, it looks like a printed paper.
  • I tied Wide Chocolate Grosgrain ribbon around this layer before adhering to a Chocolate Chip card base. If you haven't tried the Wide Grosgrain yet, you're missing out! It's a dream to work with.
  • The sentiment was created by inking the saying from So Many Sayings (this is a level one hostess set - and it is so useful!) with my markers, stamping onto Very Vanilla and punching out using the Word Window punch. I then cut a 1" circle out of Celery and the Designer Label punch out of Chocolate Chip. Layered these together and added two silver brads.

I love my Stampin' Write markers - I'm always finding a new use for them. Here's a tip - if you stamp an image and a small part doesn't transfer well to your card stock, use the same colour marker to fill in the missing part. The writing tip of these markers is perfect for touch-ups!

Have a wonderful evening,
Sarah

Stampin' Supplies:
Lovely as a Tree and So Many Sayings stamp sets.
Chocolate Chip, Very Vanilla and Certainly Celery card stock.
Stazon ink. Certainly Celery reinker and Chocolate Chip ink pad for colouring.
Wide Grosgrain ribbon in Chocolate Chip.
Silver Brads.
Stampin' Dimensionals.
3/16" Handheld punch.
Designer Label, 1" Circle and Word Window punches.
Ruler.
SNAIL adhesive.
All supplies available from Stampin' Up!

April 22, 2008

Like it a Latte!

I love this stamp set! I don't drink coffee that often (stamping is enough of an addiction without adding in caffeine!) but we'll often have a hot chocolate on these colder evenings. I love that you can make this set whatever you want, coffee, tea or hot chocolate. Here's what I did for this card:

  • Stamp Polka Dot background in White Craft ink onto Pretty in Pink card. Let it dry, or, if you're impatient like me, heat embossing with clear or white embossing powder. I used clear. Layer this piece with Regal Rose card.
  • Stamp the cup image onto Whisper White card stock with Close to Cocoa ink. I ran my black marker around the edge to get the two tone image before stamping. I followed the same procedure when stamping the hearts with Pretty in Pink.
  • Stamp the marshmallows in your cups with Stazon ink. Stamp them again onto scrap card, then cut them out to make a mask for your image.
  • Lay the marshmallow mask over the image, then stamp the foam over top with Stazon. This makes the foam look like it's behind the marshmallows.
  • Colour in your image. I used Watercolour Wonder Crayons for the pink marshmallows and my Uniball Signo gel pen for the white marshmallows and foam.
  • Cut out your cup images and your hearts.
  • Layer your polka dot piece on some designer paper from the Spring Fling pack.
  • Adhere a torn piece of Pretty in Pink card stock behind the designer paper before adhering to your card.
  • I layered Regal Rose wide grosgrain ribbon with Whisper White grosgrain before tying my knot. You can get so many different looks by layering our ribbon this way.
  • Stamp the sentiment with Stazon ink and stick everything together using SNAIL adhesive and Stampin' Dimensionals.

I layered the right hand side cup with dimensionals, and also popped up the heart on that cup. It looks great in real life.

Hope the weather isn't too cold where you are,
Sarah

Stampin' Supplies:
Like it a Latte and Polka Dot background stamp sets.
Pretty in Pink, Regal Rose and Whisper White card stock.
Spring Fling Double Sided Designer Paper.
Stazon, Close to Cocoa and Pretty in Pink ink.
Regal Rose and White Grosgrain ribbon.
Black Marker.
Stampin' Dimensionals.
SNAIL adhesive.
Watercolour Wonder Crayons.
Aquapainter.
White Gel Pen.
All supplies available from Stampin' Up!

April 21, 2008

Basic Boho

Boho Backgrounds is one of my favourite sets from the new catalogue. It's so versatile and at $35.95 is a bargain! This card was one of the make and takes for my workshops this month, it was great to see everyone having such a great time making it! Here's the step by step:

  • Stamp the flower image in Purely Pomegranate randomly over half of a Very Vanilla card base.
  • Stamp the greeting in Old Olive on Very Vanilla, and layer with Chocolate Chip.
  • Stamp the medallion image three times, twice with Purely Pomegranate and once with Old Olive.
  • Cut out one Purely Pomegranate medallion with the Scallop Circle punch.
  • Cut out the Old Olive medallion with the 1 1/4" Circle punch.
  • Cut out the remaining medallion using the 1" Circle Punch.
  • Layer the cut pieces together with SNAIL adhesive, and mount onto another Scalloped Circle, cut from Chocolate Chip.
  • Layer the sentiment on a rectangle of Old Olive, layered with Chocolate Chip.
  • Attach the medallion with a Stampin' Dimensional.

I love the Scalloped Circle Punch, it works so well with so many images in the catalogue. These colours look fantastic together too, I think I'll use this combo for some of my Christmas cards this year!

Hope you have a great week,
Sarah

Stampin' Supplies:
Boho Backgrounds stamp set.
Old Olive, Chocolate Chip and Very Vanilla card stock.
Old Olive and Purely Pomegranate ink.
Scalloped Circle punch.
1 1/4" & 1" Circle punches.
Stampin Dimensionals.
SNAIL Adhesive.
All supplies available from Stampin' Up!

April 18, 2008

Fun & Fast Birdy Revisited

This card was created for one of my workshops last week, and was based on this one:
http://thinkingstamps.blogspot.com/2008/04/fun-fast-birdy.html

I was all out of Black Gingham though (don't worry, I've ordered more!) so changed a few things. The basic instructions are the same, I just changed the colours to Whisper White, Regal Rose and Basic Black. I didn't use eyelets on this one and instead made the panel longer to accomodate the gorgeous new Regal Rose Wide Grosgrain ribbon.

The background wasn't stamped this time, instead I used some of the Berry Bliss designer paper - the colours in the pack are so pretty, it might be my favourite paper at the moment.

Can you tell how much I love that bird stamp yet? It's so fun and easy to colour, it just makes me happy!

Hope you have a great weekend,
Sarah

Stampin Supplies:
Fun & Fast Notes stamp set.
Regal Rose, Basic Black and Whisper White card stock.
Stazon Black inkpad.
Regal Rose Wide Grosgrain ribbon.
Crafters Tool Kit or Mat Pack.
Watercolour Wonder Crayons in Rich Regals.
Aquapainter.
All supplies available in the current Stampin' Up! Idea Book & Catalogue.

April 17, 2008

Darling Dahlia


This is a card made with the emphasis on the Dahlia folded accent. I wanted to try this technique to highlight the beauty of some of our new Double Sided Papers -they are truly gorgeous! The paper used on this card is from the Le Jardin pack. Here's the step by step:

  • Construct the Dahlia medallion. Instructions are here: http://thinkingstamps.blogspot.com/2008/04/technique-spotlight-dahlia-fold.html
  • After putting together your Dahlia, use SNAIL adhesive to layer it on a piece of Mellow Moss card stock. Carefully cut around your medallion, then repeat the process using Always Artichoke.
  • Lay your medallion on the foam mat from the Mat Pack, or a foam mouse pad would work. Pierce a hole through the center using a piercing tool or large darning needle. Add a Green Rhinestone Brad to the center.
  • Cut a piece of Le Jardin paper for the left hand side panel. Sponge the edges with River Rock before layering onto a piece of Mellow Moss, also sponged with River Rock.
  • Cut a piece of Very Vanilla for the right hand side. Stamp the frame image from Frames with a Flourish with Always Artichoke ink, using the Stamp-a-ma-jig Stamp Positioner to line it up correctly.
  • Use the Stamp-a-ma-jig again, this time to stamp the sentiment from Life Definitions into the frame using Mellow Moss ink.
  • Make a mask for your framed image by stamping the frame onto scrap paper, and putting 2 Way Glue on the back - allow to dry until this is just tacky.
  • Stick your mask over the frame, and stamp the background in River Rock. I've used the retired French Flair background, but the images from Carte Postale or the matching wheel would look fantastic.
  • While the mask is still in place, lightly sponge around the frame and the edges of the card stock in River Rock.
  • Remove the mask, layer onto Mellow Moss card and add two silver brads.
  • Punch the photo corner with Mellow Moss and River Rock card. I've dotted around the River Rock layer to mimic the dots on the frame, but you could omit this step.
  • Tie a piece of the gorgeous new Mellow Moss Taffeta Ribbon around a strip of River Rock layered on Mellow Moss. Adhere with SNAIL adhesive.
  • Adhere the Photo Corner element and the Dahlia with Stampin' Dimensionals.


There are lots of steps to this card, but they are all really simple - give it a try, you'll come out with a beautiful card sure to make someones day!

If you would like to see the Dahlia fold demonstrated, or learn more about masking or the Stamp-a-ma-jig at your very own workshop, please give me a call or send an email for my available dates.


Happy Stampin'
Sarah

Stampin' Supplies:
Life Definitions, Frames with a Flourish, French Flair Background (retired)
River Rock, Mellow Moss and Always Artichoke Ink.
Very Vanilla, River Rock Textured, Mellow Moss, Always Artichoke card and Le Jardin Double Sided Paper.
Green Rhinestone Brad.
Silver Brads.
Mat pack.
Mellow Moss Taffeta Ribbon.
Stampin' Sponges.
Photo Corner Punch.
2 Way Glue Pen for adhering mask.
SNAIL adhesive.
Stampin' Dimensionals.
Stamp-a-ma-jig Stamp Positioner.
Always Artichoke Stampin' Write Marker.
1 3/8" Circle Punch (for Dahlia)
1" Circle Punch (for Dhalia)


All supplies available from Stampin' Up!

Technique Spotlight: Dahlia Fold

With all the beautiful new Double Sided papers in our 2008-2009 Idea Book and Catalogue, now is the perfect time to try a tea bag folding technique...the Dahlia Fold. This makes a beautiful flower medallion. I've taken some photos to show how this is done, just click on them to make them larger. The paper used here is from the Le Jardin pack.


You'll need 8 circles to make the full Dahlia. I've used the 1 3/8" Circle Punch. Decide which side of your paper is to be the main pattern and keep this side at the back for the first three creases/folds.

Take your circle, and fold in half - but only crease the BOTTOM half of the circle, as shown by the dotted line.

Fold your circle in half again, creasing the full length of the second dotted line.

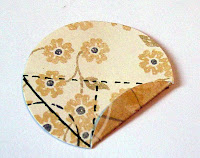
This part is a little tricky, but you'll soon get used to it. Make a fold from the two points where your creases meet the outer edge of the circle. The solid line on the left of the circle is where you should fold, the right side has been folded already.

Turn your circle over, and fold both sides towards the middle like you're making a paper dart. Repeat the above steps until you have 8 dart shaped pieces.

Cut a smaller circle, here I've used the 1" Punch, you could also use the 1 1/4" Punch. Fold in half, then in half again to make some guide lines.

Line the 8 pieces of your Dahlia on this circle, adhering with SNAIL or 2 Way Glue Pen.

To see a card featuring a finished Dahlia, please see this post: http://thinkingstamps.blogspot.com/2008/04/darling-dahlia.html

April 16, 2008

In Colour Birdy

I wanted to try colouring an image with all the new In Colour ink pads. I used the technique shown in this post:
http://thinkingstamps.blogspot.com/2008/03/watercolouring-with-su-inkpads.html I used a blender pen instead of an Aqua Painter for this image though. It blends the colours together beautifully. If you look carefully you can see I used Wild Wasabi and River Rock on the flower so all six new colours are there!

I was so excited to find out my favourite bird image fits in the new Scallop Circle punch! You have to line it up really carefully, but it looks great. Here's the step by step:

  • Stamp the bird image in Stazon. Colour using the above technique. I blended Soft Sky and Blue Bayou on the Bird, and Groovy Guava and Purely Pomegranate on the flower petals.
  • Cut bird image out using Scallop Circle punch. Sponge around the edges with Soft Sky ink, and a tiny bit of Blue Bayou. Dot around the edge with a white gel pen.
  • Stamp Polka Dot background on Groovy Guava textured card stock with Purely Pomegranate. Sponge the edges with Guava and Pomegranate.
  • Use the 1/2" Circle punch to cut the corner detail on the Guava layer. Add silver brads to the corners of the Pomegranate layer.
  • Layer onto Blue Bayou and Soft Sky textured card.
  • Sponge three small flowers from the Pretties Kit with Groovy Guava. Attach to card stock with silver brads.
  • Stamp the Get Well sentiment onto Whisper White card stock. Follow the same sponging and dotting guidelines as the focal image. Cut out using the Word Window punch and layer onto a Blue Bayou layer cut using the Small Oval Punch.
  • Layer everything together, using SNAIL for the largest Guava layer and Stampin' Dimensionals for the Blue Bayou layer, bird image and sentiment.

I'm addicted to our new colours already! They are so rich and work well with each other or many of our regular colours. The new textured card stock is so lovely to work with too, it adds real dimension to your work.

Just a hint: When lining up brads on your work, use the clear template from the Mat Pack - perfect brad or eyelet placement every time!

Hope you're having a great week,
Sarah

Stampin' Supplies:
Fun & Fast Notes and Polka Dot Background Stamp Sets.
Blue Bayou, Soft Sky, River Rock, Purely Pomegranate, Groovy Guava and Wild Wasabi Ink for sponging and colouring.
In Colour Textured Card. Whisper White card.
Stazon Ink.
Blender Pen.
Sponges.
Word Window, Scallop Circle, Small Oval and 1/2" Circle Punches.
3/16" Handheld Punch.
Signo White Gel Pen.
Pretties Kit.
SNAIL adhesive.
Stampin' Dimensionals.

All supplies available from Stampin' Up!

April 15, 2008

Cocoa Scribbles

Scribble This and Tagger's Dozen were the first sets I ever bought from Stampin' Up! I'm so glad to see them back in the new catalogue. This was a card from one of my workshops last week. Once you cut out the flowers it's really quick and easy. Here's the step by step:

  • Stamp the swirl image in Close to Cocoa ink on Pretty in Pink and Whisper White card layers. Make sure to go off the edge whenever you stamp randomly, it will give a much more appealing effect.
  • Stamp the large flower image twice on Pretty in Pink card, and once on the Close to Cocoa card. Cut these images out, then use the white gel pen to add highlights on the dotted petals.
  • Layer the flower together, securing with a Rhinestone Brad.
  • Stamp the tag image on Pretty in Pink card and line it up in the Round Tag Punch to cut it out. Fold this over your layers and secure with SNAIL adhesive.
  • Tie a piece of Pretty in Pink Grosgrain Ribbon around the layers before adhering to your card base.
  • Attach the flower using a Stampin' Dimensional of Glue Dot and you're done!

This flower looks fantastic layered this way, it's a great way to make an easy accent for your cards or scrapbook pages. It's actually really easy to cut out too, not too fiddly at all!

Happy Stampin'
Sarah

Stampin' Supplies:
Scribble This and Tagger's Dozen Stamp Sets.
Pretty in Pink, Close to Cocoa and Whisper White Card.
Close to Cocoa Ink.
Pretty in Pink Grosgrain.
Rhinestone Brad.
Handheld Punch.
Stampin' Dimensional.
SNAIL Adhesive.
Round Tab Punch.

All supplies available from Stampin' Up!

April 14, 2008

Product Spotlight: Heat & Stick Powder

Have you ever received a card that left more glitter on your hands that on the actual card? Luckily, Stampin' Up! have a few different ways to keep the glitter where you want it, and off the floor, cat, kids, desk etc! The 2 Way Glue Pen and Crystal Effects are great adhesives for glitter and work wonders at sticking it really well to your project, but the king of them all has to be Heat & Stick Powder.
I always use Heat & Stick Powder when I'm doing a lot of glittering on a card. It works in a similar way to regular embossing powder, here's a short guide to getting the best out of this product.


First, stamp your image. You'll need to use a pigment ink, Encore works great, or something like Versamark or an embossing pad. Here I wanted to use Pink Passion, so all I did was ink my stamp with Versamark first, then with Pink Passion. The Versamark won't hurt your classic ink pad, and this way you can emboss with any of our wonderful colours!


Next, cover your image with Heat & Stick powder. Tap off the excess using a Powder Pal or piece of paper to catch it. Funnel this back into your container for next time! Before you heat the image, get everything ready for the glitter step, you want to be ready to pour the glitter on as soon as you stop heating.

Gently heat the image with your heat gun - I find this takes less time than embossing powder does. As soon as you see the powder melt you're ready. Pour the glitter over your heated image (turn your heat gun off first if you don't want to look like a sparkly snowman!) and tap off the excess, returning this to the container.

Your image will look like this. All that remains is to gently heat the image once again, just to set the powder. Then I like to take a stiff bristled paintbrush, and brush quite vigorously over my image. This gets rid of any stray particles of glitter.


The finished card! I kept the base of this one a simple square of Whisper White with the sentiment stamped in Pink Passion. The flower provided all the "wow" factor this one needed! I stamped and glittered two flowers, and stamped and embossed another two before cutting out different layers of each. The layers were put together using Stampin' Dimensionals for height.


I hope this will inspire you to try Heat & Stick Powder, you'll love being able to glitter a bold, chunky image, or a delicate image with ease!

Stampin' Supplies:

Fabulous Flowers Stamp Set.
Whisper White card stock.
Pink Passion ink.
Heat & Stick Powder.
Dazzling Diamonds Glitter.
Heat Tool.
Powder Pal.
Rhinestone Brad.
Stampin' Dimensionals.

All supplies available from Stampin' Up!

April 13, 2008

Priceless in Blue

I promised a card using one of our new stamp sets, and here it is! This was one of the cards I demonstrated at workshops last week, using lots of our beautiful new releases. I apologise for the poor photo - I had to keep the blue tinge so the colours would be as true to life as possible!
Here's the step by step:

  • The Butterfly was stamped using the Rock and Roll technique. This is a really simple one, but I'll try and get a tutorial up this week so you can see it in photos. All you have to do is ink your image in a light colour, here I've used one of our gorgeous new In Color releases - Soft Sky. Then simply move your image in a circular motion around a darker inkpad, here I've used Blue Bayou, trying to only get ink on the outer edges of your image. Try it - you'll see why it's called Rock and Roll!
  • I stamped the butterfly again using the same technique onto a piece of scrap card then carefully cut it out.
  • I then stamped the smaller swirl image behind the butterfly as a trail. Part of this stamp is dotted, so I pierced the dots for added interest.
  • The sentiment is stamped in Blue Bayou - aren't this years new colours gorgeous?!
  • I used the new Photo Corner Punch to make the corner piece with some of our new textured cardstock. This comes in packs of 24 12x12 sheets for $25.95, so it's a great deal. Before layering the corner together with dimensionals cut in half, I added three silver brads.
  • The flower in the bottom right corner is from the amazing Pretties Kit. All the flowers are white, and are so easily coloured using almost all the colouring tools Stampin' Up! offer. Here I've just lightly sponged the flower with Soft Sky ink, then used a mini glue dot to attach a half pearl center.
  • The second butterfly was attached with a mini glue dot and the wings were slightly curled.
  • The card was layered together using SNAIL adhesive. The total card size is 4"x4" - it fits into a regular sized envelope for cheaper postage.

I hope you like this one, I just adore these colours together and this stamp set is fantastic to work with. The images are so versatile!

Happy Stampin'
Sarah

Stampin' Supplies:
Priceless Stamp Set.
Soft Sky and Blue Bayou textured card stock. Whisper White card stock.
Blue Bayou and Soft Sky inkpads.
Photo Corner Punch.
Silver Brads.
Handheld 1/16" Punch.
Pretties Kit.
Stampin' Sponge.
Stampin' Dimensionals.
SNAIL Adhesive.
Mini Glue Dots.
All Supplies available from Stampin' Up!

April 10, 2008

Touch of Nature


  • Touch of Nature is one of my favourite sets, it was in our last catalogue and I'm so glad to see it in the new one also.

    This is a card I made a few weeks ago, I was inspired by all those beautiful Autumn colours. Here's the step by step:

    • The Butterfly image was repeatedly stamped with Pumpkin Pie, Really Rust and Ruby Red ink onto watercolour paper. The whole piece of paper was then sprayed with a generous amount of water to make the images run. If you don't have a spray bottle, try wetting the paper with a damp cloth before stamping.
    • I dripped a combined mixture of reinker (I used the retired Cranberry Crisp, Ruby Red would be a great substitute) and water onto the card randomly, then sponged the edges with Pumpkin Pie and Really Rust ink.
    • The image panel was layered with Really Rust and Basic Black card stock, and I added Black Brads in all four corners. I tied a piece of Ivory Organdy around the card - this has since retired, but I'd recommend our beautiful new taffeta ribbon as a substitute.
    • The sentiment was stamped with Really Rust onto Very Vanilla. I used the corner rounder punch to finish off just two of the corners, doing the same for all the layers. This panel is popped up on Stampin' Dimensionals.
    • The branch image was stamped in Basic Black onto the Really Rust layer, before sponging the edges and layering with Basic Black.
    • For the cut-out butterfly, I inked my stamp with Versamark, then heat embossed the image with Black embossing Powder. I carefully cut it out and attached with Mini Glue Dots.

    If you haven't tried sponging the edges of your projects before, I'd highly recommend it. It creates a depth of colour on your card that never fails to impress!

    Happy Stampin'
    Sarah

    Stampin' Supplies:

    Touch of Nature stamp set.
    Really Rust, Pumpkin Pie, Ruby Red, Versamark and Basic Black ink.
    Really Rust, Very Vanilla and Basic Black card stock.
    Heat Tool.
    Black Embossing Powder.
    Black Brads.
    Handheld 1/16" Punch.
    SNAIL Adhesive.
    Mini Glue Dots.
    Corner Rounder Punch.
    Stampin' Sponges.

    All supplies available from Stampin' Up!

April 9, 2008

Fun & Fast Birdy


I was on pins and needles this morning, waiting for that bright red courier van to pull into my driveway and bring....my new catalogue purchases! They haven't quite all arrived, but I did get most of my order today.


Before I settle down to the task of finding a home for my new goodies- I just had to make a card with one of my favourite sets from the 2008-2009 Idea Book and Catalogue.


I've loved this little bird stamp since the first time I laid eyes on him, so I inked him up and away I went! Here's the step by step:


  • Stamped the bird image from Fun & Fast Notes in Stazon Ink onto Whisper White card stock.
  • Coloured it in using Rich Regals Watercolour Wonder Crayons and an Aquapainter. I'm kicking myself for waiting so long to order the crayons, they are amazing and I'll be buying the other sets very, very soon!
  • I punched out the corner piece using the new Photo Corner Punch. It punches out both sizes at once!
  • Pierced around my image and on the corner using the tools in the Crafter's Tool Kit. Don't forget, the piercing mats and template are also available for seperate purchase. I'm using mine a lot lately.
  • After layering my image with Rose Red and Basic Black, I created a background using a stamp from the Itty Bitty Backgrounds set in Rose Red ink.
  • Tied some Black Gingham ribbon around my layer, matted it then stuck it all down. I should mention, both the second layer of the corner punch and the bird image are attached using Stampin' Dimensionals for that cool 3D look!
  • I added three black eyelets at the bottom of the card to add a little interest.
Did you notice the slightly different shape of this card? It's taller than it is wider, but opens with a top hinge. This is my favourite card to make lately, and it's so simple - just cut your piece of A4 cardstock in halflengthways and fold in half.

I hope you like this simple card. For any of you I haven't seen at workshops already this month, you can email or call me at any time to order your copy of the beautiful new catalogue. This is just one of the many gorgeous new sets on offer! Or, as always, you can view the online version and just phone me with your order.

I also still have some dates available in April and May for workshops, so please call if you'd like a chance to earn any of our NEW hostess sets for free!


Happy Stampin'!

Stampin' Supplies:
Fun & Fast Notes, Itty Bitty Backgrounds stamp sets.
Rose Red, Basic Black and Whisper White card stock.
Stazon Black and Rose Red inkpads.
Black Gingham Ribbon.
Crafters Tool Kit or Mat Pack.
Watercolour Wonder Crayons in Rich Regals.
Aquapainter.
Black Eyelets.
All supplies available in the current Stampin' Up! Idea Book & Catalogue.